Creating Resilient Tests
We recommend that you follow a few best practices when creating Reflect tests. These recommendations will help ensure that your tests are resilient to false-positive failures.
Designing Tests
Keep Tests Small
We recommend keeping tests as small as possible, but no smaller. What this means is that a test should replicate how real users interact with your web application, including all of their logically-related actions, but no additional, unrelated actions. Sometimes this requires a liberal use of visual assertions to verify that the site looks like you expect.
What we advise against is chaining actions which could be split up into separate tests. Avoiding this pitfall has the dual advantage of making your tests run faster (if you’re running them in parallel), as well as making the root cause of a bug clearer when test runs fail.
Don’t Repeat Yourself
Each end-to-end test should test a unique scenario. When the same set of actions are shared across tests, those shared steps should be extracted into a Segment. If tests assert against the same behavior, they will also fail at the same time. In the worst-case this can lead to a majority of tests failing together, all for the same reason. Segments ensure that when these common steps fail, you only need to update the segment in order for all tests to be put back into working order.
Utilize Existing Resources
Since Reflect tests are essentially manual tests that you record once and execute as many times as you wish, many of the principles of designing an effective manual test plan apply to designing Reflect tests. Utilizing some of the many resources on this topic may help you refine your testing strategy.
Handling Dynamic Elements
Most web applications today contain some form of dynamic behavior. From the standpoint of an automated test, dynamic behavior is behavior which may change between test runs, and is usually the main cause of tests failing to record successfully (or failing in one of its first few tests runs).
Examples of dynamic behavior include:
- Pricing and availability changes on an e-commerce store which result in a frequently changing assortment of products on a category page.
- Adjustments to the test account’s internal application state, which result in different “state” from one test run to the next.
- Ongoing A/B tests which result in small changes to page components, visual styling, or marketing copy between test runs.
As a subject-matter expert of the site you’re testing, your best defense for avoiding this class of false positive failure is to know which elements of the page will change between test runs, and which will not. If you are testing an e-commerce store, instead of clicking on the first product in a category page that changes frequently, you could instead search for a specific product or SKU before selecting it. If you are testing an element which frequently changes (such as the nth-item in a collection of products), assert against visual elements which will not change even if a different item was selected. For example, instead of asserting on the name of the product added to cart, you could instead assert that the number of items in the cart is ‘1’.
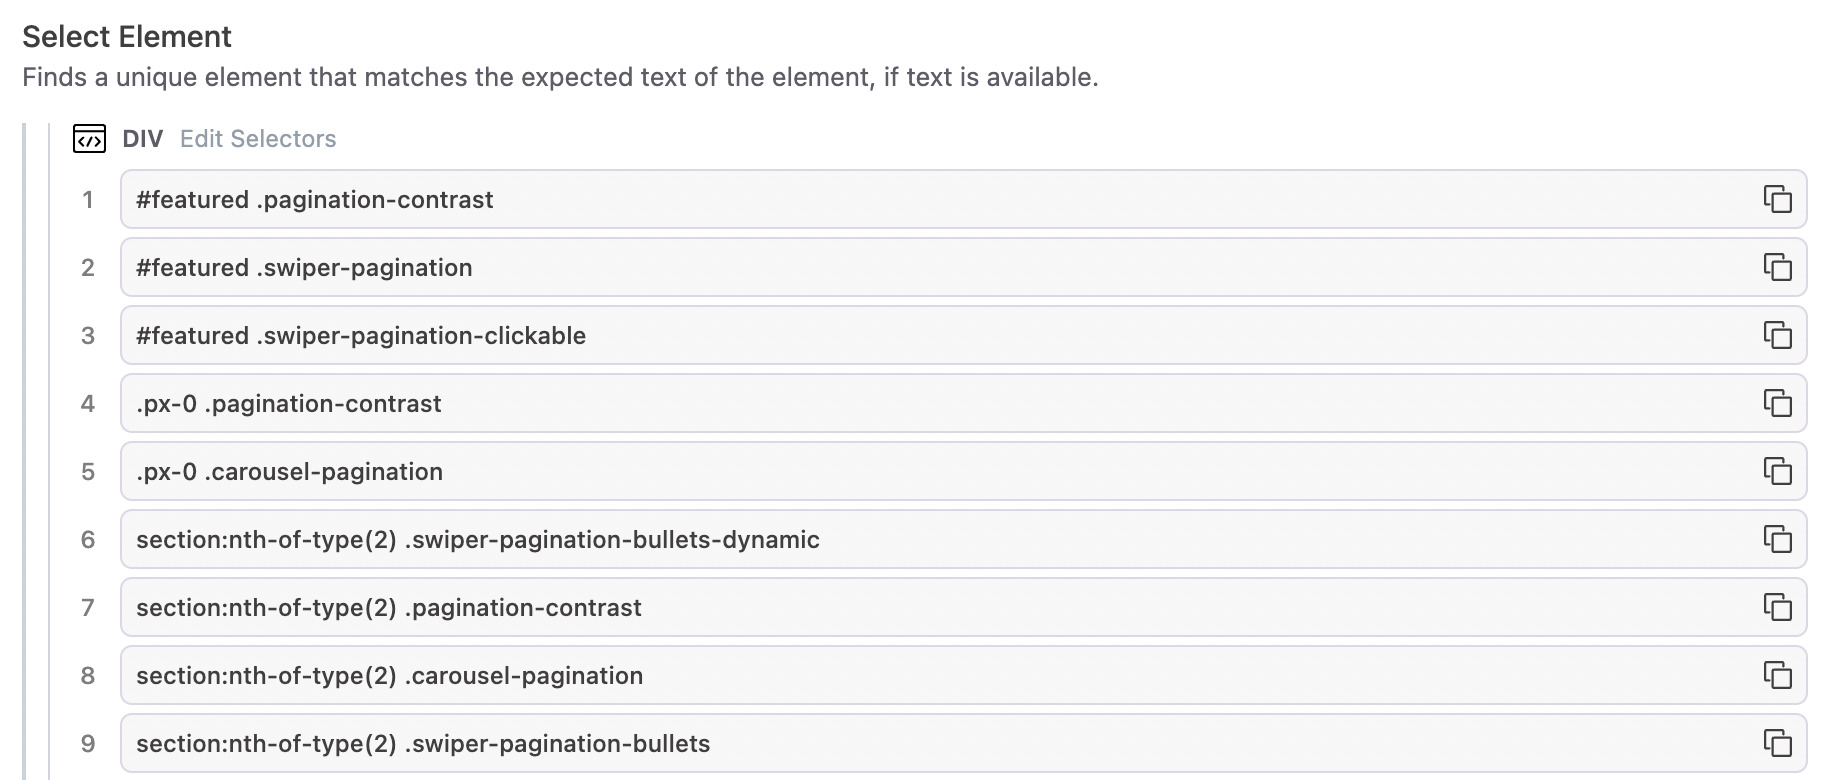
Selectors
Unlike code-based automation tools, Reflect does not require you to manually find a selector to target the elements that you interact with in your test. Reflect automatically generates multiple selectors that uniquely identify the element, and the selector generation algorithm uses several strategies that are resilient to change. Additionally, our algorithm favors building a diverse collection of selectors, where different classes and attributes are used.
The generated selectors are ordered in terms of specificity,
where the first selector is the one which most narrowly identifies the element.
This selector should be the most resilient to changes in the underlying web application.
For example, a selector #baz has higher specificity than a selector .foo,
because an ID is more likely to uniquely identify an element than a class.
Similarly, a selector of .item:nth-of-type(5) will have the lowest specificity since it’s essentially an XPath value in the form of a CSS selector.
During test execution, Reflect tries to locate the target element using the selectors in order. When a selector uniquely identifies a visible element, Reflect uses that element without trying additional selectors. If all selectors are used and none of them locates a unique visible element, Reflect stops the selection process and marks the test step as failed (based on its Failure Settings, see below).
Finally, in cases where Reflect fails to produce a stable selector (or enough stable selectors), you can manually edit the selectors, add or remove them, and reorder selectors to suit your preferences. This gives you complete control of which element is targeted in the current test step. To change the selectors, click “Edit Selectors” in the test step details and click “Save Selectors” when you are finished.
“Test Attributes”
Some software organizations prefer to add explicit attributes to elements under test to make it easier for test automation to target the element, and make it less likely that false positive failures occur due to selectors becoming invalid due to innocuous changes. This practice is not required with Reflect, but if Reflect encounters an element with a “test attribute” it will generate a selector for that test attribute and make it the first selector that is used. Reflect will consider any of the following attributes to be test attributes:
data-testdata-testiddata-test-iddata-cy
An Alternative to Hard-coded “Waits”
One practice in test automation which is widely adopted yet widely considered an anti-pattern is adding explicit waits inside a test. Reflect does not support the concept of an explicit wait, and for good reason; they make tests more non-deterministic and prone to failure.
Reflect has two features which replace the need for explicit waits:
-
Before executing each test step, Reflect will verify that the next element is visible and interactable before proceeding. If one of these criteria is not met, Reflect will wait and re-check these conditions again after a short delay. This process will repeat until the test step’s Step Timeout is exceeded.
-
After executing a test step, Reflect will determine if any network requests were generated as a result of this action. If so, Reflect will wait a predetermined amount of time for those network requests to complete before proceeding.
This built-in logic should automatically handle the vast majority of cases where an explicit wait would normally be required. In the rare circumstances where an explicit wait is still required, we recommend adding a Visual Validation step instead. By adding a Visual Validation step, you are essentially telling Reflect to wait until that element appears on the page, or otherwise fail the test if the element does not appear. This is a great solution to validate that a long-running operation has completed, or to guard against performance issues on your site which could cause tests to fail non-deterministically.
Scroll into View
Often the height (or width) of a page will change over time. Since Reflect captures user-initiated scrolls, this can cause elements that you interact with to be misaligned or even out-of-view. Reflect will automatically detect this situation and scroll these elements into view. This option is enabled by default on all relevant test steps, but can be toggled off within the Select Element section of the test step, under Selection Options.

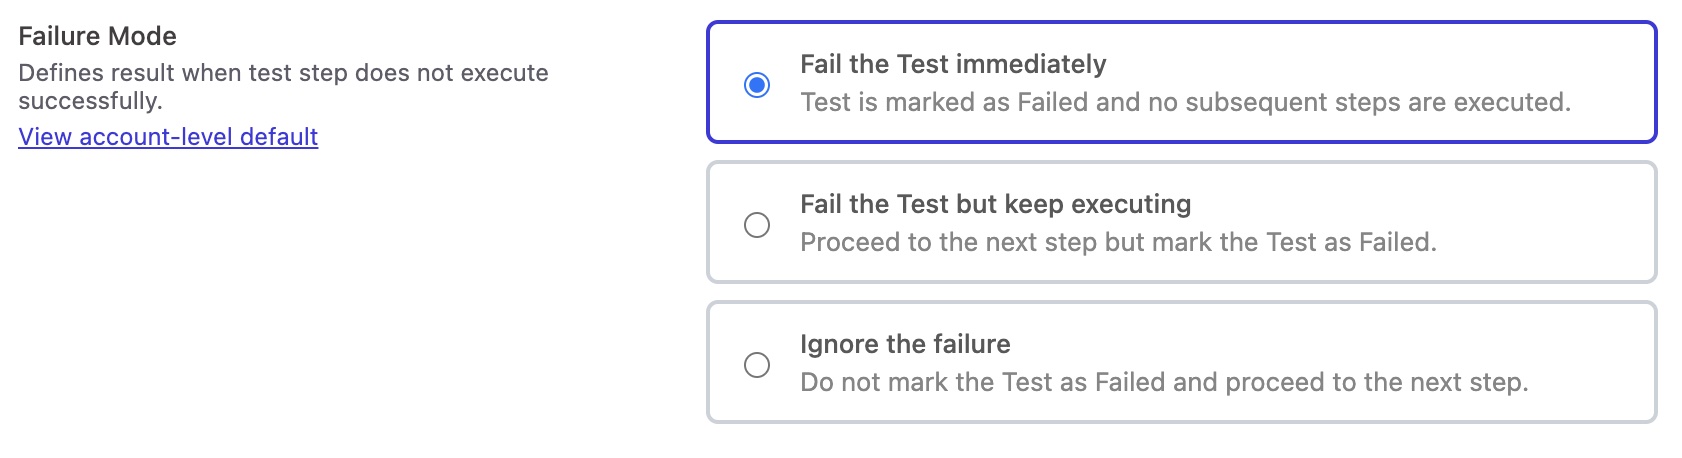
Failure Settings
Each test step in Reflect can be configured to have one of three failure modes. Generally, when a test step cannot be executed successfully, you will want to mark your test as “Failed” and stop the test execution immediately. A test step might fail because the element could not be found, or the element was found but the action failed, such as the input element being disabled.
An exception to the above rule is for Visual Validations. By default, when a visual validation step fails Reflect will ultimately mark the test itself as failed but Reflect will continue executing the test until a non-visual validation failure occurs. The reason for this is to allow you to see all failing visual validations from a single test execution. For example, if a website has wide-reaching visual updates, then every visual validation step will potentially fail. To avoid the tedious approach of seeing and fixing a single failed visual validation step for each execution, Reflect continues the test execution after a failed visual validation so that you can update all failed validations in one pass.
The last failure setting is to make a test step optional. This means if the test step’s target element is not found, or it fails execution, the test step will still never be marked as failed, and the test execution will continue.
You can configure the failure behavior for a test step by clicking on the test step and modifying the default Failure Mode:
Handling ReCAPTCHAs
ReCAPTCHA is a technology that presents a short puzzle that is easy for humans to solve, but impossible for machines to solve. Being a completely automated system, Reflect cannot solve reCAPTCHAs. This means that if you have workflows that include a reCAPTCHA step, you must conditionally disable this step for Reflect test recordings and test runs. There are multiple options for conditionally disabling reCAPTCHAs:
- Every Reflect test run and test recording sets a global variable on the Window object called
isReflectTest. In your front-end code, you can add the following logic to conditionally disable reCAPTCHAs:
if (!window.isReflectTest) {
  // Display reCAPTCHA
}
- You can use Execution Overrides to pass a parameter containing a shared secret from your Reflect tests. This would be a query parameter that’s appended to the starting URL of each test. On your app’s side, you can then add logic to look for the existence of this parameter and make a server-side call to validate the parameter (thus not exposing the shared secret on the frontend). If the server-side check passes, set some flag on the user’s session (potentially server-side again to prevent tampering) to disable the captcha.
- A Static IP address is available as an add-on to any paid plan. When enabled, all Reflect traffic both when recording and running tests is routed through a single static IP address. You can configure your server-side check to validate that the IP address matches the static IP, and if so then disable the captcha check in a way that can’t be forged client-side.
Handling HTTP Basic Auth
If your site utilizes Basic HTTP Authentication, you may see a prompt when initially navigating to your website:
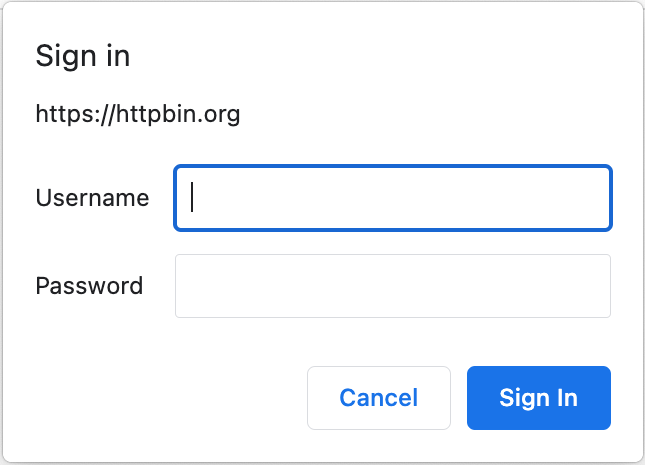
You can bypass this prompt in Reflect by either:
- Specifying an Authorization header as an Execution Override.
- The value of the header should be
Basic, followed by a space and a base64-encoded string of the username and password separated by a colon. - For example, to authenticate for a user named
foowith a password ofbar, you would specify anAuthorizationheader with a value ofBasic Zm9vOmJhcg==(whereZm9vOmJhcg==is the base64-encoded value offoo:bar).
- The value of the header should be
- Including the login credentials in the starting URL of your test with a prefix of
username:password@(for example,https://foo:bar@example.com).