Suites
Orchestrate regression test plans by combining test cases, configurations, and notifications.
A suite encompasses a complete regression testing plan, from the individual test cases and their environments to the email notifications on failures. Suites can be executed manually in the web application, via periodic schedule, or via the Suites API. Suite execution results are stored and accessible for the duration of your account’s retention window.
Creating a Suite
From the main Suites List, create a new suite by clicking the “Create Test Suite” button and providing a name for the suite in the modal.
From there, move on to building and configuring the suite as described in the following sections.
To delete a suite, use the dots menu on the suite detail page, and accept the confirmation dialog.
Building a Suite
A suite is primarily a composition of workflow actions and the execution of a suite follows a sequential path through the workflow, completing actions one at a time. Reflect supports the following types of actions:
- Run Tests - execute an ordered collection of tests sequentially or in parallel, and optionally apply configuration overrides to the test executions.
- Decision - choose which of two workflow actions to execute next based on the pass/fail outcome of the previous action.
- Call API - execute an HTTP request to an external system.
- Send Email - send individual test failure emails, or a summary digest email describing the state of the suite execution.
- Send Slack - send a Slack notification to a channel of your choosing that reports the state of the suite execution.
- Wait - wait for some amount of time before continuing in the workflow.
When you create a new suite, Reflect adds the default workflow, which consists of a Run Tests action, followed by a Decision action. The Decision action has a Send Email action attached to its failure path. Thus, this workflow will execute 0 or more tests, and if any one of them fails, send a digest email to the users in your account.
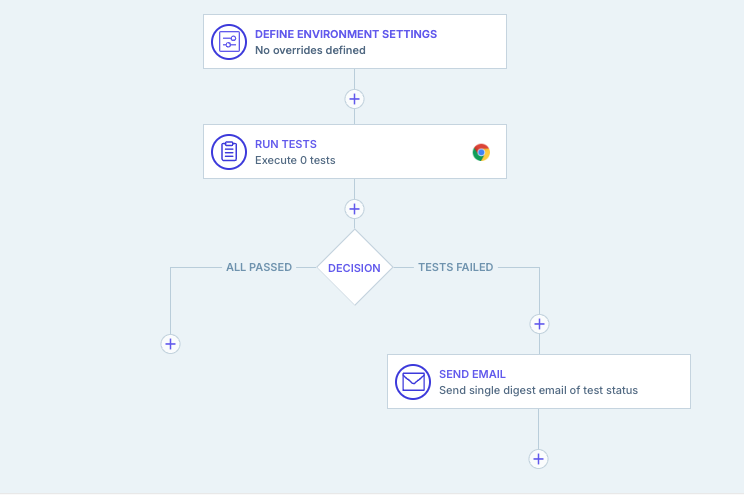
You can edit any action in the suite workflow on the suite detail page by clicking on the action to open the configuration panel on the right side. To add new actions, click the (+) symbol anywhere in the workflow to open the actions panel on the left.
Run Tests
To change the tests or their order in a Run Tests action:
- Click the Run Tests block in the workflow
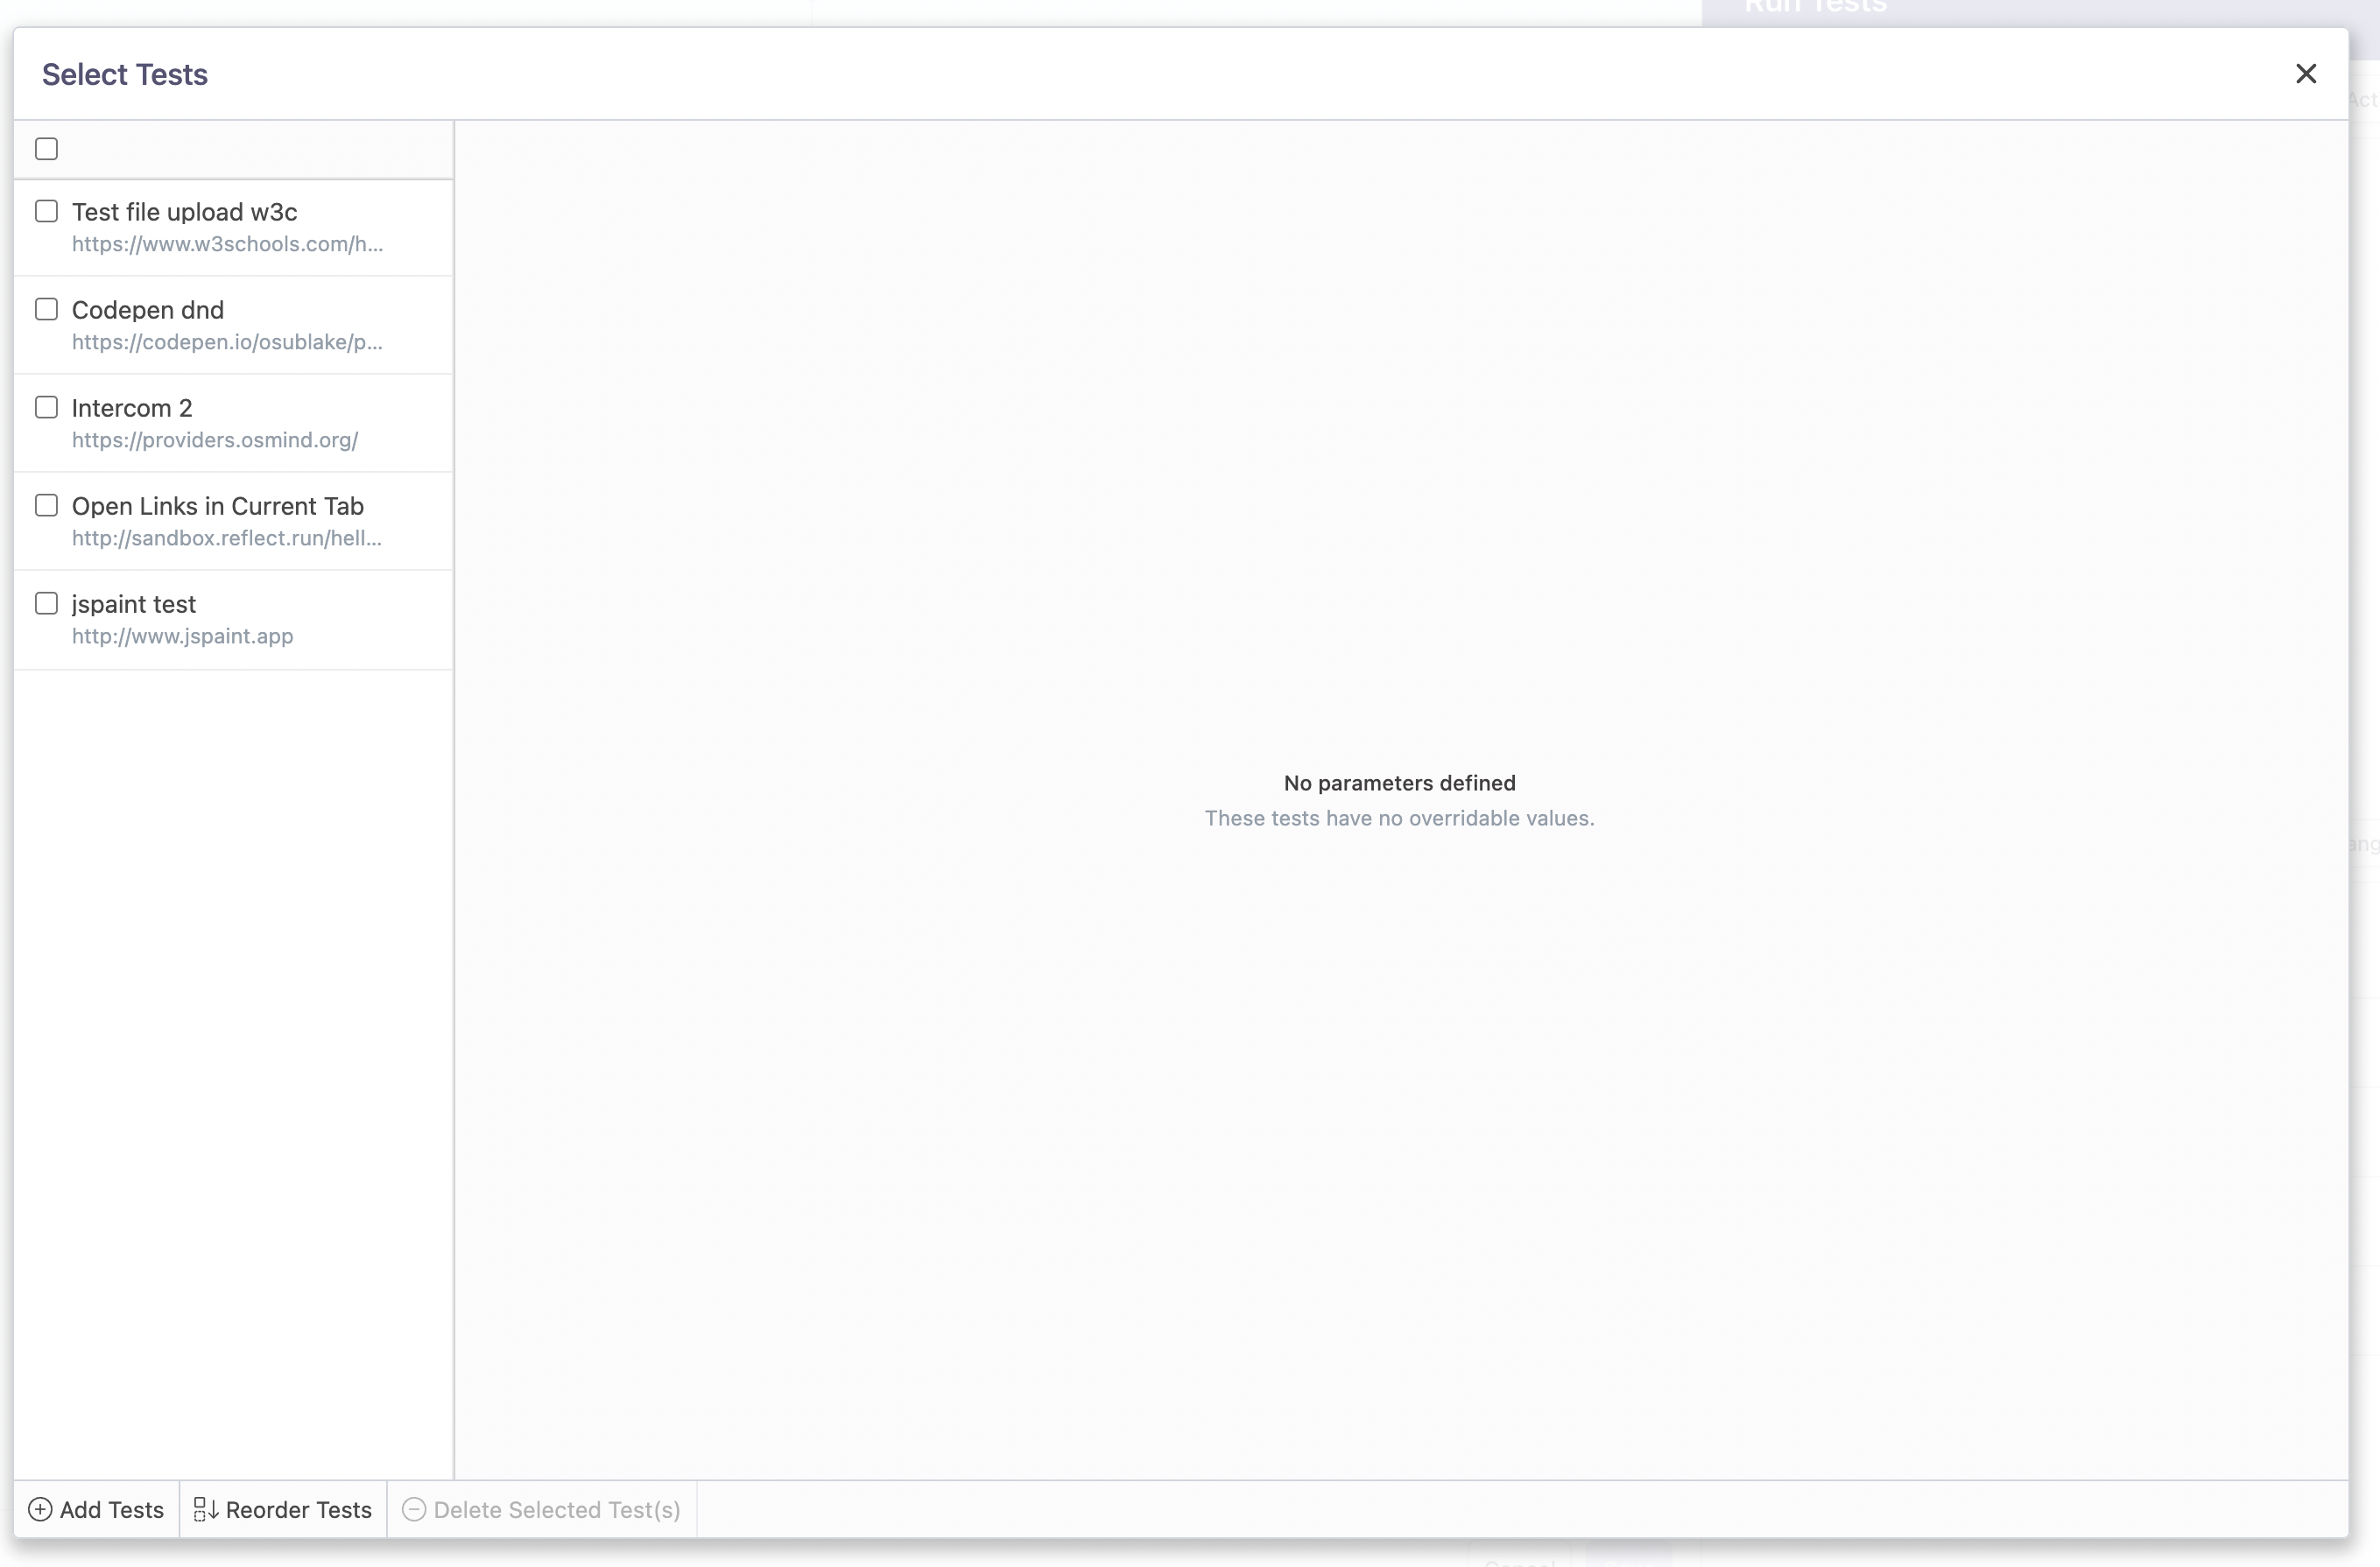
- Click the “Change” button to open the tests modal
- Click “Add Tests” at the bottom of the modal to select tests to run and close the modal
Reflect supports Cross-Browser testing for tests using the Desktop device profile. Cross-browser testing is configured in the Run Tests action, and Reflect supports the latest version of all modern browsers, including Chrome, Safari, Firefox and Edge.
To configure a Run Tests action to use cross-browser testing, toggle on or off the browser selections above the tests list in the action configuration.
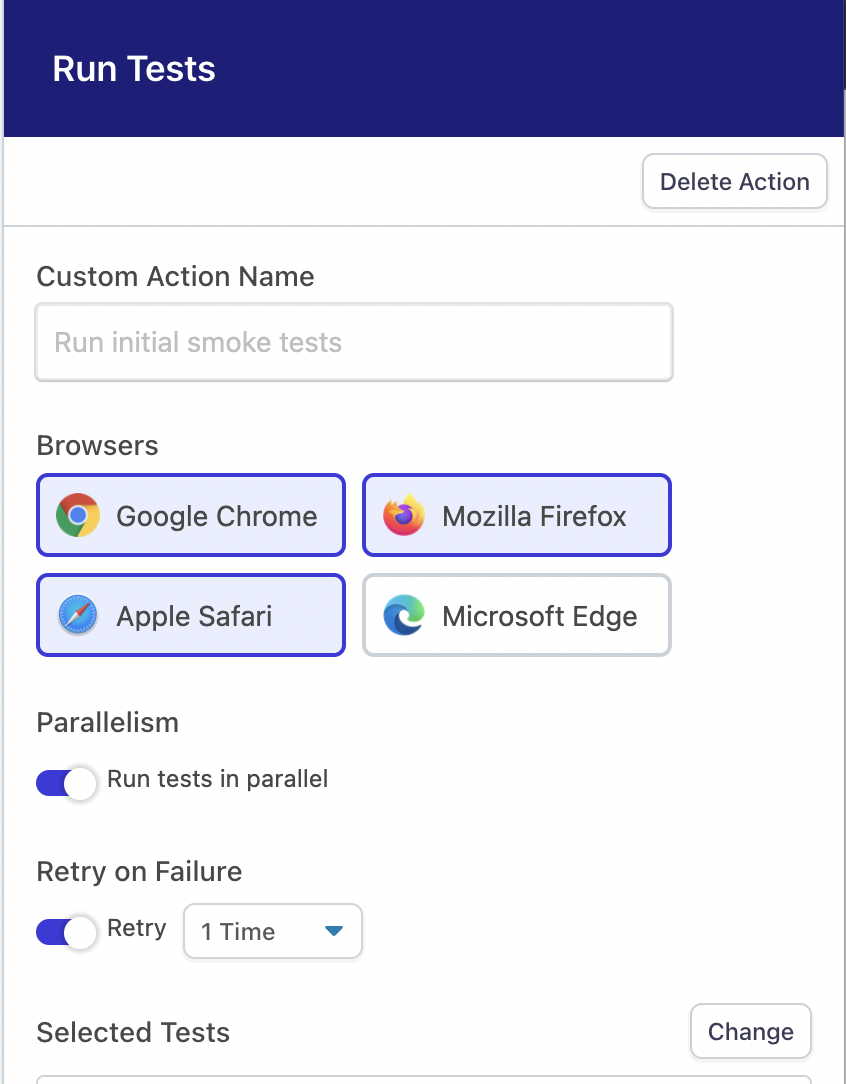
Use the “Details” panel dropdown to toggle the parallelism setting for the tests' execution.
Automatic Retries
Reflect supports the ability to automatically retry a Run Tests action a preconfigured number of times. This is useful in cases where the tests cannot be made to run reliably and/or deterministically. To enable automatic retries, toggle ON the “Retry on Failure” setting and choose a retry limit.
If parallelism is turned on and multiple browsers are configured, then parallelism is enabled within a single execution of the tests list against a browser.
If parallelism is not enabled the full list of tests will be executed for each browser independently and sequentially. For example, Reflect will execute the list of tests for Chrome, then Firefox, then Edge if those three browsers are selected and parallelism is not enabled.
Finally, click “Save” on the workflow to commit the updates.
Data-driven Tests
Any test within a Run Tests action can be configured to run as a data-driven test. A data-driven test executes multiple “instances” of a particular test with different parameter values for each instance. For example, a data-driven test allows you to verify that a given workflow within your application works as expected for the different role-based access controls (RBAC) defined in your application.
Consider the configuration below:
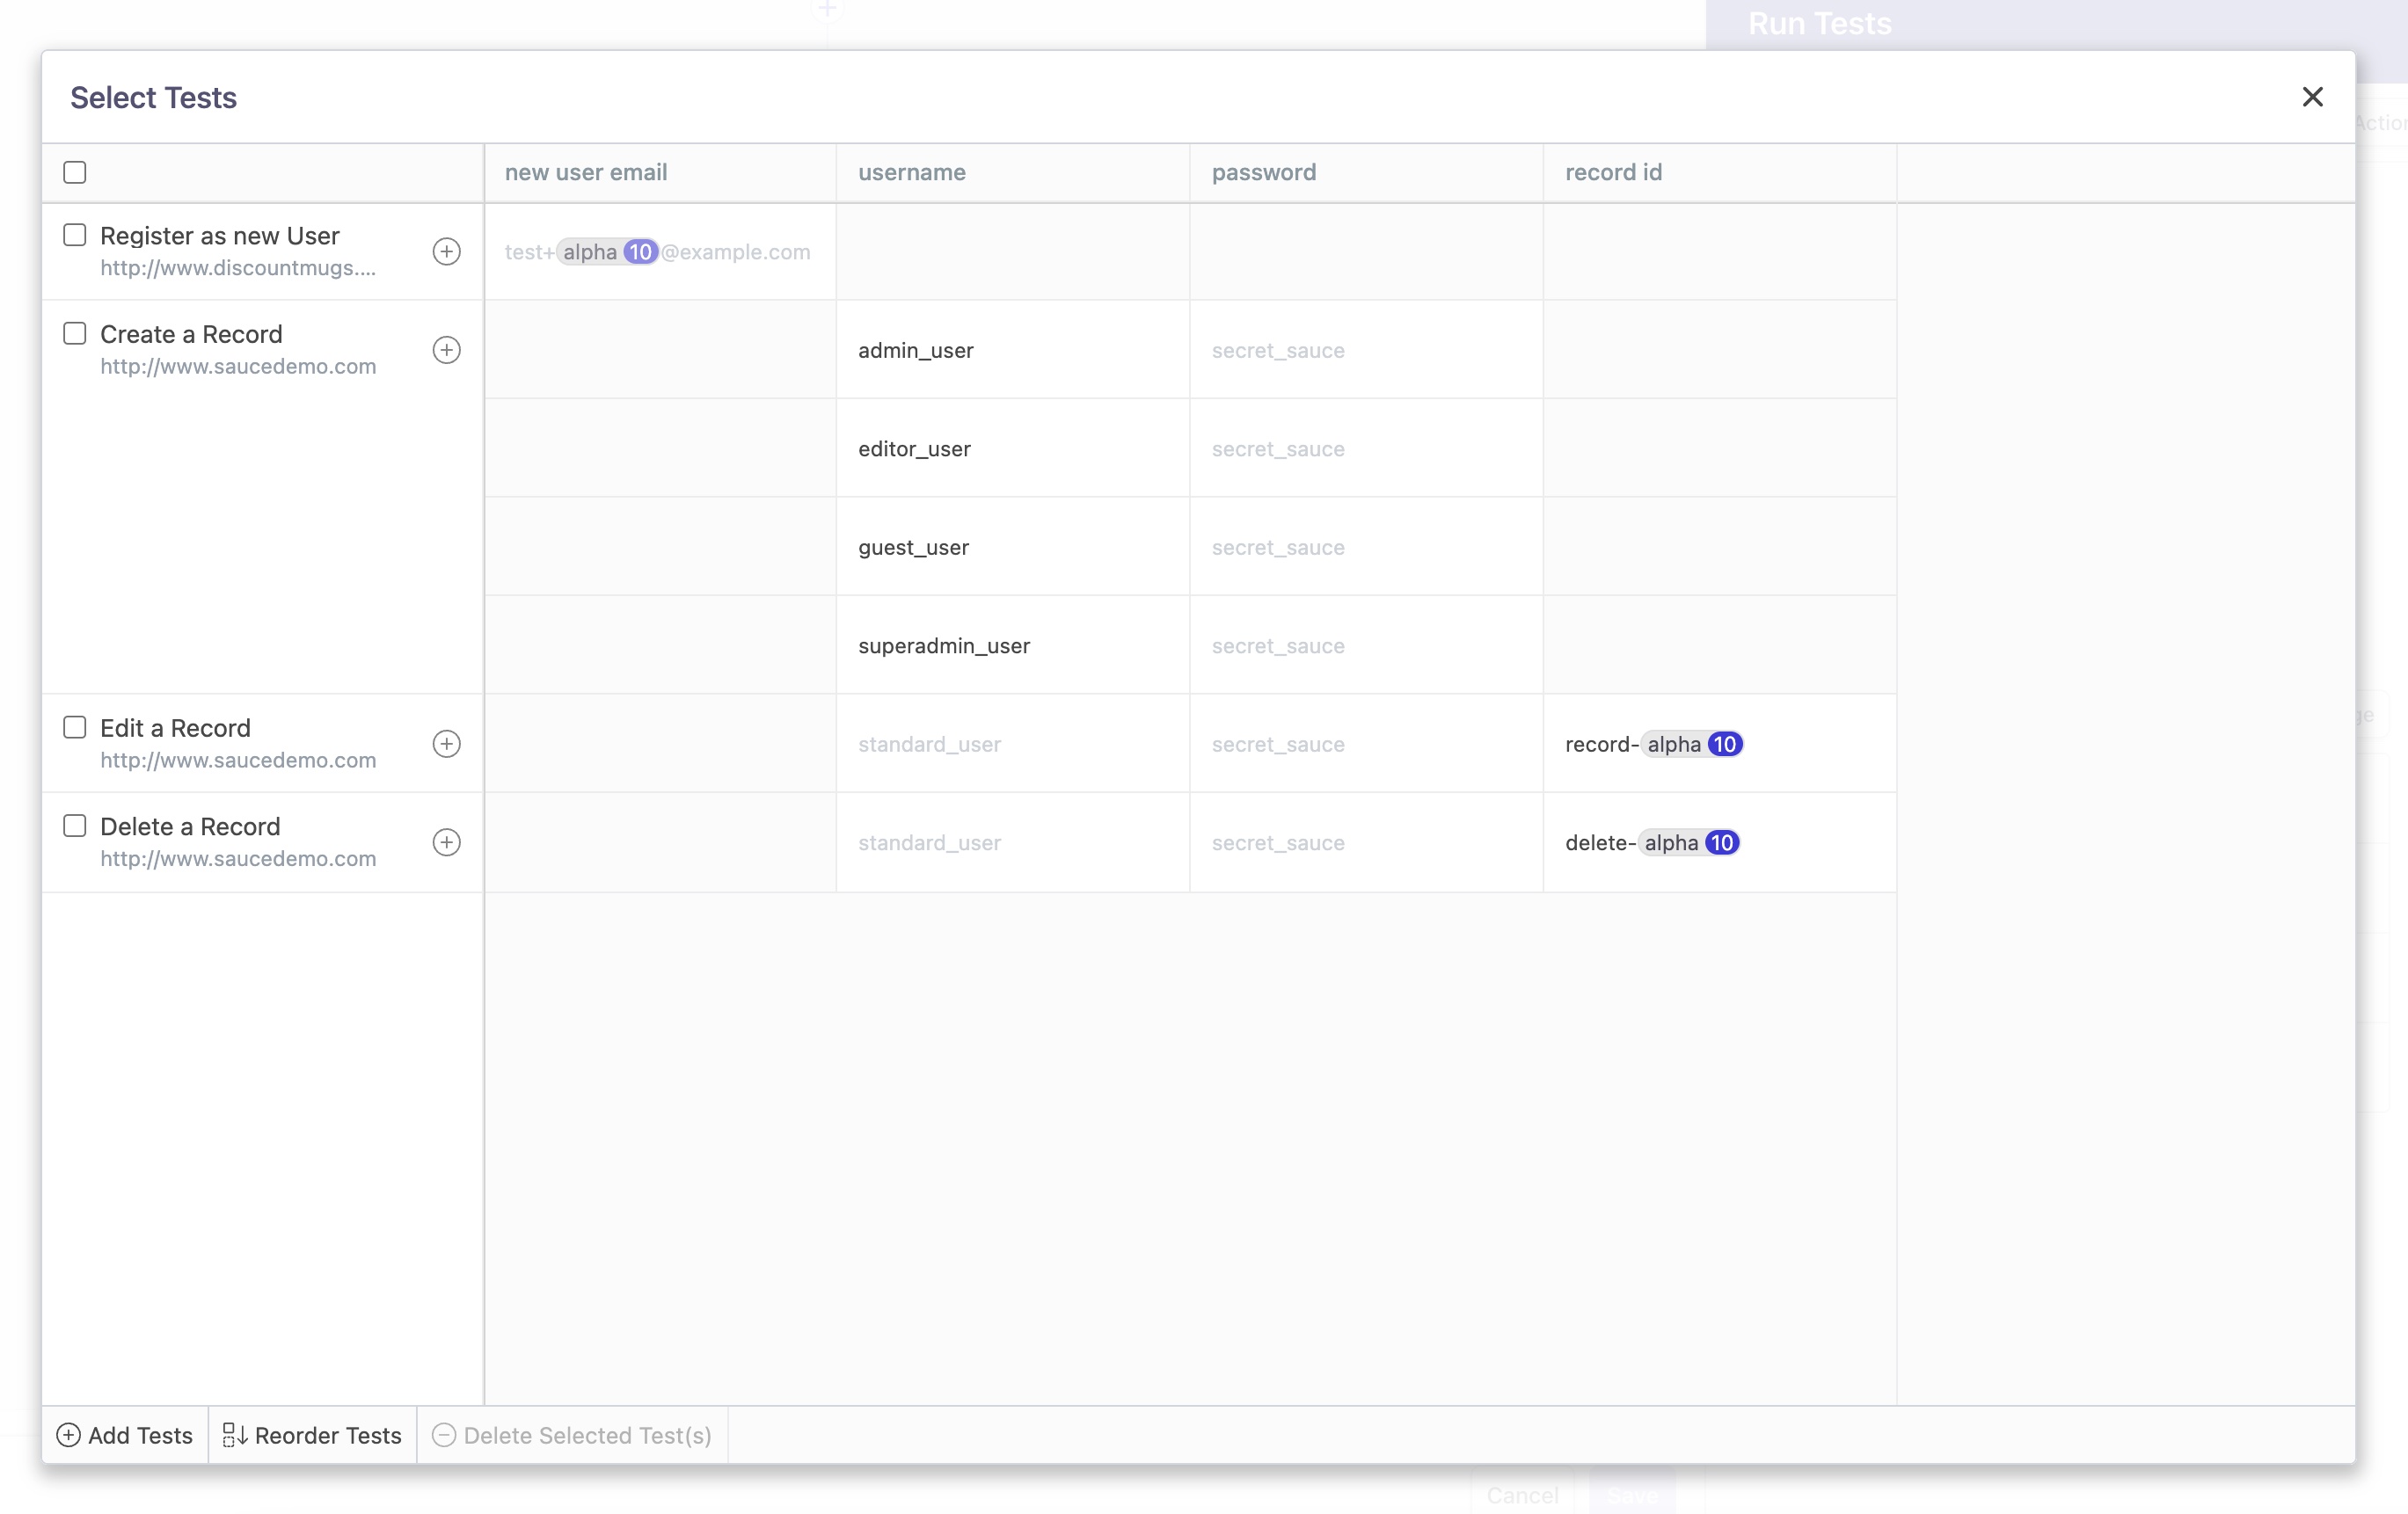
This setup instructs Reflect to execute the “Create a Record” test that defines two parameters: username and password. This Suite is set up to run this test four times for four different usernames, each sharing the same password.
To create a data-driven variant, you must first define at least one parameter for your test so that you can override values sent to the test. Once a test has a parameter, a plus button will appear on this screen which allows you to create data-driven variants. The default value for each parameter will be pre-populated, but can be edited to contain whatever value you’d like, including containing a function or variable reference.
Each test instance will run and will appear in its own row in the “Tests” table in the suite execution detail page.
Sharing state across tests
In more advanced testing scenarios, it may be necessary to take data that’s created in an earlier test, and use it in one or more later tests. For example, at the beginning of your Suite you may want to execute a test that creates a new user, and then log in as that newly created user in one or more subsequent tests.
To accomplish this, you can configure tests within a Suite such that a Parameter (i.e. input) of a test references a Variable (i.e. output) of a prior test. Within a Run Tests workflow action, click on Change Tests and then select the parameter of a test that needs to reference state from a prior test. Choose to insert a variable, and you’ll be presented with an option to reference a variable from a prior test:
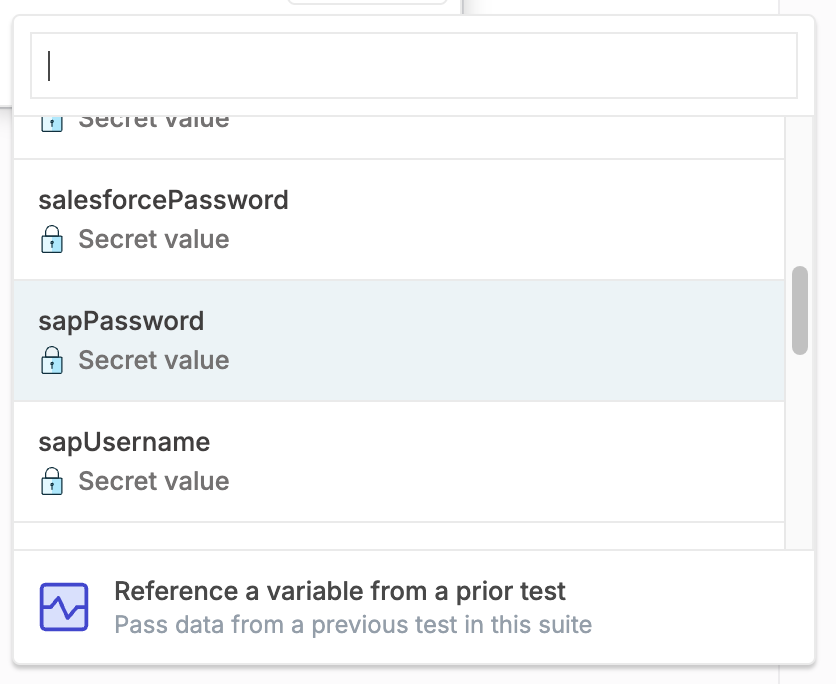
Within the modal, choose your desired variable by first selecting the Run Tests workflow action that contains the test you want to reference, then select the desired test, and finally select the desired variable associated with that test:
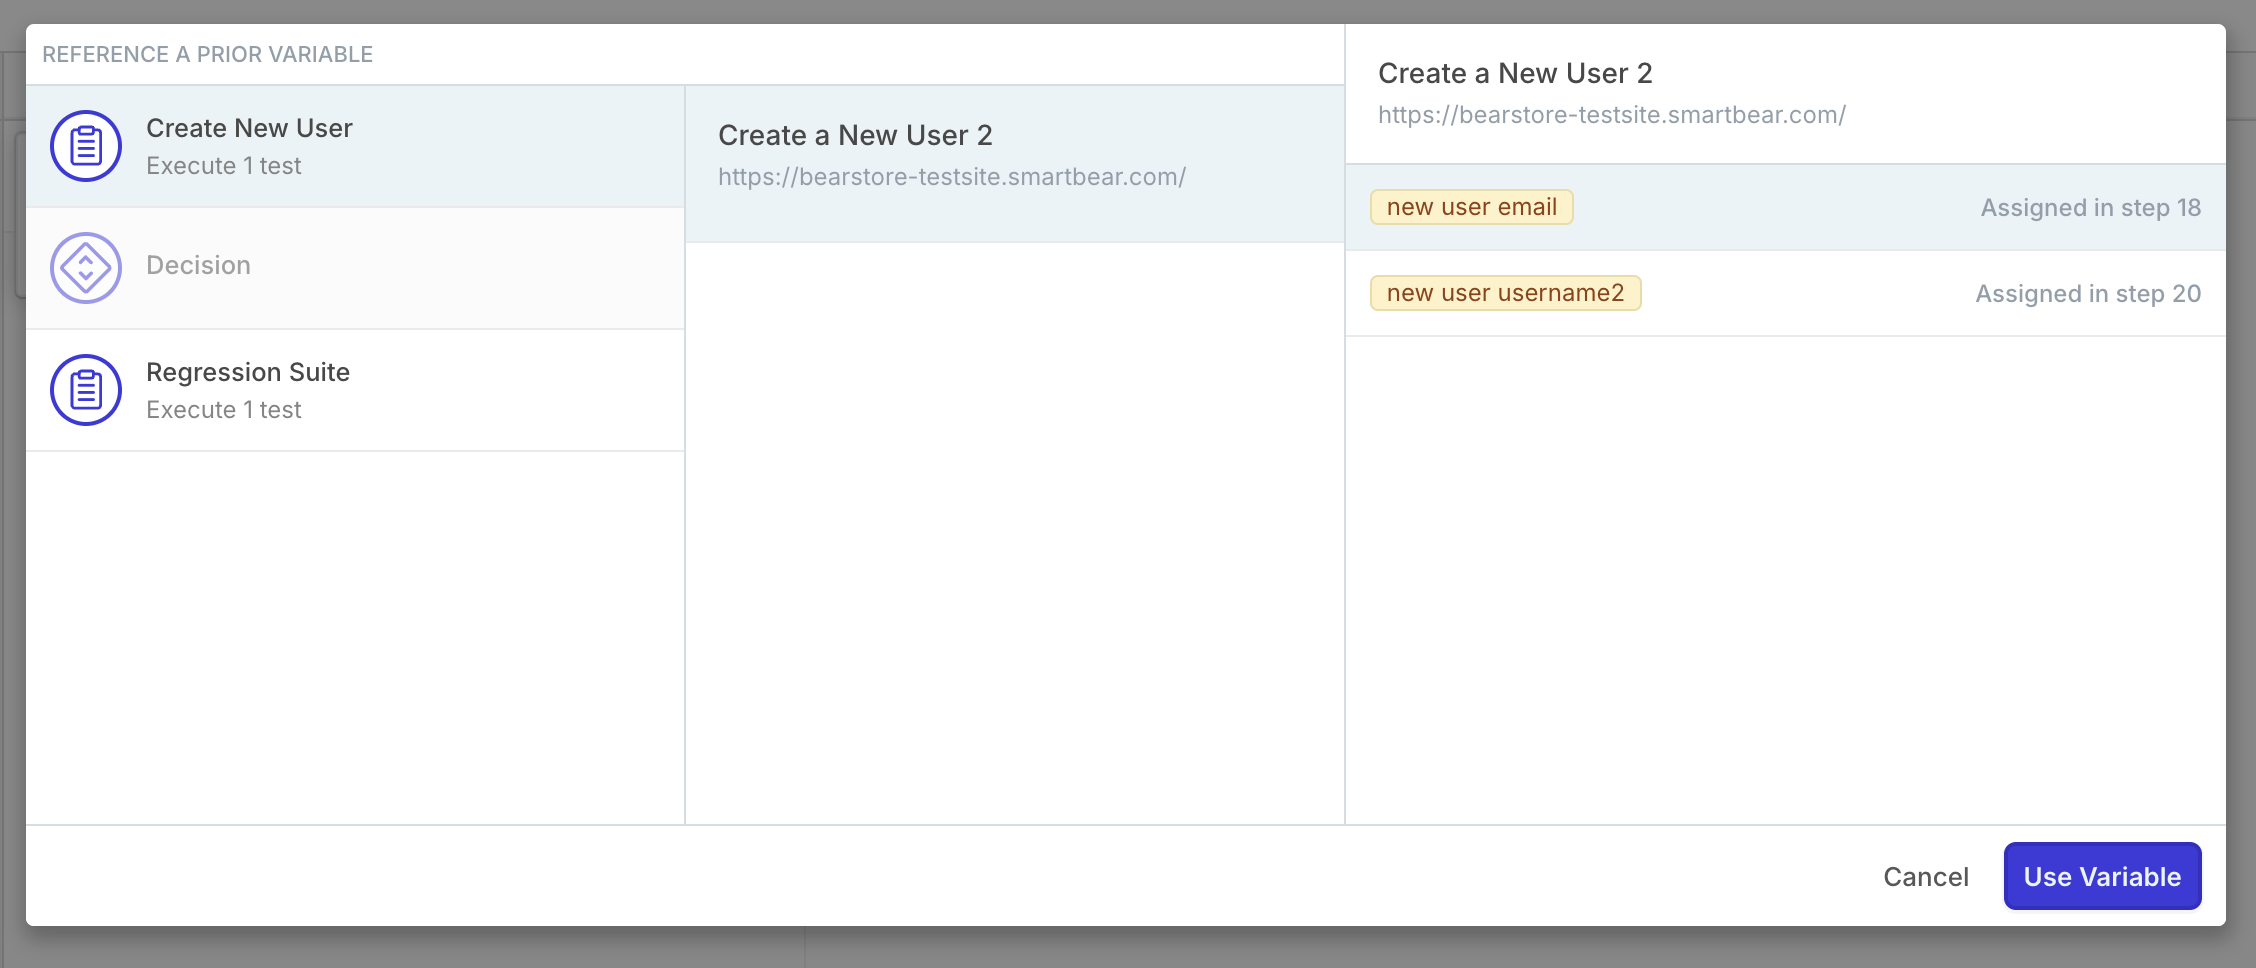
In order to reference a prior variable, its associated test must be guaranteed to execute before the test that’s referencing it. You can always reference variables in tests that are in a prior Run Tests workflow action. If the current workflow action has parallelism turned off, then you can also reference prior tests within the current Run Tests workflow action.
Call API
The Call API action issues a custom HTTP request to any Internet endpoint. All aspects of the request are configurable, and the HTTP response code of the request can be used in the subsequent Decision action in the workflow.
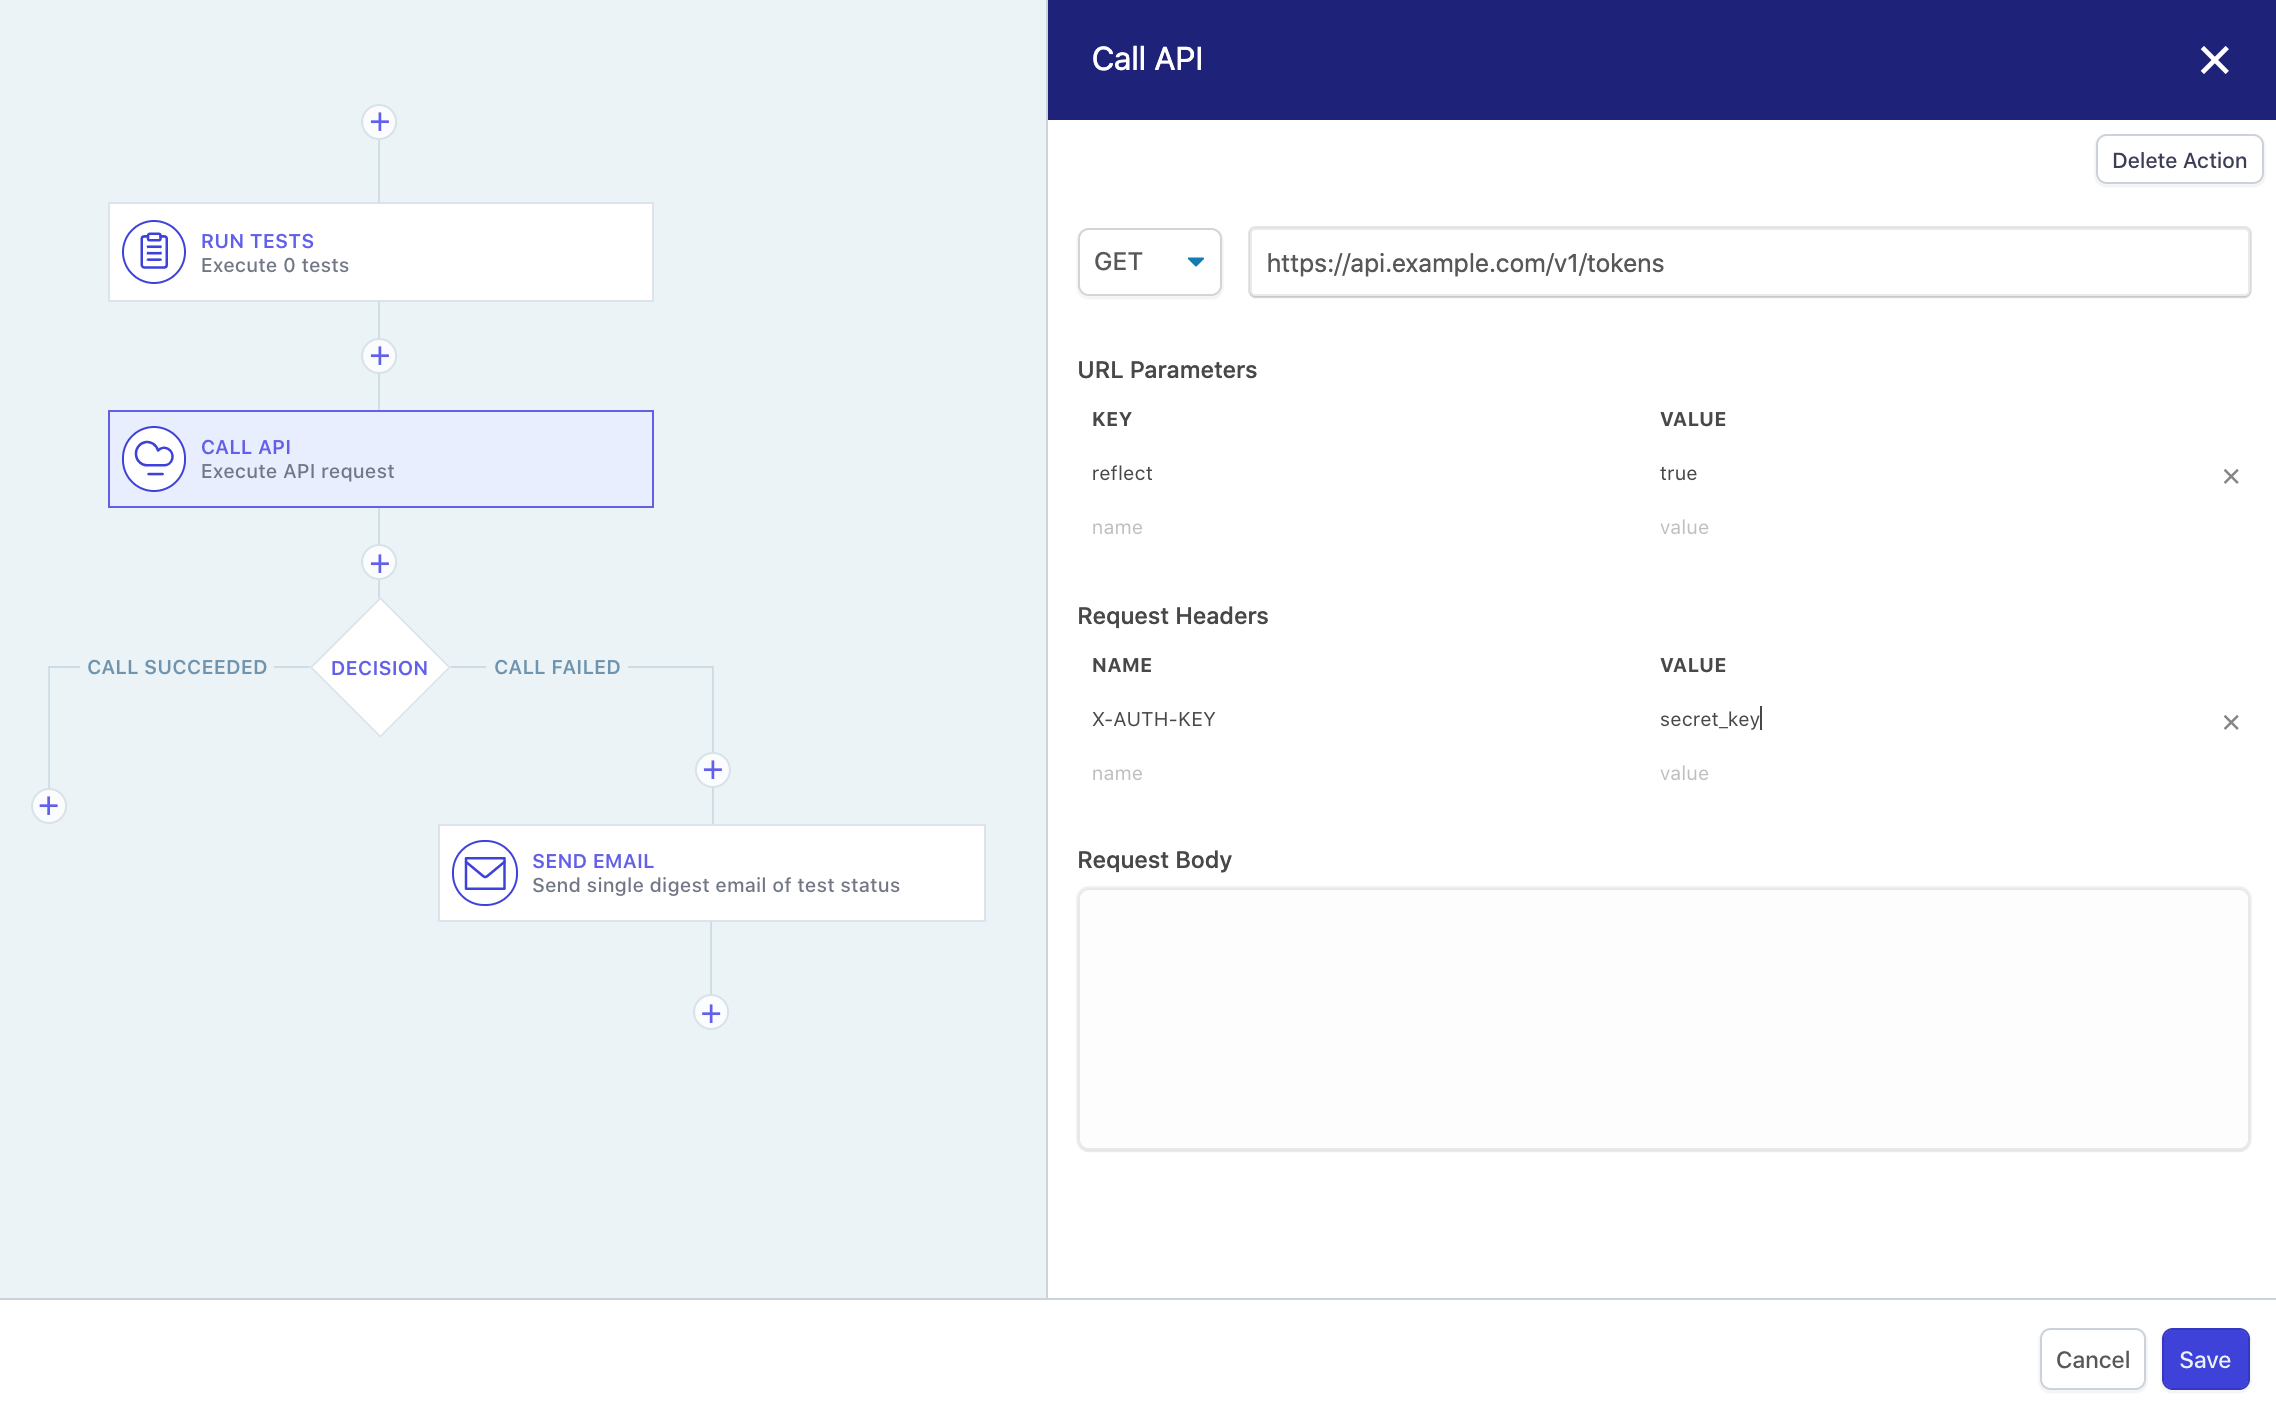
Send Email
The Send Email action can be configured to send either a summary digest email with the current status of the suite execution, or individual emails for each test failure (thus far) in the suite execution. The digest email includes information about the test pass rate, run time, and the failed test steps for any failed test runs.
Send Slack
The Send Slack action sends a notification to the channel of your choosing which reports the current state of the suite execution. In order to use this workflow action, you must first connect your Slack workspace from within the Settings section of Reflect.
Wait
The Wait action can be configured to delay execution for some amount of time before moving on to the next step in the workflow.
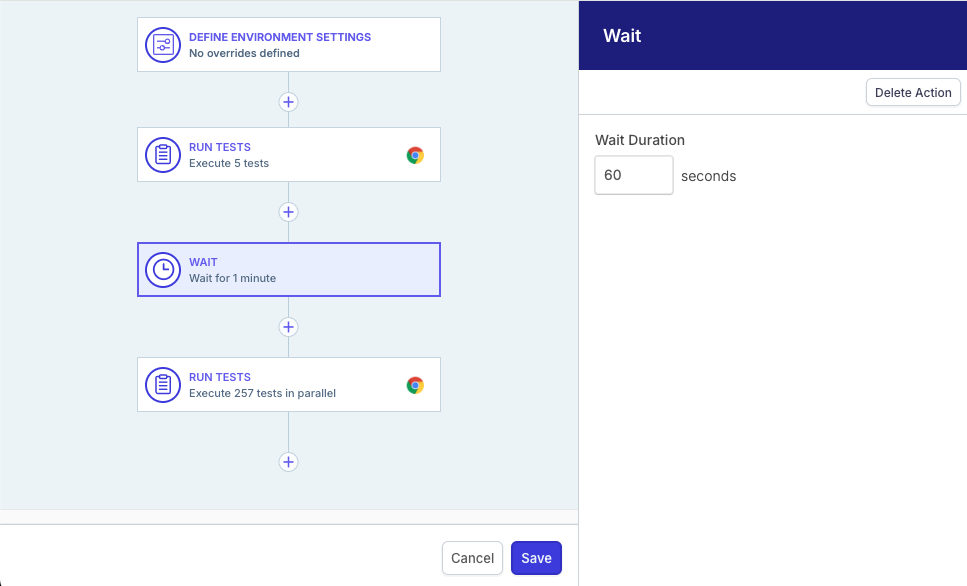
Configuring a Suite
The Run Tests action executes tests individually, and as such, you can alter the environment or behavior of the browser for these test runs. The Define Environment Settings workflow action is at the start of every Suite workflow, and allows you to change the hostname and variables within the test definition to be executed, as well as set browser properties like Local Storage and cookie values.
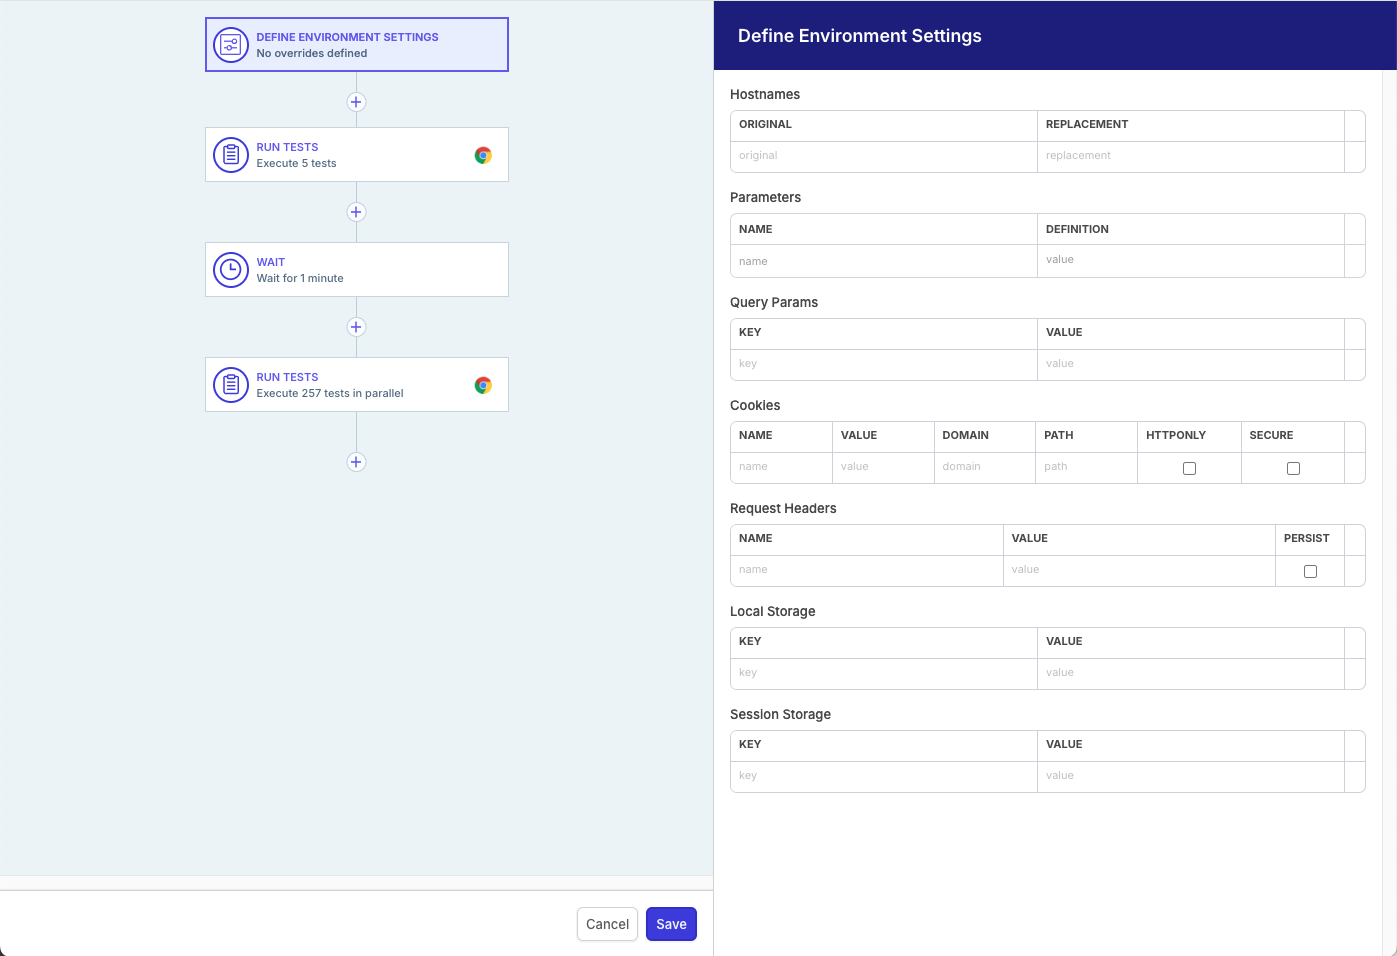
Any execution overrides configured on the suite are re-evaluated for each Run Tests action. That is, if you have a dynamic variable in the overrides and multiple Run Tests actions in the suite’s workflow, the dynamic variable will be generated twice.
Executing in different environments
It’s common to record tests against one environment, such as a dedicated QA or staging environment, and then run those tests against other environments (such as production). Using a hostname override, you can execute a suite against different environments without creating multiple tests or otherwise changing the workflow.
To execute a Run Tests action against a different environment:
- Click the “Run Test Suite” button when viewing the suite detail page
- Find the “Hostnames” section, and enter the original hostname that the test was recorded with, and then enter the replacement hostname that the test run should load instead. You can replace multiple hostnames.
- Click the “Run Suite” button in the modal to execute the suite with the override.
- (optional) Save these overrides on the suite (as described above) to automatically apply them whenever the suite is executed.
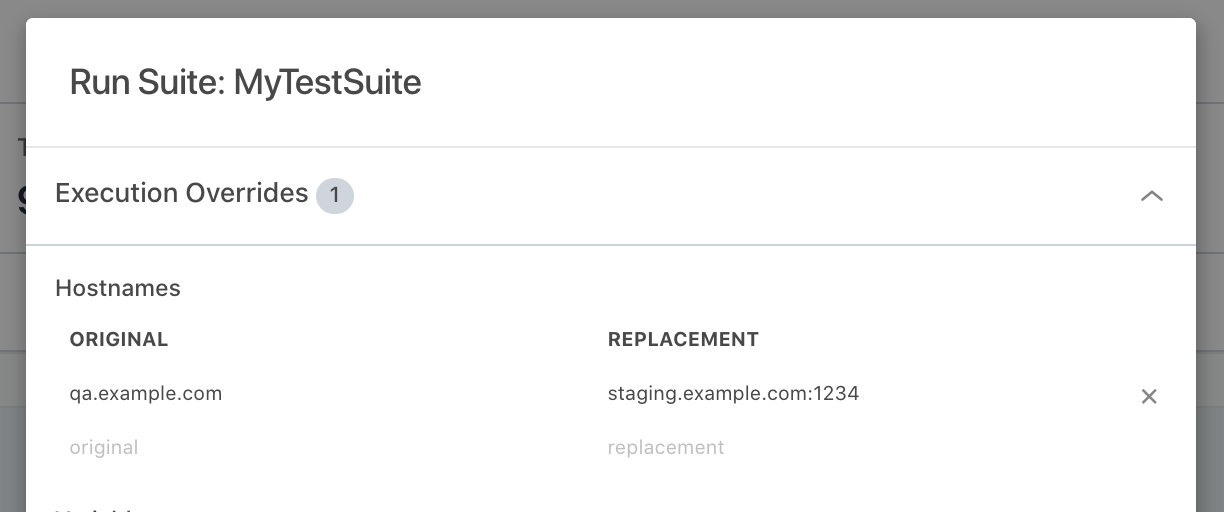
In the example above, we are replacing qa.example.com with staging.example.com:1234, which means that the replacement hostname is specifying a different port for the destination hostname of 1234.
Additional overrides
HTTP query parameters can be applied to the test’s URL and this enables specialized behavior such as bypassing authentication flows with a short-lived token, as in Firebase’s auth tokens. This parameter will be appended to the start URL of each test when test execution begins. If the parameter already is present in the start URL, the parameter’s existing value will be overwritten.
Cookies, request headers and browser storage are other types of overrides that can be saved on a suite or supplied at run-time.
Scheduling a Suite
In addition to the on-demand methods of invocation, you can schedule a suite to execute automatically within Reflect. To create a schedule, click the “Change” button beneath the suite name:

Next, select your desired schedule from the options in the modal and click the “Save” button:
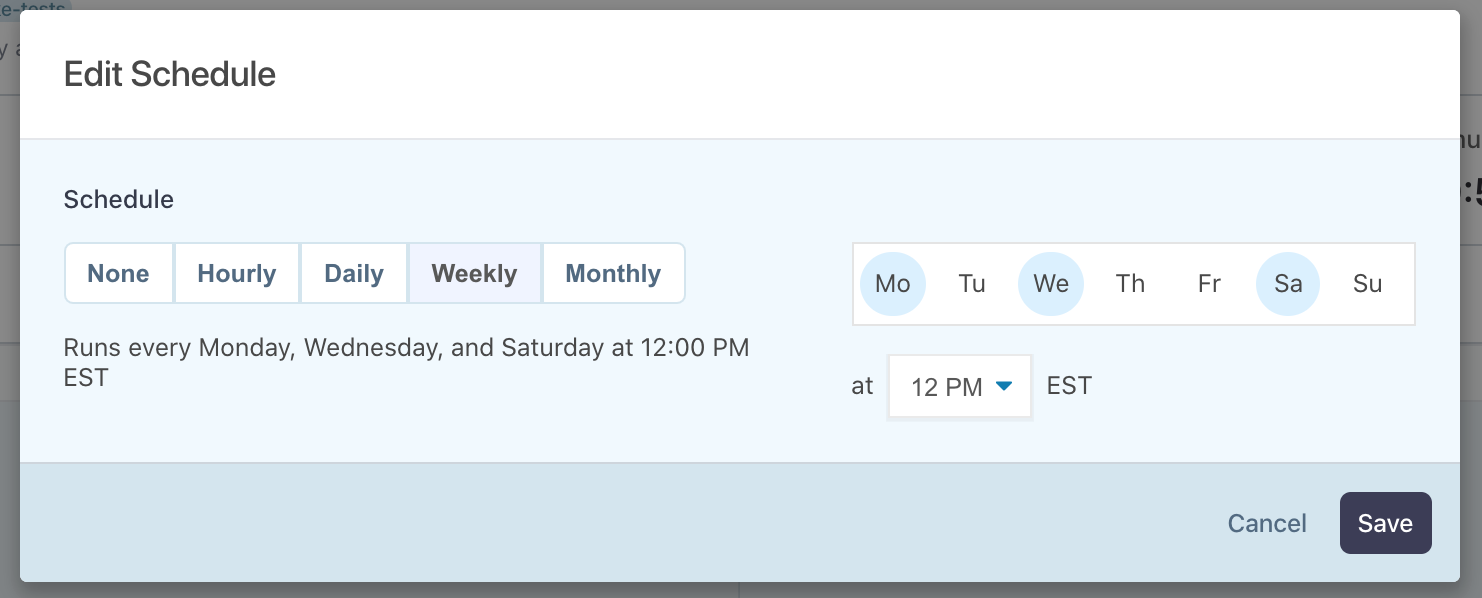
Reflect will now automatically trigger a suite execution at the scheduled times.
Executing a Suite
To execute a suite, click the “Run Test Suite” button. This opens the Run Suite modal, which displays the default execution overrides configured for the suite. You can change these overrides in-line for this specific execution, as described in Configuring a Suite. When you click “Run Suite” to confirm the configuration, the suite execution is queued in Reflect and you are redirected to the suite execution detail page.
Integrating with CI/CD
Suites can be executed automatically via our CI/CD integrations, or by using Reflect’s Suite API. Since every suite has a name, each suite also has a transformed identifier based on the name. The identifier, or “slug”, is a lower-case string that removes some special characters from the name and replaces spaces with a hyphen (-).
The suite identifier is shown at the top of the suite detail page next to the suite’s name:

Use this identifier (e.g., regression-test-plan) as the suite-id when integrating with the Suites API or our CI/CD integrations.
Viewing Suite Results
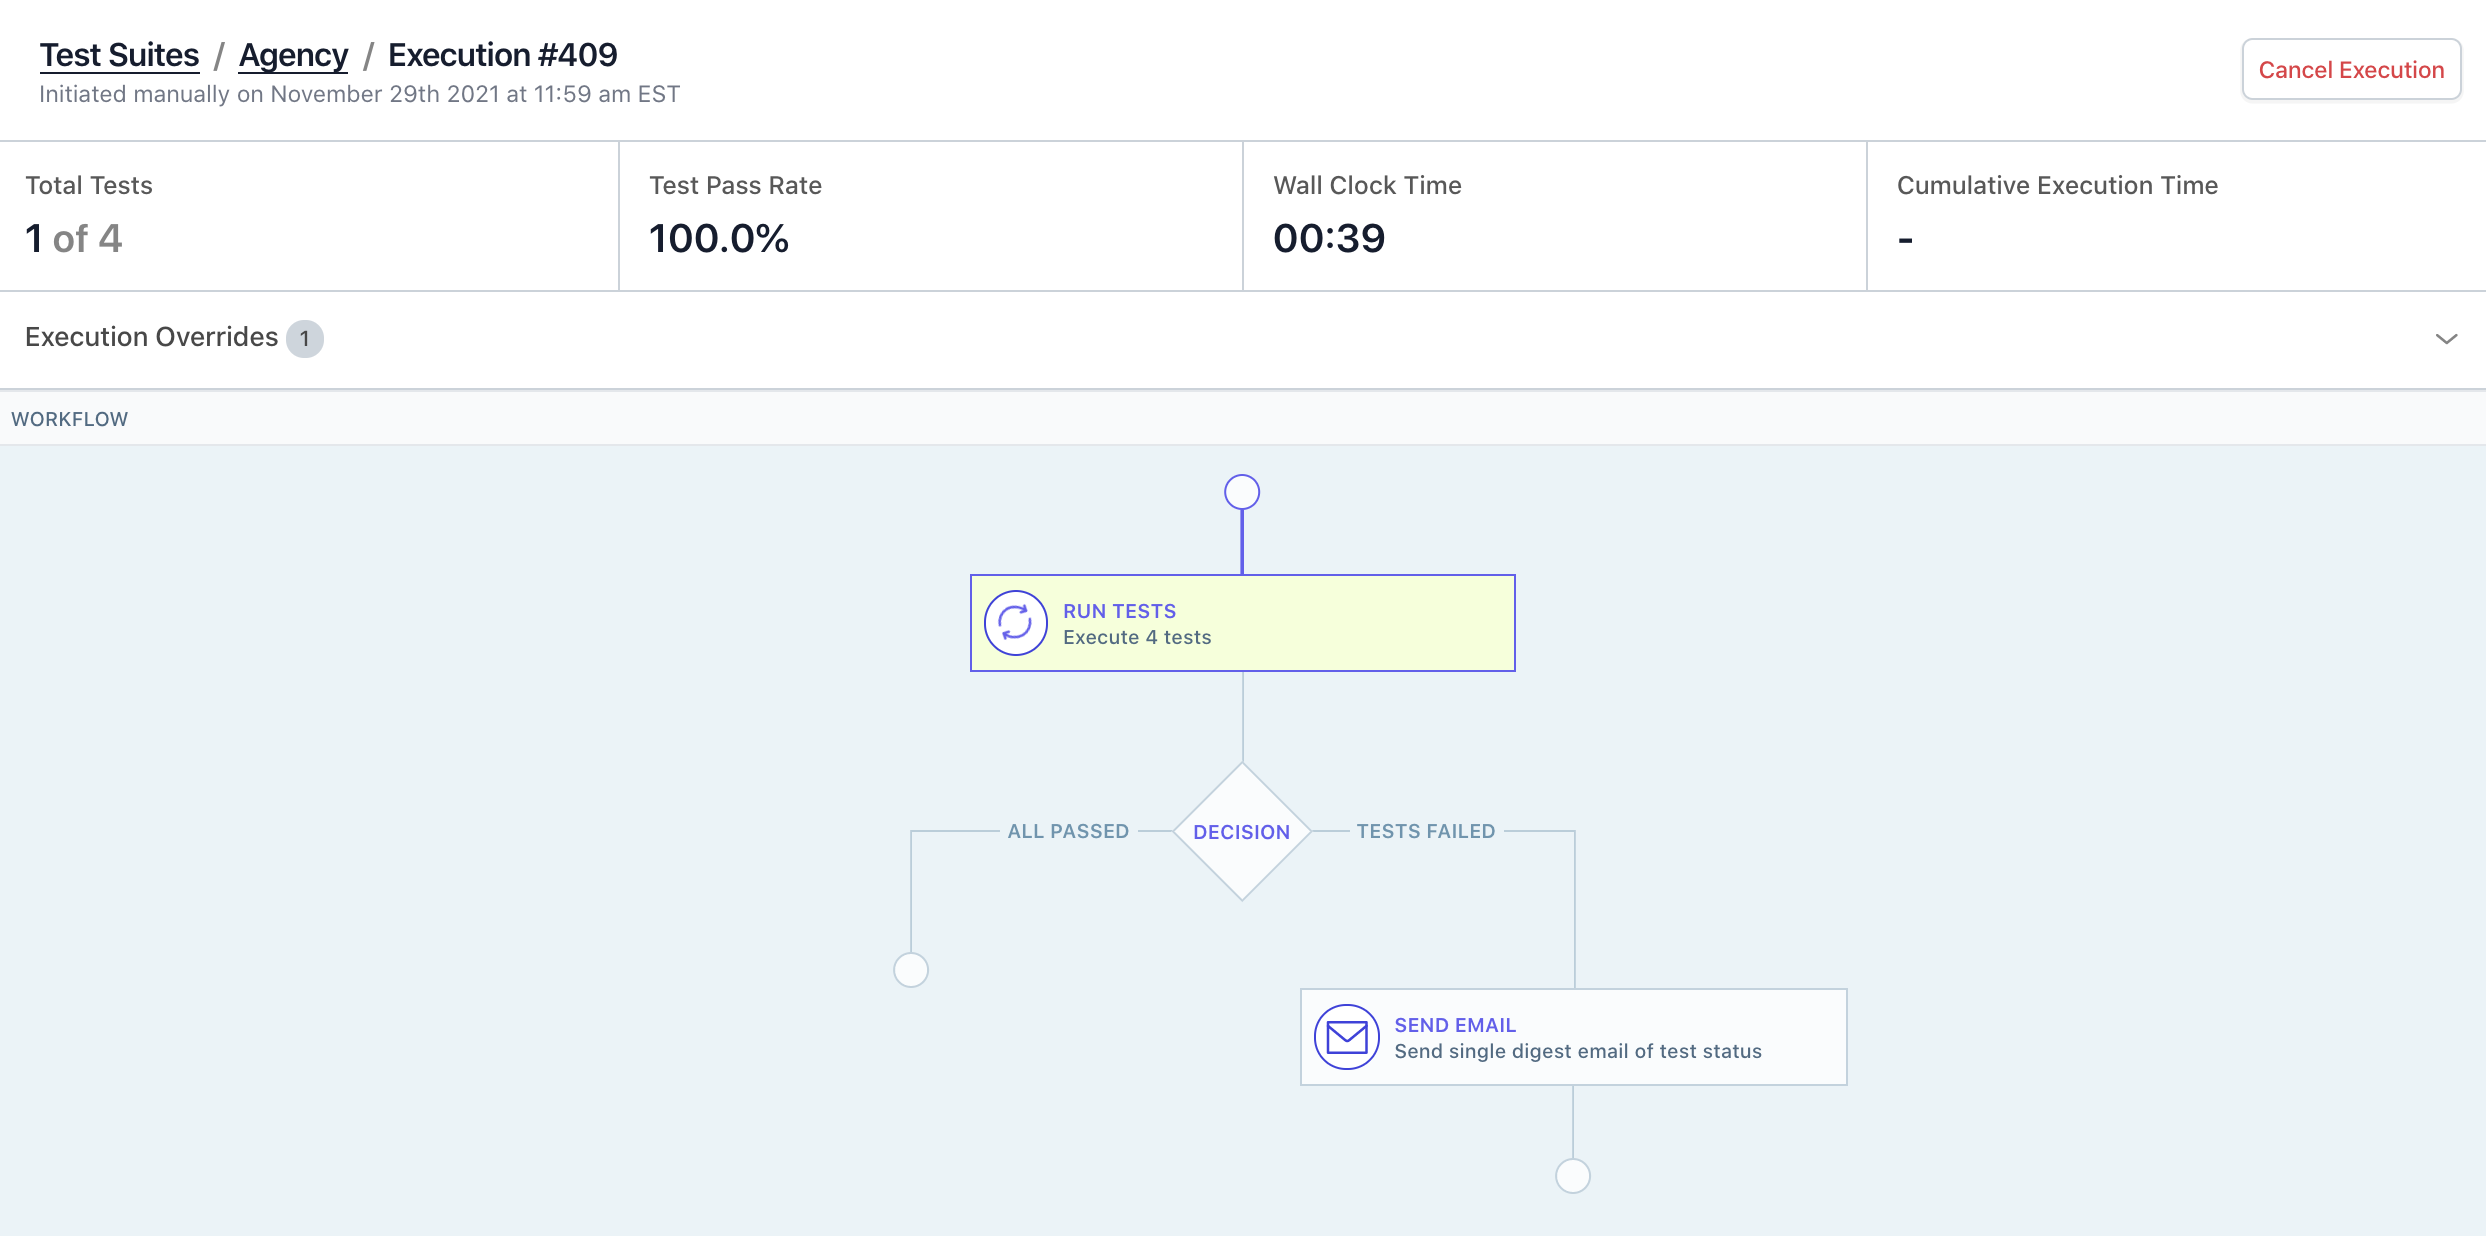
The execution detail page has four different sections, all of which dynamically update as the suite execution progresses.
Statistics
Reflect provides high-level metrics for individual suite results, along with cumulative stats for a given suite as well as across all suites.
The following metrics are shown for individual suite results:
- Total Tests: The number of test instances in this execution.
- Test Pass Rate: The pass rate for all test runs within this execution.
- Wall Clock Time: The time between initiating the suite execution and its completion or cancellation.
- Cumulative Execution Time: The sum of individual execution time for all test runs within this execution.
The following metrics are shown when viewing the suite configuration page, and represent cumulative stats for a given suite:
- Total Executions: The number of executions of this suite in the past 30 days.
- Test Pass Rate: The pass rate for all test runs within this suite in the past 30 days.
- Avg. Suite Run Time: The average wall clock time from start to completion for all executions of this suite in the past 30 days.
- Cumulative Execution Time: The sum of individual execution time for all test runs within this suite in the past 30 days.
Finally, the following metrics are shown when viewing the Suites list page, and represent cumulative stats across all suites:
- Total Executions: The number of executions across all suites in the last 30 days.
- Test Pass Rate: The pass rate for all test runs within suite executions in the last 30 days.
- Avg. Suite Run Time: The average wall clock time from start to completion for all executions in the last 30 days.
- Cumulative Execution Time: The sum of individual execution time for all test runs within suite executions in the last 30 days.
Workflow
The Workflow section displays the current state of the workflow for this suite execution. If the suite execution is still running, you will see the workflow status update in real-time.
You can click on any action in the workflow to open the detail panel on the right side in read-only mode. (Once the execution is initiated, it cannot be modified.)
Failures
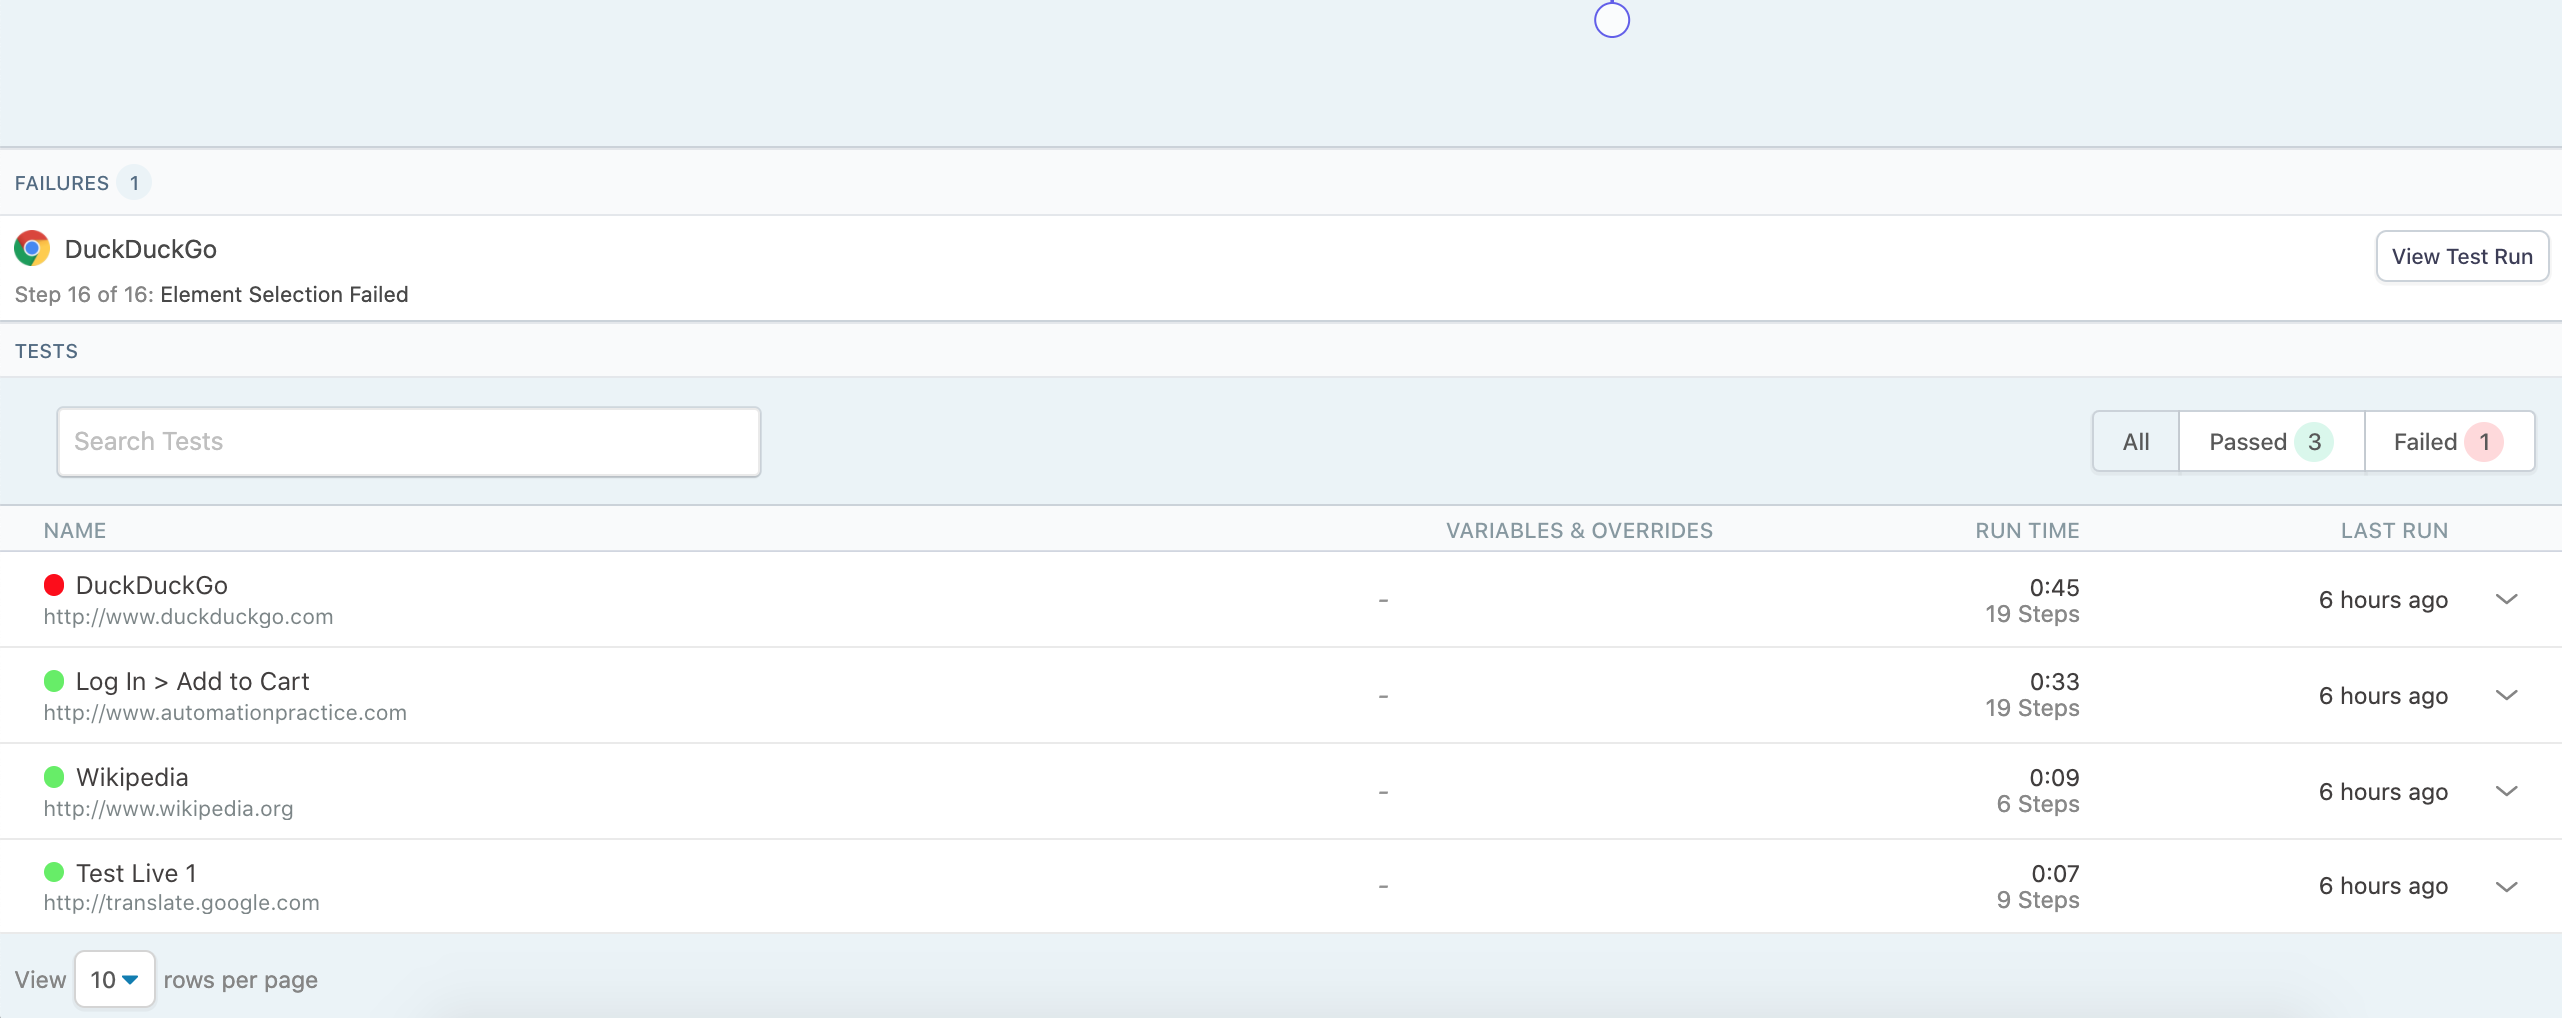
The Failures section displays any test runs which have failed in the execution, as well as the test step(s) in the runs which failed. You can open the individual test run by clicking “View Test Run”.
Tests
Finally, the “Tests” table at the bottom displays the individual test instances in the suite, grouped by their browser and execution overrides. Within this section you can toggle between a Data Driven view, which shows results in a condensed tabular format, or a Run Details view, which shows test results in a flattened list.
Re-run Failed Tests
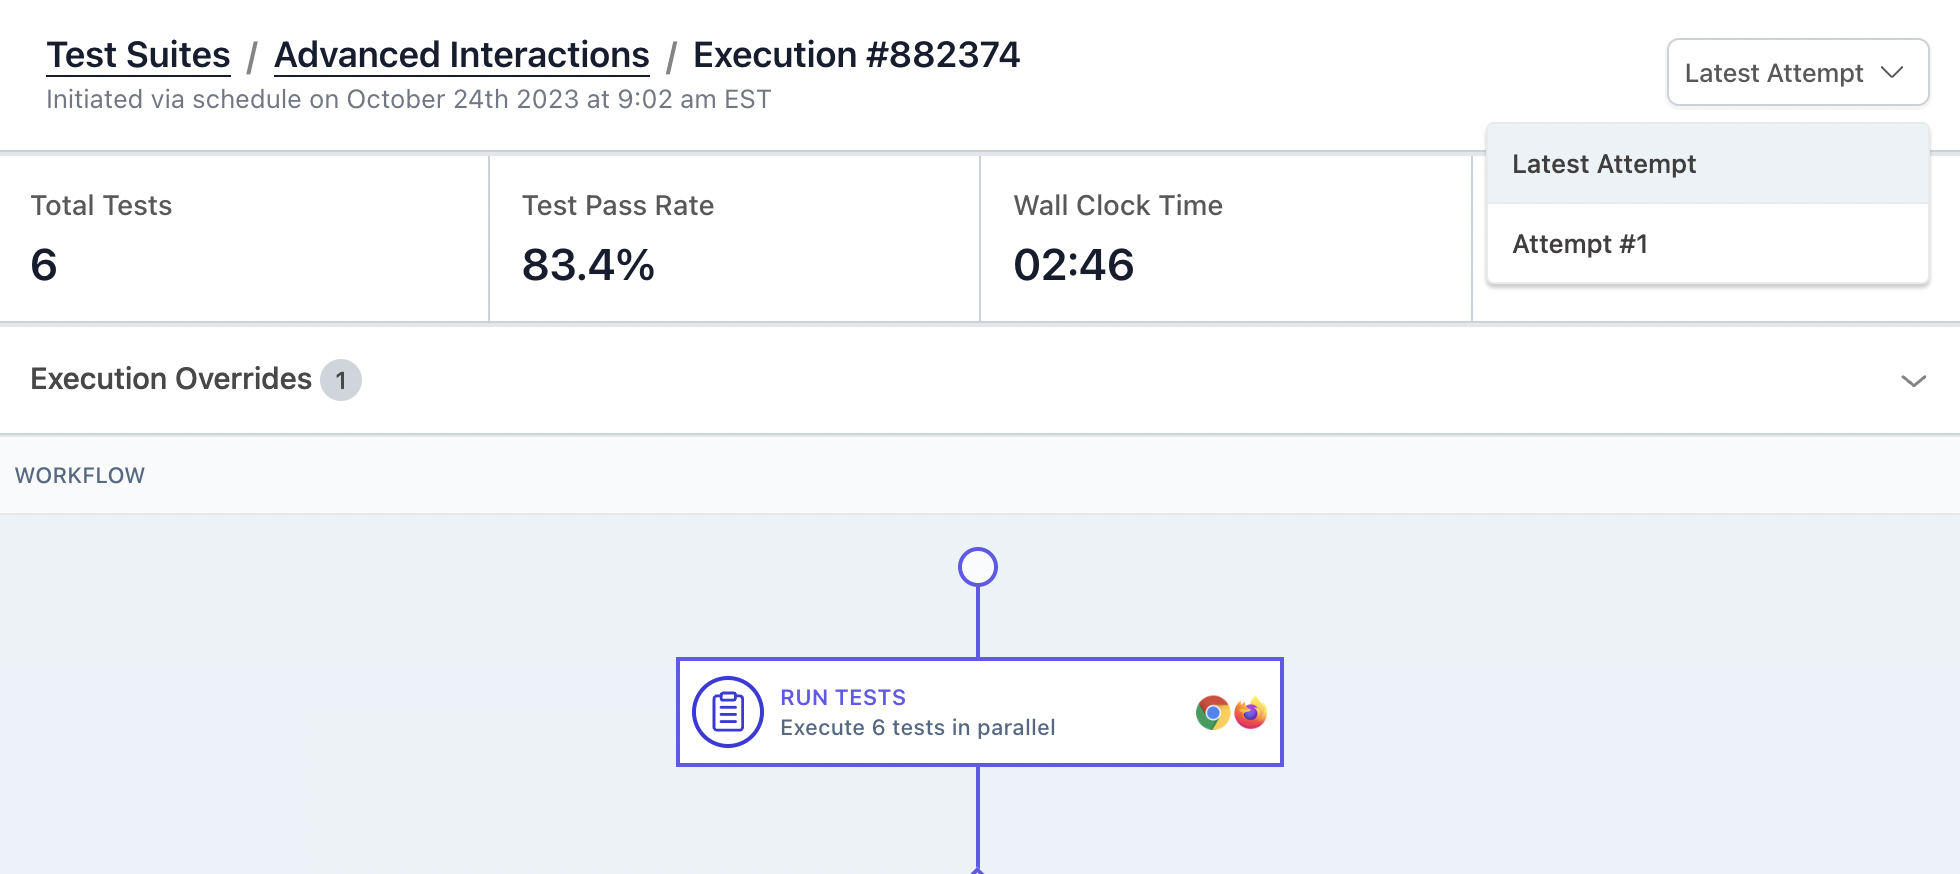
When a suite execution completes and there were failed tests, you can re-run those failed tests within the suite execution. This is useful because it allows you to edit the tests or make fixes to them, while still preserving the suite execution’s overrides or parameterized inputs. The re-run of the suite execution is treated as a new “attempt”, and is displayed on the same suite execution detail page as the original.
To re-run a suite with failed tests, view the suite execution detail page and click “Re-run Failed Tests”.
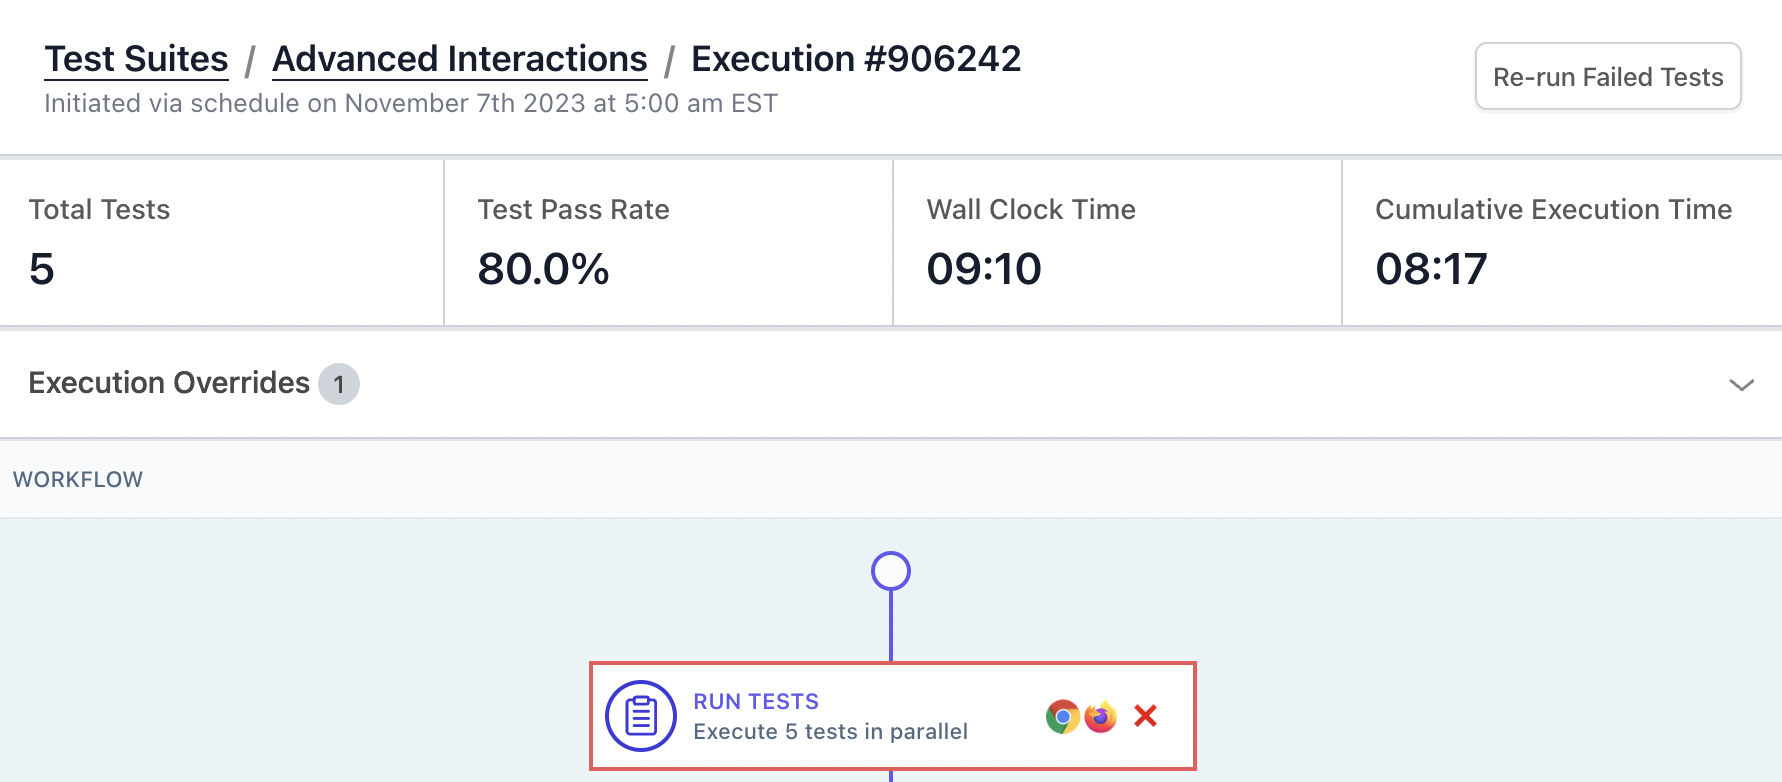
The new suite execution will only execute the failed tests, and the new test results will overwrite or update the suite execution’s overall results. One exception is that if newly-passing tests cause a new Decision branch to be taken, that will execute tests or actions that didn’t run originally. Once the new suite execution attempt has completed, the combined results will be shown on the execution detail page by default. But you can view previous execution attempts using the dropdown at the top right corner.
Canceling a Suite
A suite execution which is still in-progress can be canceled by clicking the “Cancel Execution” button at the top right. Canceling an execution prevents any additional tests from being executed, regardless of the workflow action that is currently being executed.

