


More and more web apps have adopted automated emails to interact with users. These emails play a key role in the user journey. Thus, a bug in one of these email workflows can represent a serious problem for the reputation of your web application.
In this tutorial, you will learn how to create a script to test an email workflow using Cypress. Specifically, you will see how to fill out a passwordless form in a Cypress script, wait for the authentication email, extract the authentication URL, and use it to log in to a web application.
What are common automated email scenarios?
Automated emails are common in several scenarios. Let’s see the most important ones:
- Passwordless authentication: In this scenario, the user provides a service with their email address. An automated email is sent to that email address. This email involves a one-time authentication link (also called a “magic link”) that immediately authenticates the user.
- Forgot password workflows: In this case, an email containing a password recovery link is sent to a user who lost their password. That link generally leads to a page that allows the user to set a new password and log back into their account.
- Idle notifications: a notification email including a link to a web page, thread, or message is automatically sent to the user’s inbox if they are not online.
- New user registration: a newly registered user is asked to verify their email address to have access to all the features offered by a service. Usually, the user can verify their email address by clicking on a link received in the inbox or by entering a code.
- Two-factor authentication (2FA): during the login process, users are asked to pass a simple challenge to log in. This challenge is delivered on the second factor chosen by the user. When the second factor is an email address, the user must click a link or copy a code received in the inbox.
How to test an email workflow with Cypress
In this step-by-step tutorial, you will learn how to test a passwordless authentication scenario with Cypress. In detail, you will learn how to use Cypress to:
- Connect to a temporary email service
- Retrieve the temporary email address
- Connect to the passwordless service you want to test
- Fill out the passwordless form with the temporary email address to trigger the automated email workflow
- Retrieving the authentication email sent by the passwordless service
- Extract the authentication URL from the email and use it to log in to the passwordless service.
If the Cypress script manages to log in, then the test is passed. Otherwise, there is a bug in the email workflow. Note that this is just an example to learn how to test emails with Cypress. You can easily adapt this email testing logic to other scenarios.
Let’s now see how to test an emails using Cypress!
Prerequisites
To follow this Cypress tutorial, you only need to meet the following prerequisite:
If you do not have Node.js on your machine, follow the link above to download and install the latest LTS version of Node.js.
Setting up a Cypress project
Before starting coding, you need to set up a Cypress project. If you already know how to set up a Cypress project or already have one, skip this section and move on to the next step.
First, launch the following command in your terminal to initialize the project folder:
|
|
This will create an empty cypress-email-test folder.
Next, switch into the newly created directory:
|
|
And run the command below:
|
|
This will initialize an npm project without going through an interactive shell session. You now have a blank npm
project containing only a package.json file.
It is time to install Cypress. As stated in Cypress’s official documentation, install Cypress using the command below:
|
|
This will take a few minutes. During the installation process, Cypress should log the following messages in the terminal:
|
|
You are now ready to launch Cypress. Follow the wizard to initialize a Cypress project. If you run into problems, take a look at the Setting up a Cypress project section from our Testing drag-and-drop workflows in Cypress tutorial.
From now on, email-test.cy.js will be considered as the Cypress spec file containing the email testing logic.
1. Connecting to the Temporary Email Service
Let’s use Cypress to connect to the Guerrilla Mail temporary email service. If you are not familiar with this, a temporary email service provides you with a short-lived email address you can use to receive emails. Guerrilla Email automatically generates a disposable email address that is available for 1 hour.
What makes Guerrilla Email special compared to other disposable email providers is that the email address is tied to your browser session. This means that if you close the Guerrilla Mail tab and reopen it within an hour in the same browser session, the temporary email address will still be the same. This will come in handy for the limitations imposed by Cypress.
Guerrilla Mail is particularly useful when it comes to testing because it is Cypress-friendly. On the other hand, most popular email providers such as Gmail will detect and block Cypress.
You can connect to Guerrilla Mail with Cypress as follows:
|
|
Note that the Cypress visit() function allows you to connect to a website through its URL.
2. Retrieving the Temporary Email Address
If you inspect the email HTML element in Guerrilla Mail with Chrome DevTools, you will see:
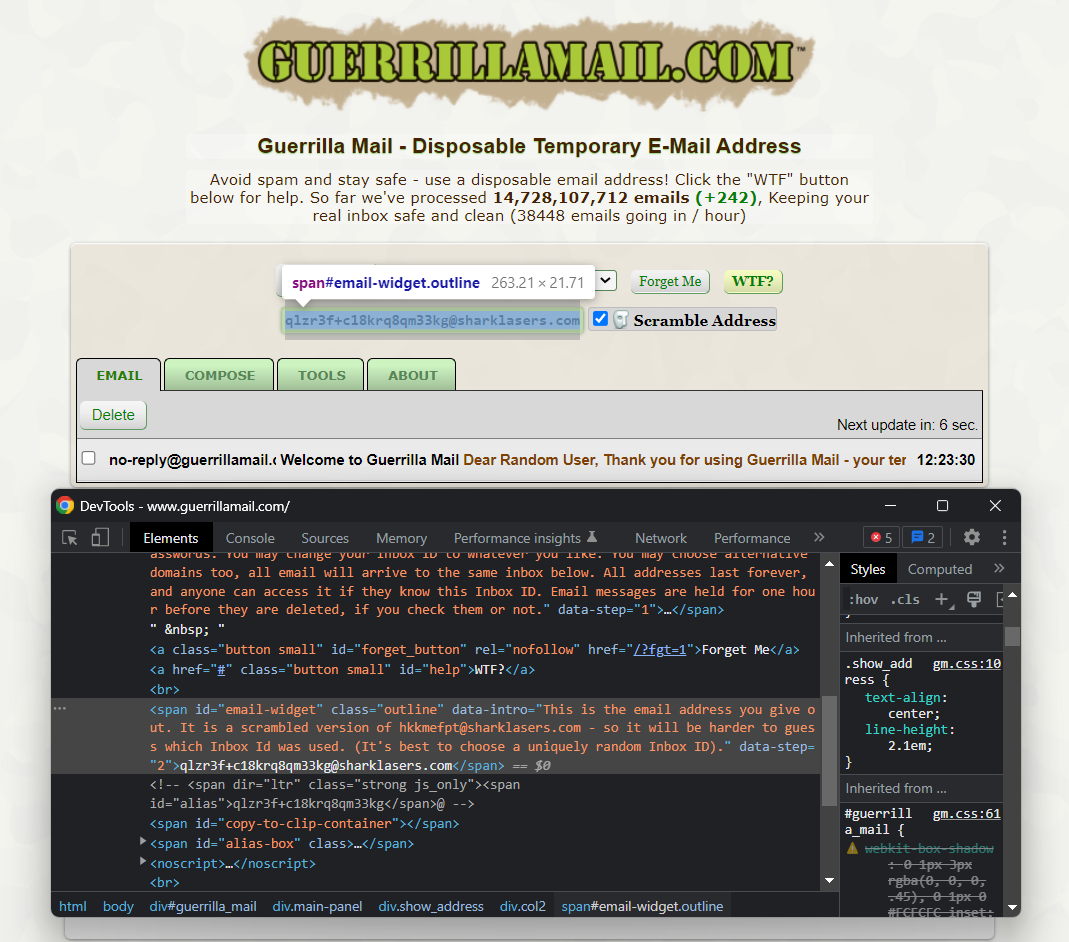
Here, you can note that Guerrilla Mail stores the temporary email address in a #email-widget <span> HTML element.
You can extract this data with Cypress as follows:
|
|
What this snippet does is select the #email-widget HTML element with the Cypress
get() function. Then, it uses the
invoke() function to get the text contained in the HTML element. Thus,
the email variable will contain the temporary email address below:
3. Connecting to the Passwordless Service
By default, Cypress only allows you to run commands in a single origin. This means that you cannot connect to websites with different domains in a single test. To overcome this limitation, you need to enable the experimentalSessionAndOrigin config. This experimental option enables cross-origin and improves session support.
Note that this config is available starting from Cypress 9.6. If you are using an older version of Cypress, update it with:
|
|
Now, open the cypress.config.js file in the root folder of your project. This represents the
Cypress config file. In the e2e object,
set experimentalSessionAndOrigin to true:
|
|
Relaunch Cypress, and you should now be able to connect to multiple origins in a single test.
Connect to the passwordless service with the origin() function as follows:
|
|
The Cypress origin() function allows you to visit multiple domains of different origins in a single test. Note that
Cypress runs the callback functions inside origin() in an entirely separate instance. This means that these callbacks
do not have access to any variable defined previously. If you need to use any of these variables, you can pass them to
origin() callbacks through the
args option. Cypress will copy
this data and make it available to the functions inside origin().
In other words, if you do not pass email in args, email would be undefined inside the origin() block. This is
why the code above specifies it in the arg object.
origin() accepts a domain string as a parameter and does not perform a page change in the test. If you need to visit a
new web page, you have to do it manually with visit(). Note that inside origin() you can visit() with relative
paths. Also, make sure to replace your-service.com with the domain string of the website you want to test.
4. Fill Out the Passwordless Form
Chances are that the login page of passwordless service includes a form as below:
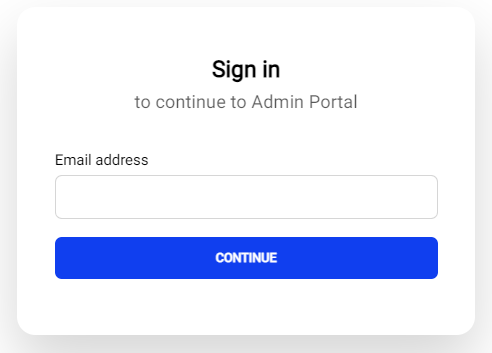
A passwordless form generally contains an input field and a button. First, you are supposed to type your email in the input field. Then, you should press the button. When you click the button, the email workflow is triggered.
After submitting the form, you will receive an email to the email address you specified in the form. This email will contain a link. By clicking on the link, you will find yourself logged in the passwordless service. This mechanism enables you to log in without a password. That is why it is called passwordless.
Let’s assume the passwordless form consists of the following two HTML elements:
- An
#email<input> - A
#continue<button>
You can fill out such a form in Cypress using the code below:
|
|
Note that by clicking the “CONTINUE” button you just triggered the email workflow.
5. Retrieving the Authentication Email
Your Cypress test is now on the https://your-service.com/login page. It is time to go back to Guerrilla Mail page. You
can achieve this with visit():
|
|
This command will close https://your-service.com/login and open https://www.guerrillamail.com/. If Guerrilla Mail
did not tie the temporary email address to the browser session, you would get a new address. This would be a problem
because you could not verify that you actually received the email. And you could not access its content accordingly.
This is why it is so important to use Guerrilla Mail with Cypress.
Then, you have to wait for receiving the authentication email. Specifically, your goal is to identify the authentication
email from the welcome email sent by Guerrilla Email. If you inspect the <tr> HTML element associated with the
authentication email with your browser’s dev tools, you will see the following:
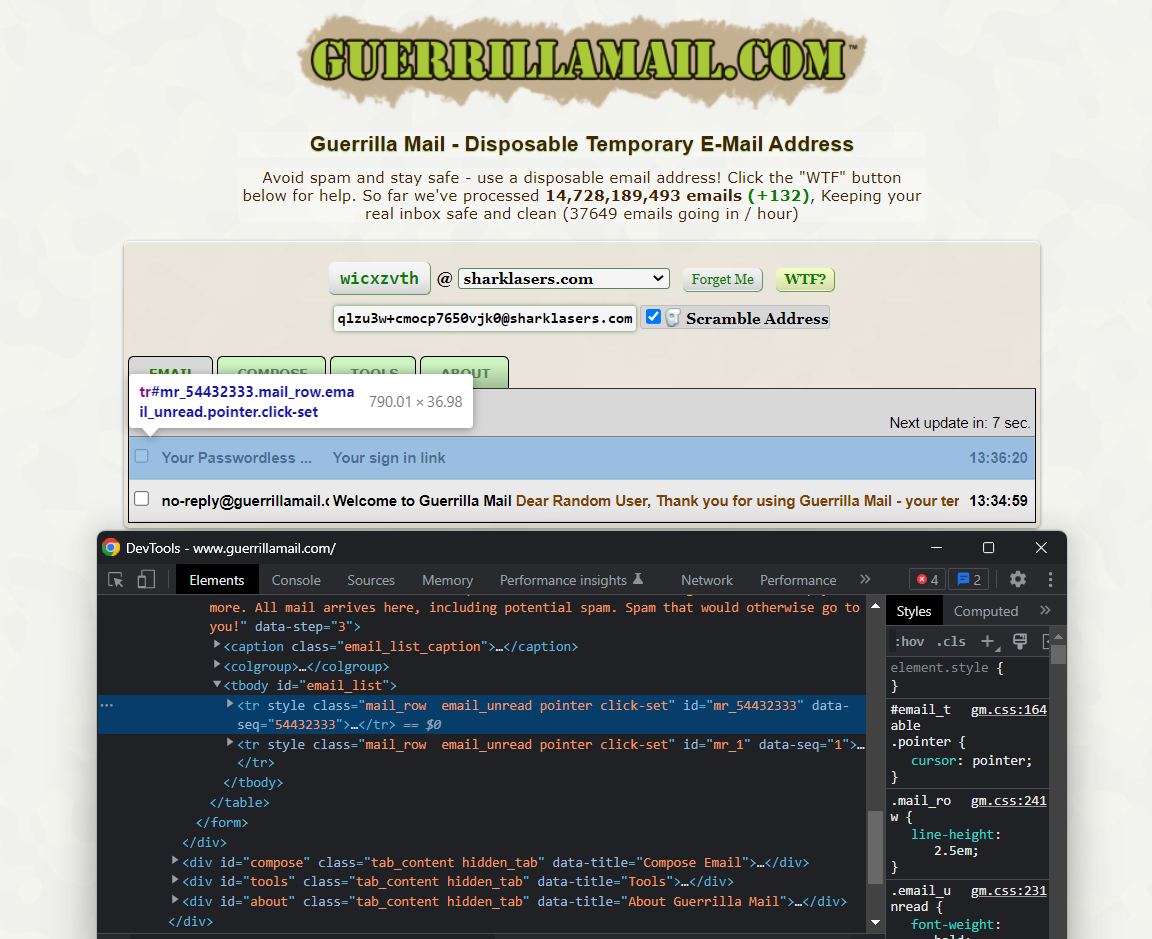
Note that you can select this HTML element with the following CSS selector:
|
|
This gives you all <tr> HTML elements inside #email-list that are not #mr_1, which is the welcome email. Since you
expect to receive only the authentication email at this temporary email address, this CSS selector should be enough.
Since receiving an email takes time, you have to wait for the #email_list tr:not(#mr_1) HTML element to show up. You
can achieve this with the timeout parameter, as follows:
|
|
Waiting for one minute should be enough. Then, click on the <tr> element to access the email content.
6. Extracting the Authentication URL
Your authentication email should look similar to the image below:
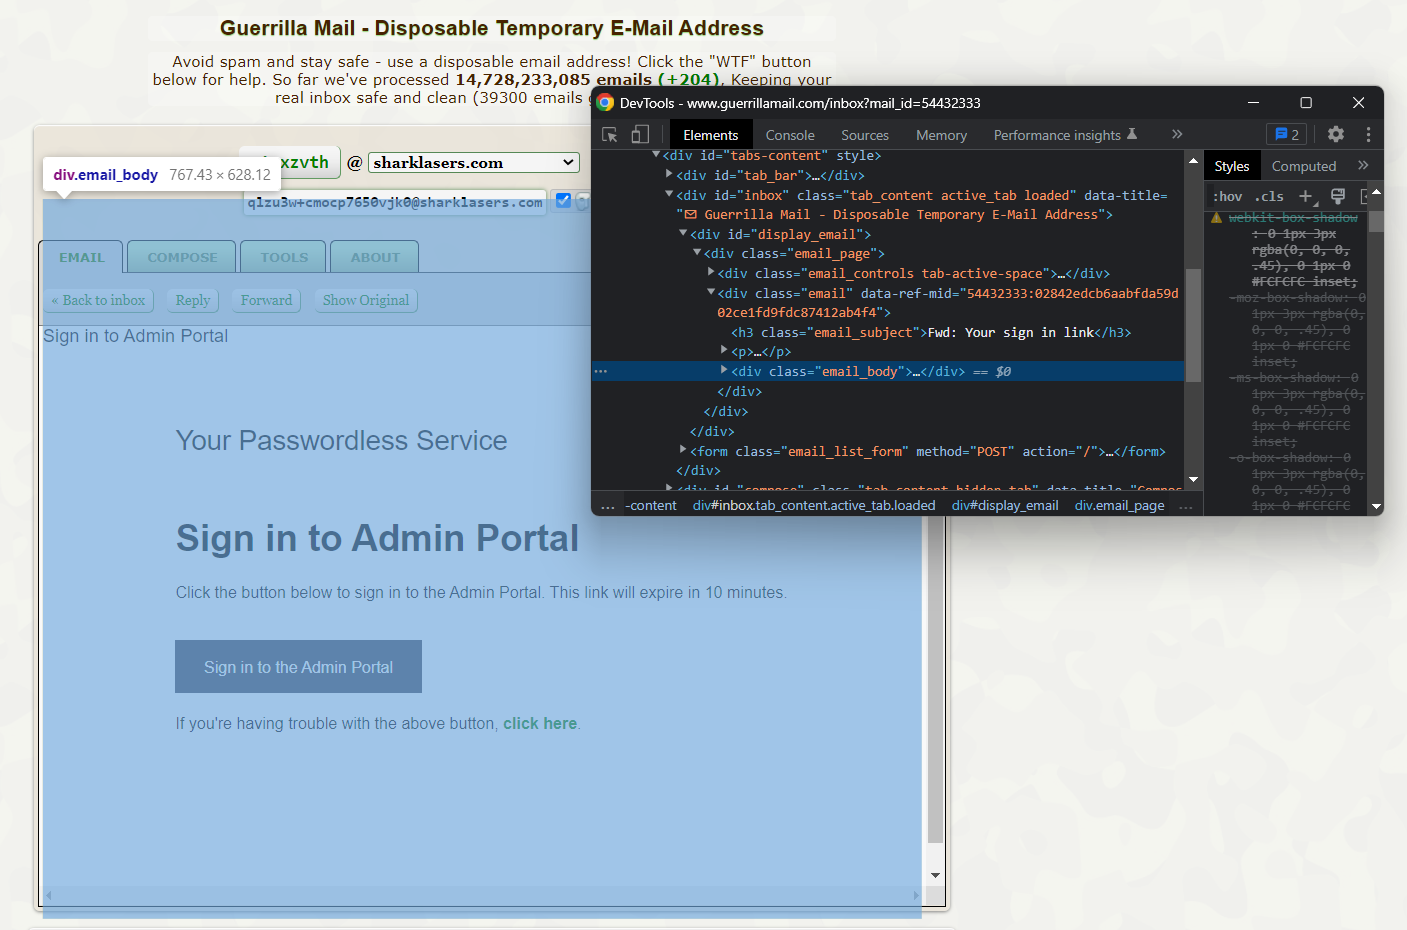
The email content is contained in the .email_body HTML element. So, you can retrieve the authentication URL with the
following CSS selector:
|
|
Note that your authentication email could contain more than one link, use the first() to click on the first link:
|
|
If everything went as expected, you should now be logged in to the passwordless service. You can verify this as follows:
|
|
This verifies that the URL of the page currently shown in Cypress contains the your-service.com/admin string.
Congrats! You just learned how to test an email workflow in Cypress.
Putting it all together
This is what the complete Cypress script looks like:
|
|
Conclusion
In this tutorial, you learned what you need to test automated emails, when you need to use them, and how to test them in Cypress. Automatic emails are a critical aspect of an application’s success. For this reason, you need to be able to test them.
Here, you saw how to test an automated email workflow with Cypress through a simple script. In detail, you learned how to trigger a passwordless email workflow in Cypress, retrieve the authentication URL in the email sent to a temporary email service, and use it to log in to a service.
Thanks for reading! We hope that you found this article helpful. Feel free to reach out to us on Twitter with any questions, comments, or suggestions.