


React State Management
React comes out of the box with state management in the form of Hooks. Hooks provide a functional programming approach to create, update and maintain state. We can visualise how Hooks work by considering the state of a simple Counter application:
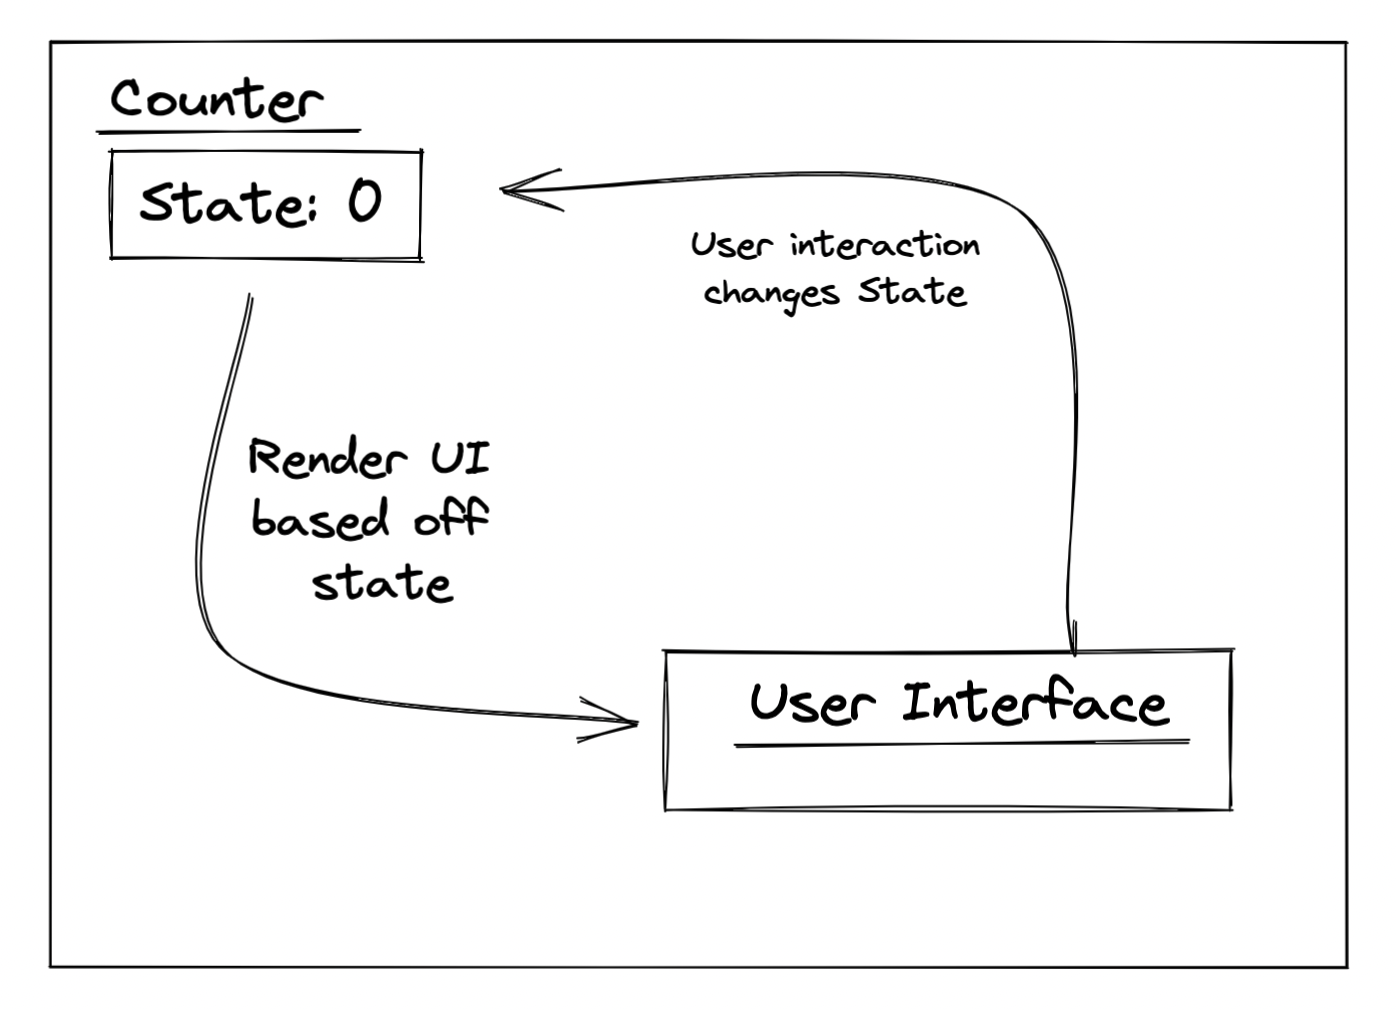
In the example above, a Counter component keeps a running count. The Counter has a default state of zero, which is what is initially displayed to the user. After some user interaction (e.g. clicking a button), a state change will be triggered and the internal state will change from 0 to 1. This in turn will trigger a re-render of the UI. Note that this is perhaps the simplest example of state management within an application. Real-world applications typically have a much larger and more complicated set of internal state.
For the remainder of the article we’ll be working with a more complex example. Specifically, we’ll be working on a “To Do List” application:
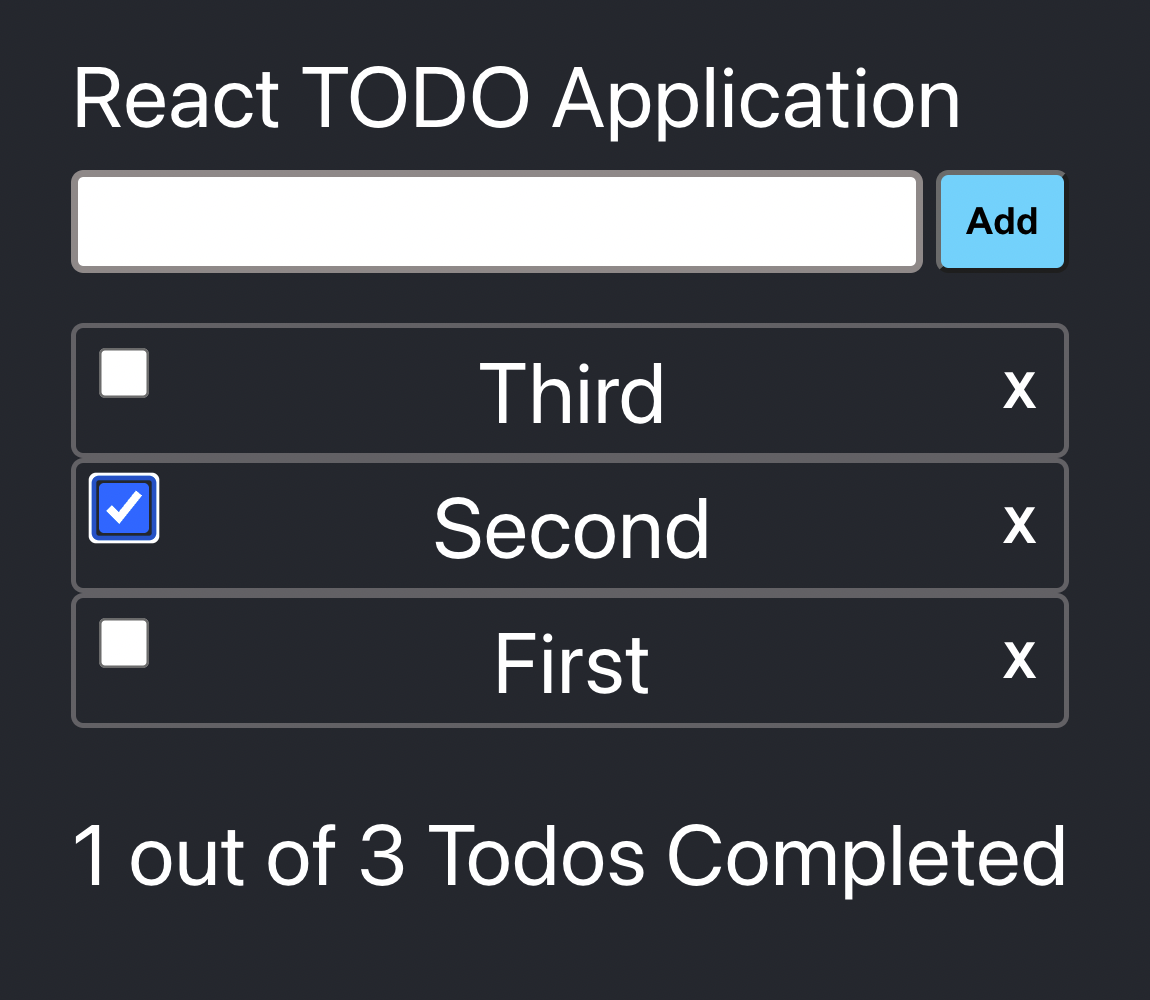
The app is comprised of the following components:
- Todo Application - this is the container that will be the root of the React application. This will hold our state and render all child components.
- New Todo - this will allow the user to type in a new todo and on clicking the add button it will add the todo to our list.
- Todo List - this will take in the todo items and render them as a list.
- Todo Item - this will display the todo text and allow the user to change the completed status or delete the todo
- Todo Progress - this will show a completion status based on the todos in the list.
We can visualise these components to see how state flows through the application and how we need to handle state changes.
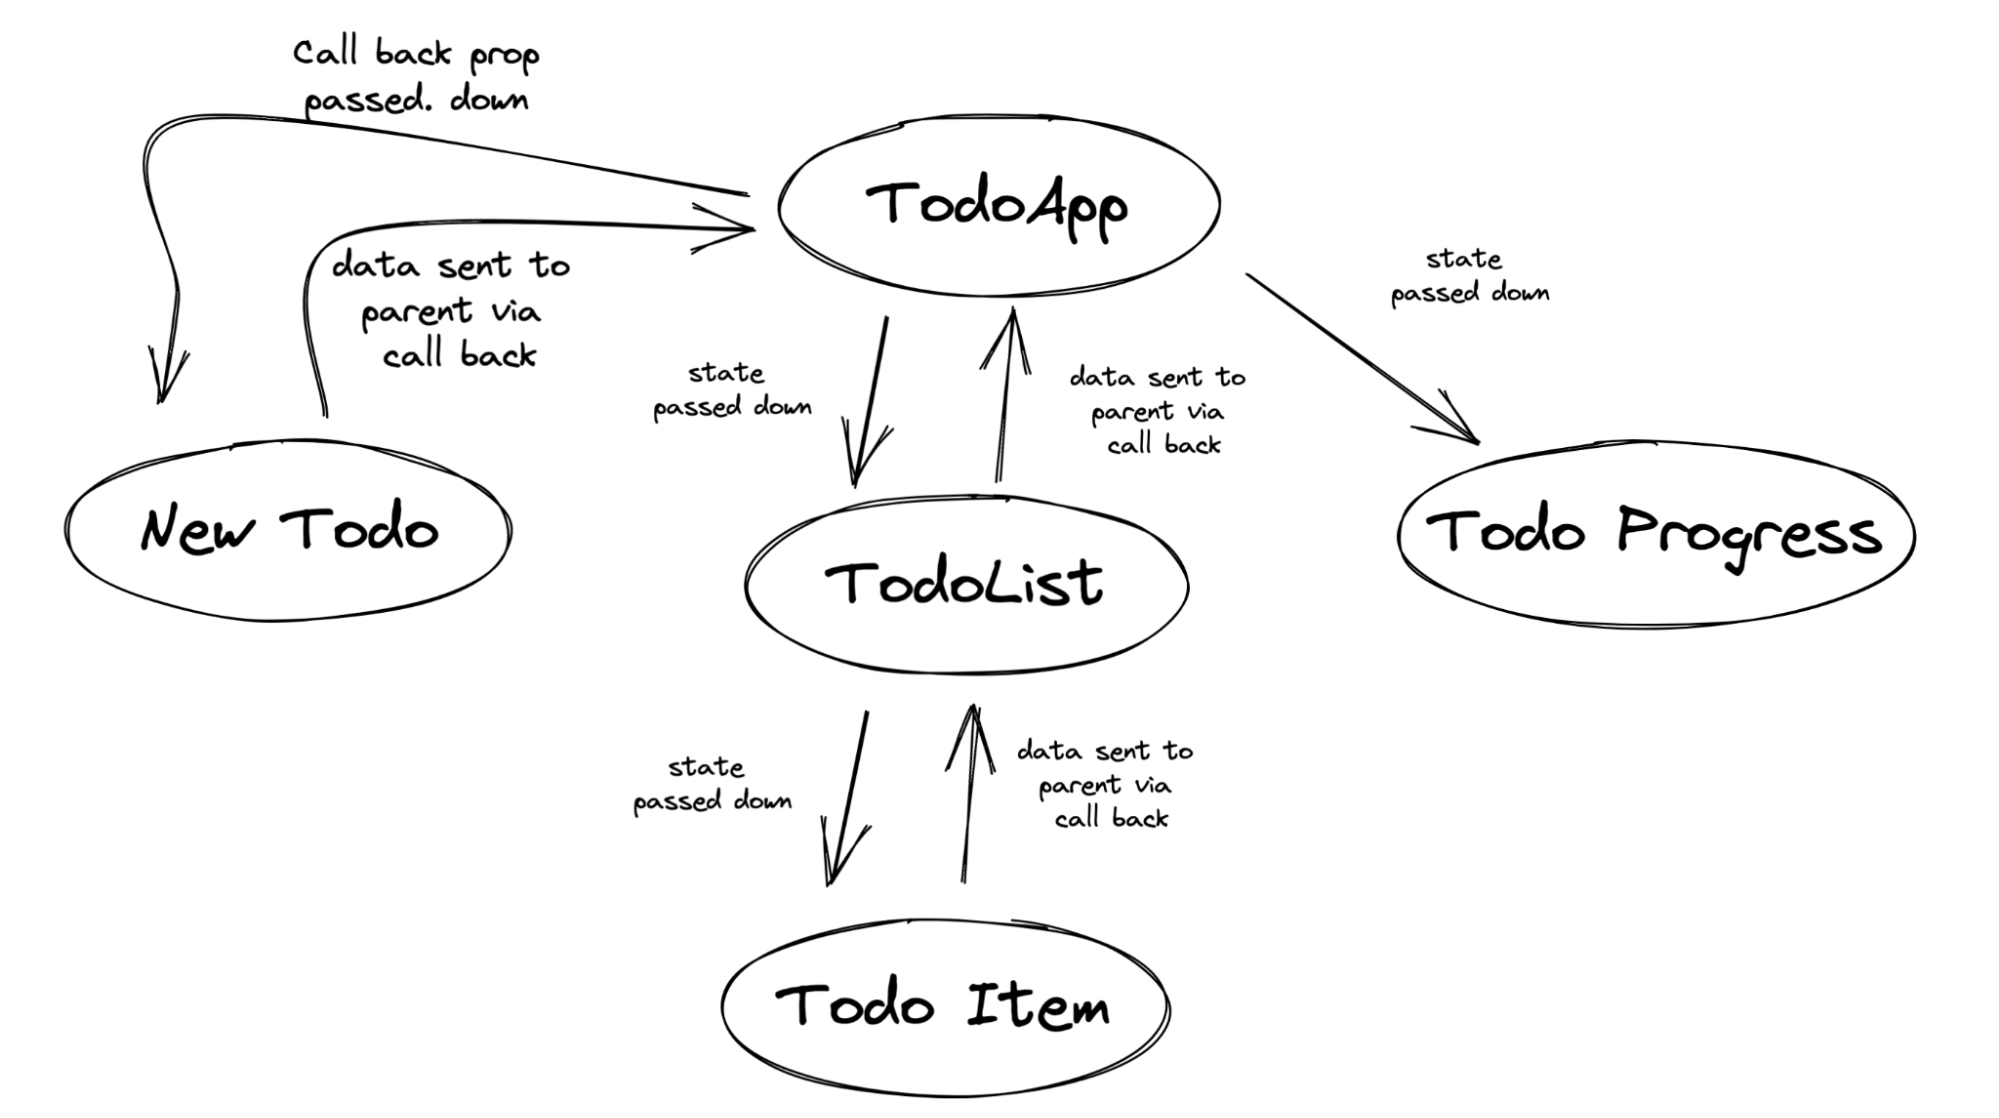
As we can see from the diagram, the root of the application holds the state and passes it down the application tree. If we need to make a state change at any point in the tree, we’ll need to pass this operation up to the application root. To notify all components about the state change (e.g. a change to the ToDo list), we’ll then need to pass the updated state. This concept is called prop drilling. In our example, it’s starting to get hard to maintain and guarantee that the required state is being passed down to all required components. As our application grows, this issue will multiply. It’s at this point that we need to look for a state management solution.
Overview of Recoil
Recoil is a state management solution for React applications developed by the team at Meta. Recoil uses an atom-based approach for state management. Atoms are units of state that are updatable and subscribable. When an atom is updated, each component subscribed to that atom is re-rendered with the new value.
Recoil also has the concept of selectors. A selector is a pure function that accepts atoms or other selectors as input. When these upstream atoms or selectors are updated, the selector function will be re-evaluated. Components can subscribe to selectors just like atoms, and will then be re-rendered when the selector’s resultant value changes.
Selectors are used to calculate derived data. They work by keeping track of what components need them, as well as keeping track of what state they depend on. By storing a minimal set of state as atoms, and deriving the rest of the state via functions computed using those atoms, we can avoid redundant state.
Let’s explore the benefits of Recoil by refactoring our existing React ToDo App, to replace React state management with Recoil.
First, we need to set up Recoil to work with our application. Import the RecoilRoot component and make it the root
element of the application..
|
|
Wrapping the whole React application in this component will act as a React Provider and Context layer. This allows Recoil to share data across components and the React application tree.
Atoms and Selectors
Now that we have wrapped the application with RecoilRoot, we can start to define our atoms and selectors. Create a new
file called atoms.ts. In this file we will define the atom for our todos, and a selector for the progress of the
todos.
We start by importing the atom and selector utils from Recoil:
|
|
Then create an atom to hold our todos.
|
|
Here we pass an object with the properties key and value to the atom util function.
keyis a unique string that will identify the atom across the application. Atoms need a unique key, which is used for debugging, persistence, and for certain advanced APIs that let you see a map of all atoms.valueis the default value that will be used on the first render of the application. This follows the same convention used by React’suseStatehooks.
Lastly, we will create a selector that we will be using later in the application rebuild:
|
|
Like an atom, the selector must have a unique key. However, the selector also has a get function. The get function
allows us to define a function that Recoil will use to determine if state has changed. In the function we get the value
of the todosAtom then create a string that indicates the completed status of the todo application. Recoil will check
the return value of the get method and only re-render components when this has changed.
Recoil Hooks
Now that have defined our atom to hold the application state and a selector to derive a value from our state, let’s put the state to use.
Recoil provides a number of hooks to allow the components to subscribe to an atom or selector. The first change to our
state based application is to remove the useState hook and all the function props in
App.tsx. Since we have defined our
state and the initial value in the atoms file, we no longer needed to define a state object at the top of our
application tree. When we go to use the atom, Recoil will handle setting a default value for us.
|
|
New Todo Component
In the NewTodo.tsx component, we
can remove the Props type, and replace these with the equivalent from Recoil.
First, we import the useRecoilState hook that allows our component to interact with the todosAtom. We call the
useRecoilState like we would a useState hook like below:
|
|
We won’t be replacing the existing useState hook that tracks what the user is typing. This could be refactored into a
Recoil atom, however it’s not necessary since this state is local to the component and does not need to be shared
anywhere else.
Lastly we need to update the button click to use the Recoil hooks set function:
|
|
For the onClick function, we now call the setTodos function, adding the new object to the existing array of todos.
TodoList
Next, update TodoList.tsx to
remove the props. We then import the useRecoilValue hook. In the case of the TodoList, we want to subscribe to the
todosAtom and we don’t want to make changes to the value. Recoil provides a hook for this:
|
|
After we get the todos value from the hook, we can map over it just like we did with the originaltodos prop.
TodoItem
Originally, App.tsx contained all the
logic for updating or deleting a todo item. But with Recoil and atoms, we can move this logic to
TodoItem.tsx. Like the other
components, we remove the exising props and replace it with Recoil elements. In this TodoItem component we are going
to make use of the useSetRecoilState hook. Similar to the todo list, we are setting the todo state but not reading it,
as the current todo item comes in via a prop from the todo list component.
To use the updateTodos function that comes from the useSetRecoilState hook, we need to pass it a function as a state
callback. This is another pattern that comes from React’s useState hook, and allows for state updates and merges
without storing copies of the current state.
Here is the code for the checkbox and the delete button associated with each todo:
|
|
The state-as-function pattern allows us to call the set function, but instead of passing in a brand new state object
we can pass in a function that will be executed by Recoil. This function takes in the current state as a param and
returns the new (updated) state.
Todo Progress
Lastly, we can update TodoProgress.tsx to use Recoil. In this file we have the chance to use a Recoil selector. This component takes in the todo list state, creates a count of the completed todos along with a count of the total todos, then renders a message telling the user how many todos are completed. Since we are deriving this value from our state, we can move this logic away from the component and keep it closer to Recoil. By using the selector we created earlier, we can make this component very basic and easy to understand.
Like the previous components, we’ll remove the props and replace them with Recoil hooks. First, import the
useRecoilValue hook and our selector:
|
|
Next, grab the value of the selector and render this in the component:
|
|
The advantage of a selector over a standard atom is the caching that Recoil will provide out of the box. Each time our todo atom changes, Recoil will reevaluate the selector and trigger a rerender of the subscribed component only if the selector’s returned value changes. This allows us to create components that don’t rerender as often, which in turn improves the performance of our application. For example, if we had the ability to change the text of a todo, the complete count and total count would not change and thus the string returned from the selector would not change. This would not trigger a rerender of the Todo Progress component. Whereas if we add a new todo or change the completed status of a todo the counts change and this component will rerender with the latest values. The final Recoil example can be found on Github.
Conclusion
We have successfully converted a standard React todo application from using React state hooks to using the Recoil state management library. In the process, we have removed the antipattern of prop drilling as well as removed the need to hold our state at the root of the tree and pass down callback functions and state variables.
For small applications, having state and callbacks at the root of the tree is okay. However as the application grows, this pattern becomes complex and hard to manage. Using Recoil allows us to remove this complexity and use state at any part of the tree while simultaneously improving performance.
However, Recoil is not perfect. One of the biggest challenges is a change of mindset. Moving away from single state and passing state around to having an atom-based approach to application state can be a big change. There is also the added complexity of managing atoms, what size an atom should be, how to link atoms, and knowing when to use selectors.
In practice, the positives have to outweigh the negatives when it comes to using Recoil or any other state management library. If your application is small and starting to grow or is already large and complex, Recoil could be the solution to many of your problems.