


Encouraging your readers to share your blog posts on social channels like Reddit, LinkedIn, Twitter, and Facebook is a great way to increase your audience. But with so much content being shown to social media users, how do you ensure your content cuts through the noise?
One way to increase engagement is with high quality imagery. A recent study showed that Facebook posts that contained images have 2.3x more engagement compared to posts without images.
In this article, we’ll show you how to set up your blog to automatically generate images that are (1) optimized for social media sharing and (2) personalized for each blog post on your site.
How do Open Graph and Twitter Cards work?
Social sites are heavily reliant on user-generated content, so it makes sense that they want to make sharing content on their platform as easy as possible. When you share a link on a site like Reddit or Facebook, they automatically extract key information from the web page, like its title, domain, and representative image, so that the user sharing the link doesn’t have to enter that information manually.
For example, here’s what LinkedIn automatically grabs and displays for a different Reflect blog post:
In order for the right content to be displayed on social sites when a link is shared, you’ll need to implement some basic HTML tags on each page of your site using the protocols described below.
Open Graph Protocol
Most popular social sites, including LinkedIn, Reddit, Facebook, Pinterest, and WhatsApp, use a protocol called
Open Graph (OGP) to determine what information to display when a URL is shared on their platform.
While it might sound complex, the Open Graph protocol is actually very simple. It’s just a set of tags added to an HTML
page which define some important information about the page, including its title, what type of content it contains, and
what image to display when it’s shared. This information is defined in <meta> tags that have property attributes
which describe different aspects of the content of the page. Here’s an example of what an og:image property would look
like, which is the property used to define the image associated with the page:
|
|
Open Graph Protocol supports defining other image-related properties. This includes the og:image:secure_url attribute,
which is meant to be used by sites that requires HTTPS, as well as the og:image:width and og:image:height
attributes, which define the dimensions of the og:image. In practice, just defining the og:image property is all you
need to get an image to display properly, so long as the dimensions of the image you’re specifying fall within the
recommended dimensions of the various social platforms. (Note: We cover the recommended dimensions for several popular
social sites in the Frequently Asked Questions section at the end of this article).
Twitter Cards
While Twitter does support crawling and parsing Open Graph tags, it also created its own metadata protocol called
Twitter Cards which supports
most of the same information as Open Graph. To specify what image should be displayed on Twitter when a link is shared,
you’d define the twitter:image property like in the example below:
|
|
Though you could get away with just defining Open Graph image. We’d recommend implementing both Open Graph and Twitter Cards to ensure links to your site are displayed optimally everywhere.
Why generate a dynamic image for each blog post?
Now that you know how to implement Open Graph and Twitter Card tags, you might be tempted to use the same static image such as a logo for each blog post and call it day. This approach may be marginally better than not defining an image at all, but it’s still not the best solution. Look at the example below:
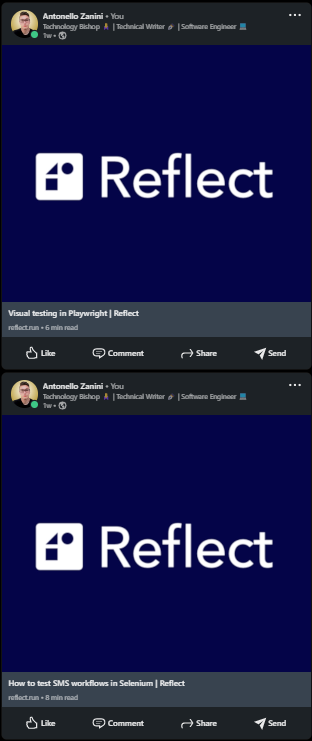
The two links posted on LinkedIn refer to two different blog posts. However, it is not so easy to tell at a glance. Plus, an image that’s completely unrelated to the topic could actually deter users from clicking on the link.
Instead, we’d recommend using a site like Unsplash to find an engaging piece of imagery that relates to each blog post. Unsplash images are free to use, so long as you provide the proper attribution back to the content creator’s Unsplash page.
However, we can go even one step further and generate a customized social share image that contains additional information about the blog post, like in the example below:

Writing a script to generate social share images using TypeScript and Puppeteer
Let’s walk through the code used to generate the image above. Since this script runs on Node.js, you’ll first want to ensure that Node and npm are installed on your local machine.
The complete code to generate this image is in the following GitHub repository. To run this code ourselves, we’ll star by cloning the repository and installing the necessary dependencies:
|
|
1. Libraries used by the social image generator script
Before digging into how the script works, let’s first see what libraries it depends on.
As you can see in the package.json file, the social image generator TypeScript script depends only on the following two libraries:
- gray-matter: This is a JavaScript library that parses the “front-matter” of a Markdown file, and is what allows this script to be used with any Markdown-based CMS like Hugo or Jekyll.
- node-html-to-image: This library utilizes Puppeteer to render a web page and then convert that into an image. This allows the script to format the image template using HTML and CSS.
To understand why the script requires gray-matter, you first need to understand what a front-matter is. A front-matter
is a set of meta variables that are used to describe information about a document, such as a title, author, description,
and publication date.
Front-matters are generally defined at the beginning of a file, such as a Markdown document. A front-matter generally
starts and ends with three dashes (---).
This is what a sample front-matter looks like:
|
|
Similarly, to understand how node-html-to-image works, you need to learn more about Puppeteer. Puppeteer is a Node.js
library that provides a high-level API to control Chrome or Chromium over the
DevTools Protocol. In detail, Puppeteer can run Chrome or
Chromium in headless mode by default, providing
headless browser capabilities.
In other words, Puppeteer allows you to use the native features of a browser in your Node.js backend. This is how
node-html-to-image manages to convert HTML into images.
2. Creating the template for your social share images
First, let’s see how to generate an HTML template for your Open Graph/Twitter Card images.
This is what the image HTML template generator function looks like:
|
|
As you can see, the generateTemplate() function requires a matter.GrayMatterFile<Buffer> object containing the
front-matter info read with matter. Then, it uses this parameter to extract the info required to build the image HTML
template.
In detail, it gets the reading time with the following calculateReadingTime() function:
|
|
Note that while this script was developed for Hugo, and other CMSes may use a different approach
to generating read-time. The [reading-time](https://www.npmjs.com/package/reading-time) would be a more robust and
accurate way to calcuate the reading time of an article vs. the hard-coded approach used in the script.
Also, generateTemplate() requires the following generateBase64ImageUrl() function:
|
|
generateBase64ImageUrl() simply converts an image file into its
Base64 Image URL
representation through the toBase64() function below:
|
|
Note that the string returned by generateBase64ImageUrl() can be used as the src attribute of an <img> HTML tag.
3. Putting it all together
This is what the social image generator TypeScript script looks like, with a few parts omitted for brevity. The full script is available here:
|
|
This script works by reading the contentDir and outputDir arguments passed by the CLI. The first parameter should
contain the path of the input directory containing all your front-matter files. The second parameter should contain the
path of the output directory that will store the images generated by the script.
In the main() function, the script splits the array containing all front-matter file names into an array of subarrays.
Each element of this new array contains up to MAX_CONCURRENT_PUPPETEER_PROCS elements. This splitting process is done
by the following chunk() function:
|
|
Therefore, only a limited amount of front-matters will simultaneously be transformed into images. This is a good compromise to get the required results faster than in working in series, but without overloading the system.
Then, each front-matter file name is passed to generateSocialCardForArticle(). Here, the Open Graph image is
automatically generated by transforming the image HTML template created by the aforementioned generateTemplate()
function into an image file with the node-html-to-image library.
Note that some lines of code were omitted for brevity. You can take a look at the entire script here.
4. Using the social image generator script
It is now time to learn how to launch the social image generator script. Place your front-matter Markdown files in the
<contentDir> parameter folder. Similarly, place all your source image files in the <contentDir>/assets/image folder.
Retrieve great hero images for free to use as the background of your generated images with services like Unsplash. Just make sure to provide proper attribution to the author of the Unsplash image when using the generated image.
Now, let’s learn how to use the TypeScript script. First, build it with the following command:
|
|
This will launch the command below:
|
|
As you can see from the tsconfig.json file below, the built application will be written in the dist directory.
|
|
Now, move your <contentDir> folder inside the dist directory.
Enter the dist directory and launch the script with the command below:
|
|
Note that assets/content represents the <contentDir> parameter and output the <outputDir> parameter.
The script will log the following info in the terminal:
|
|
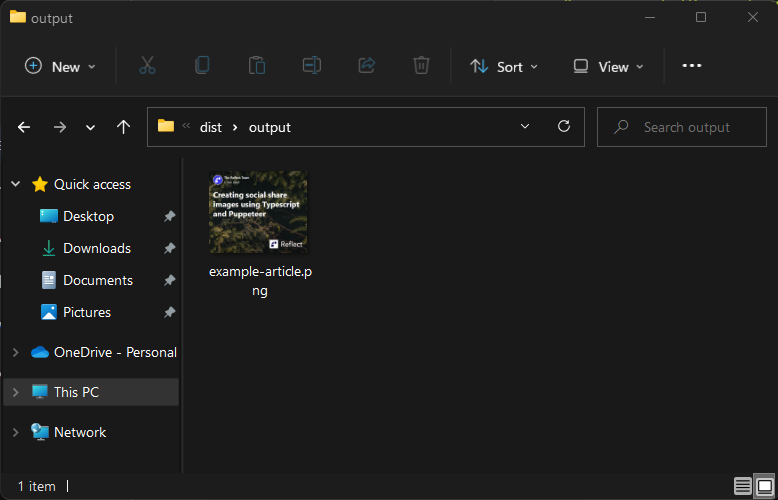
Then, in the output folder inside the dist directory, you will see all the generated images.
Et voilà! You just learned how to automatically generate original Open Graph/Twitter Card images for your blog posts from Markdown front-matters.
5. Associating the generated images to your blog posts
You can now use the generated images in your CMS platform or headless CMS solution like Hugo, Strapi, Ghost, or DatoCMS. All you have to do is upload them as Open Graph and Twitter Card images in your SEO plugin/section of your CMS.
Frequently Asked Questions
What are the recommended image dimensions for a Twitter card?
Twitter recommends an aspect ratio of 2:1 and minimum dimensions of 300x157 pixels.
What are the recommended dimensions for Open Graph images?
Each social networks has its own recommendations for the optimal Open Graph image size:
- Facebook: At least 1,200 x 630 pixels, with an aspect ratio as close to 1.91:1 as possible.
- LinkedIn: At least 1,200 x 627 pixels, with an aspect ratio of 1.91:1.
- Reddit: Open graph images only appear as tiny thumbnails on Reddit posts, so anything 140px wide or larger will work.
Conclusion
In this article you learned what Open Graph/Twitter Card images are, why they are so important when it comes to sharing
links on social, and how to automatically generate high-quality Open Graph images for your blog posts through a
TypeScript script based on Puppeteer. In particular, you saw how this image generator script works in a step-by-step
explanation. Also, you learned how can use it to produce original social share images and use them in the <meta> tags
of your HTML documents.