


As programming libraries, and frameworks continue to evolve, so do effective testing strategies. One aspect of testing that has gained popularity in recent years is visual testing.
Visual testing verifies that updates to an application have not caused any unexpected visual changes that would be perceived as a bug by an end user. In this article, you will learn how to create a visual regression test based on the screen comparison features with the Playwright test framework. Specifically, we’ll cover how to script Playwright to visit a website, take a screenshot, and compare it to the screenshot of a known-good screenshot of the website in order to detect any visual changes.
What is Visual Testing?
Visual testing consists of comparing the visible output of an application against a known-good source, such as a design mockup created in Photoshop or Figma, or a screenshot from a previous version of the same application.
When run as part of an automated regression test suite, visual tests can identify the visual differences in the application that have occurred as a result of a code change. Changes to the CSS styling of a common component, such as the default styling of a button component, can have far-ranging effects across the application. Visual tests can detect unintended changes to the UI and prevent bugs from reaching end users.
Visual tests are generally run within the context of an automated test script which not only takes screenshots, but also performs actions to simulate things like clicks and form field entries. This is because visual tests often require that the application be in a pre-defined state before the visual check can occur. For example, many applications require a user to be logged in before performing an action. By running visual tests within a larger regression test, you can script the necessary actions to authenticate the user and navigate to the proper page so that the browser is in the proper state before executing a visual check.
What is Playwright?
Playwright is an open-source test automation framework that enables end-to-end testing for modern web apps. The first version of the framework was released in 2020, which makes it a fairly new tool. Playwright is developed by Microsoft and can currently be used to write scripts in JavaScript, TypeScript, Python, Java, and C#. It also supports Chromium, Firefox, and WebKit-based browsers, and can also run tests against an emulated mobile browser.
You can run Playwright tests on Windows, Linux, and macOS, either locally or within Continous Integration environments.
Code example
Let’s learn how to perform screenshot-based visual testing in Playwright! We’ll be using TypeScript for this example, but you can implement a similar script in any of the other languages that Playwright supports.
Prerequisites
Playwright requires only a single prerequisite:
You can download and install the latest LTS version of Node.js by following the link above.
Initializing a Playwright project
It is time to initialize your Playwright project. Create a new playwright-example folder and enter it in the terminal
with the following commands:
|
|
Now, launch the command below:
|
|
As described on the official documentation page, this will initialize a Playwright project. Playwright will ask you some questions, let’s provide the default answer as below:
|
|
By default, Playwright will initialize a TypeScript project.
This is what your playwright-example folder should look like at the end of the process:
|
|
The playwright.config file is where you can configure Playwright,
while the tests folder contains a basic example test. By default, Playwright is configured by playwright.config to
simultaneously run all tests on Chromium, Firefox, and Webkit using 3 different workers. Also, tests are run in headless
mode, which means that no browser will open up when running the tests.
You can launch your Playwright tests with the following command:
|
|
Once finished, type the command below to get access to the HTML report.
|
|
This is automatically created by Playwright and contains a full report about the results of your tests. This HTML report allows you to filter the results by browsers and by passed, failed, skipped, and flaky tests.
You now have everything you need to start writing your first test in Playwright.
Visually testing a website using Playwright’s screenshot comparison feature
First, let’s initialize the example.spec.ts test file:
|
|
The Playwright test() function requires a test title and a test function. The title will be used in the logs and HTML report, while the test function is where you have access to the Playwright page variable. This variable offers methods to interact with a single tab in a browser and implement the test logic. Also, note that the Playwright expect() is required to test assertions and will be used in the test logic.
Now, let’s navigate to the page to visually test. In this simple example, you will see how to visually test the page located at https://time.is/.
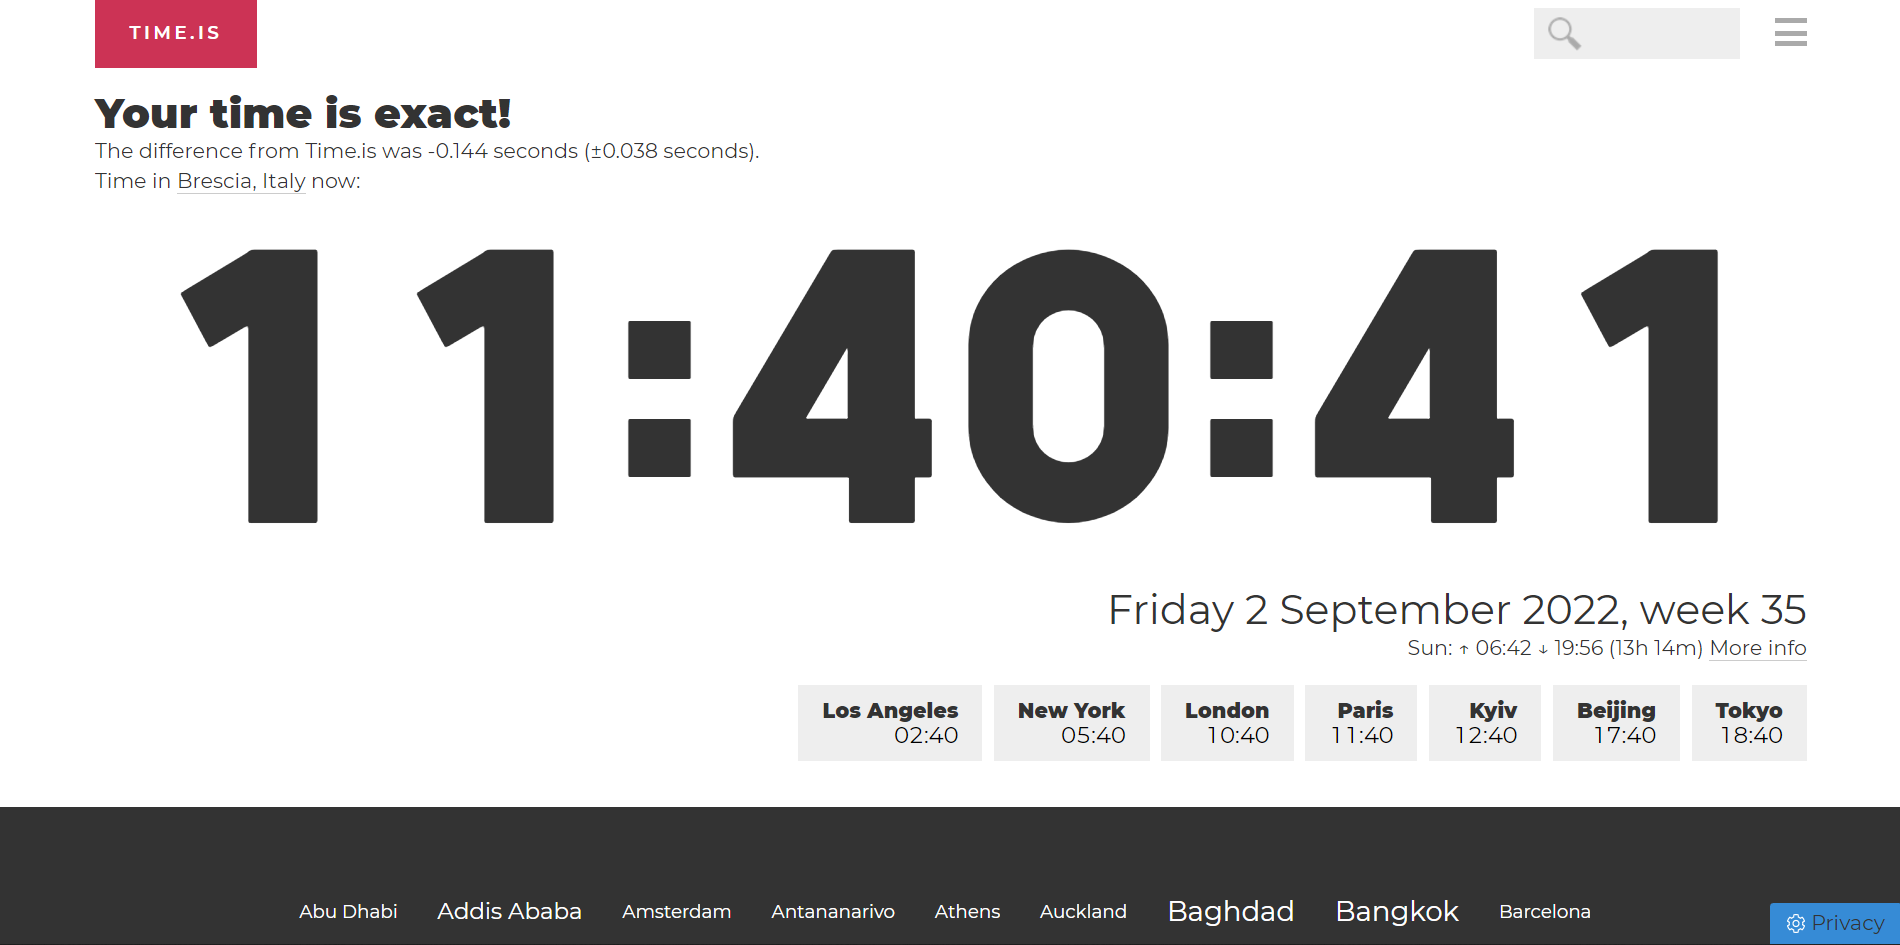
Considering that time.is involves the current time, the visual results will change every second. This makes it easier
to try out the visual testing features offered by Playwright.
Thanks to the goto() function exposed by page, you can
navigate to https://time.is as follows:
|
|
Now, it is time to visually test the website.
As explained in the Playwright official documentation, you can use screenshots for visual testing as below:
|
|
This simple test navigates to https://time.is page and closes the CMP modal to get free visual access to the webpage.
Then, it uses the
toHaveScreenshot() function to
compare the visual differences between the current screenshot and an existing screenshot. If there is no screenshot to
compare the current one with, the test will fail and toHaveScreenshot() will take care of creating a new screenshot.
Therefore, the first time you execute the test, you will get an error:

This is because there is no screenshot to compare the new screenshot with. After running the test for the first time,
you will see a new example.spec.ts-snapshots folder containing a screenshot for each browser:
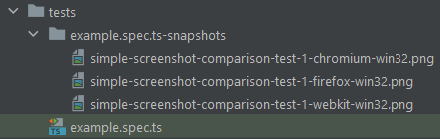
toHaveScreenshot() created these files, which will be used the second time the test is run.
When the toHaveScreenshot() function executes, it performs the following steps:
- It verifies if there is an existing screenshot file. If not present, it fails
- It takes a new screenshot.
- It computes the difference between the two screenshots using the pixelmatch library.
- If there is any difference, it takes another screenshot.
- It computes the difference again.
- It writes an expected, actual, and diff file to the
test-resultsfolder.
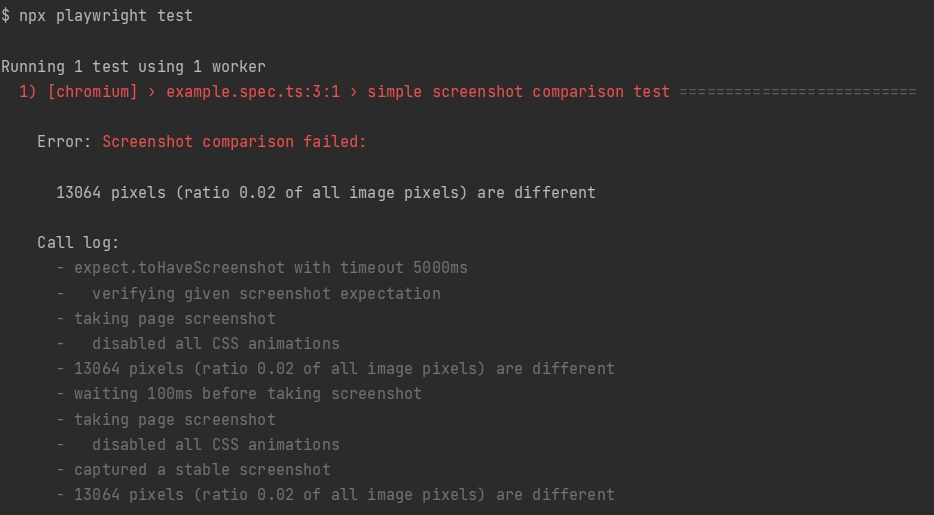
Launch npx playwright test again, and the test should complete as expected. Considering that time.is changes every
second, the test will fail. Specifically, when running the test for a single browser, you will get the following error
logs:
Open the /test-results/example-simple-screenshot-comparison-test-chromium/simple-screenshot-comparison-test-1-diff.png
diff file, and you will see the following image:
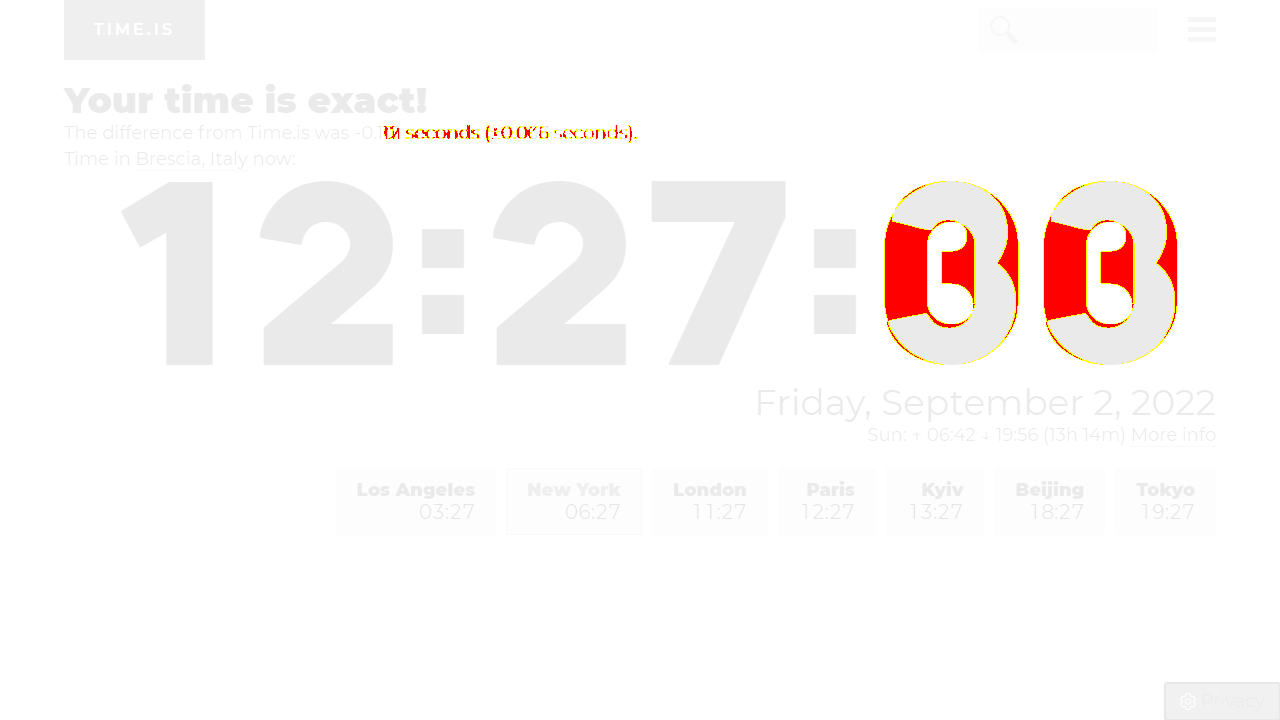
The parts in red are the pixels that differ between the “expected” and “actual” images, and is the reason why the test failed.
If you want to simply update the screenshots without running the entire test, launch the following command:
npx playwright test --update-snapshots
This is useful to keep the screenshots up to date.
Keep in mind that the toHaveScreenshot() function comes with several options. Let’s dig into the most important ones:
fullPage: whentrue, it takes a screenshot of the full scrollable page. Whenfalse, it takes a screenshot of the currently visible viewport. The default value isfalse.maxDiffPixels: the acceptable amount of pixels that could be different in the two screenshots.maxDiffPixelRatio: the acceptable ratio of pixels between0and1that can be different compared to the total amount of pixels.threshold: the acceptable perceived color difference in the YIQ color space between the same pixel in compared screenshots, between0(strict) and1(lax). The default value is0.2.omitBackground: whentrue, it hides the default white background and allows capturing screenshots with transparency. This is applicable to.jpegscreenshots because they do not support transparency. The default value isfalse.
You can apply these options as in the example below:
|
|
Notice that the fuzzy matching offered by maxDiffPixelRatio is generally more effective than the strict matching
offered by maxDiffPixels when comparing images. In the time.is example, using maxDiffPixelRatio instead of
maxDiffPixels allows you to make the test pass. After all, only one or two digits on the webpage should change between
the two screenshots, and this might be tolerable for the test.
You can also run the screenshot comparison on a single element within a web page:
|
|
Specifically, the locator() page function accepts a
CSS selector and allows you to select a single element
on the webpage.
And that’s it, you’ve just learned how to create a visual test using Playwright!
Conclusion
In this article you learned what visual testing is, why it is important when it comes to regression testing, what Playwright is, and how it is used to perform visual testing. In particular, you realized the importance of visual testing. Additionally, you had the opportunity to take a look at how to use the Playwright testing framework to visually test a website by comparing screenshots. Here, you learned everything you need to know to start performing visual tests based on screenshots with Playwright, both on an entire webpage and on a single element.
Try Reflect: A no-code alternative with built-in visual testing support
Reflect is a no-code testing platform that lets you build and run tests across all popular browsers.
Reflect includes built-in support for visual testing, including the ability to detect changes on individual elements and ignore areas that frequently change. Since Reflect runs in the cloud, you don’t need to worry about maintaining test infrastructure or storing screenshots. You’ll get automatically notified when visual changes are detected in your application, and Reflect makes it easy to either mark a change as valid, or open up a bug ticket for the visual regression directly in your bug tracking system (such as Jira, Linear, or Azure DevOps).