End-to-end Testing
How-tos & Guides
10 min read

Guide to creating your first Cypress test

Learn how to create your first Cypress test using this step-by-step guide.

Sodeeq Elusoji
Published November 30, 2022
AI Assistant for Playwright
Code AI-powered test steps with the free ZeroStep JavaScript library
Learn more

Looking to create automated tests for your web application? In this guide we’ll walk through how to install and create your first tests using Cypress, an end-to-end testing framework.

Installing Cypress

There are two ways to install Cypress: via the command-line using npm, or by using one of the standalone installers provided for Windows, macOS, and Linux at https://www.cypress.io/. The standalone installer has some limitations, including not being to view the results of your Cypress tests online, so we recommend installing Cypress via npm.

In order to install Cypress via the command line, you’ll first need to make sure you do the following:

  1. You must install Node.js on your system. The version for your OS can be downloaded from the Node.js download page. To install Cypress with npm, you need Node.js version 10 or higher.

  2. A code editor. We recommend Visual Studio Code, a free code editor created by Microsoft which can be downloaded from the Visual Studio Code homepage.

Method 1 - Installing Cypress via Node Package Manager (npm)

1
npm install Cypress --save-dev

Cypress is now installed locally in your project directory and is ready to use!

Method 2 - Direct download and Installation of Cypress

If you are unfamiliar with npm but want to use Cypress immediately, download Cypress’s zip file from a Content Delivery Network (CDN). You can use the direct download link to access the updated version of Cypress. This Cypress file, once extracted, can be started quickly without needing to install extra files or plugins.

Now, you have successfully installed Cypress.

Click here to learn how to create a project path on Cypress.

Component vs. end-to-end testing

Cypress supports two types of automated testing: component testing and end-to-end testing. When creating your first project, Cypress will prompt you to choose what type of tests you want to write, so before creating our first test, let’s cover the differences between these two approachest to testing:

What is component testing?

Put simply, component testing is where you test a single component in your UI in isolation. Imagine you’ve developed a new React component called Foo. Before using this component in your application, you may want to write some automated tests that verify that the component is working as expected.

With Cypress’s component testing support, you could write a set of Cypress tests to verify the behavior of the component. Unlike an end-to-end test, it’s not going to use the component as part of the larger workflow. Instead, the component tests will test isolated behavior, such as what happens when the Foo component is clicked.

What is end-to-end testing (E2E)?

End-to-end tests are meant to test complete workflows in an application. They are the closest thing to simulating how an actual user uses your application. Unlike component tests, which test some isolated action, a single end-to-end test may touch many components and exercise lots of different functionality.

Consider an end-to-end test that simulates registering as a new user on your application. Your new Foo component may appear on the registration page and is subsequently interacted with as part of the test. But the test may also interact with many other components and make real network calls.

Now that we’ve covered the differences between E2E and component testing, let’s walk through how you’d create each of these types of tests in Cypress. First, we’ll cover end-to-end tests.

Creating an end-to-end test in Cypress

In order to test Cypress, we’ll first need to set up a sample application. Below we’ll create a minimal ecommerce app that has a product listing page as well as a cart page. From the products page, you can add an item to cart, and then navigate to the carts page to see the added products.

The complete code for this example can be found on GitHub

Step 1: Install node-static-server

In the project directory we created earlier, we will be installing a new package to render static files. This package will be used to run static html files on our server.

1
yarn add node-static

Step 2: Create a server.js file in the root project directory and add the following contents:

 1
 2
 3
 4
 5
 6
 7
 8
 9
10
11
12
13
var http = require("http");

var nStatic = require("node-static");

var fileServer = new nStatic.Server("./public");

http
  .createServer(function (req, res) {
    fileServer.serve(req, res);
  })
  .listen(5000);

console.log("Running app on port 5000; url=localhost:5000");

Step 3: Create 3 new files in the public folder (create this folder if it doesn’t already exist): index.html, products.html, and cart.html:

index.html

 1
 2
 3
 4
 5
 6
 7
 8
 9
10
11
12
13
14
<!DOCTYPE html>
<html lang="en">
  <head>
    <meta charset="UTF-8" />
    <meta http-equiv="X-UA-Compatible" content="IE=edge" />
    <meta name="viewport" content="width=device-width, initial-scale=1.0" />
    <title>Getting Started With Cypress Ecommerce</title>
  </head>
  <body>
    <div>
      <h2>Welcome to E-commerce testing with Cypress</h2>
    </div>
  </body>
</html>

products.html

 1
 2
 3
 4
 5
 6
 7
 8
 9
10
11
12
13
14
15
16
17
18
19
20
21
22
23
24
25
26
27
28
29
30
31
32
33
34
35
36
37
38
39
40
41
42
43
44
45
46
47
48
49
50
51
52
53
54
55
56
57
58
59
60
61
62
63
<!DOCTYPE html>
<html lang="en">
  <head>
    <meta charset="UTF-8" />
    <meta http-equiv="X-UA-Compatible" content="IE=edge" />
    <meta name="viewport" content="width=device-width, initial-scale=1.0" />
    <title>Products</title>
  </head>

  <body>
    <div class="products-list"></div>
    <div><a href="/cart.html">View cart</a></div>
    <script>
      // This function renders the product page
      function renderProductPage() {
        // Get the products from the server (in this example, we are using a hard-coded list)
        const products = [
          { id: "abc123", name: "Product 1" },
          { id: "def456", name: "Product 2" },
          { id: "ghi789", name: "Product 3" },
        ];

        // Create the HTML for the product list
        const productListHtml = products
          .map(
            (product) =>
              `<li>
          ${product.name} -
          <button onclick="addToCart('${product.id}')" data-product-id="${product.id}">Add to Cart</button>
        </li>`
          )
          .join("");

        // Render the product list
        document.querySelector(".products-list").innerHTML = `
    <h1>Our Products</h1>
    <ul>
      ${productListHtml}
    </ul>
  `;
      }
      // This function adds a product to the cart
      function addToCart(productId) {
        // Get the cart from local storage
        let cart = JSON.parse(localStorage.getItem("cart")) || [];

        // Check if the product is already in the cart
        const productIndex = cart.findIndex((p) => p.id === productId);
        if (productIndex === -1) {
          // If not, add the product to the cart
          cart.push({ id: productId, quantity: 1 });
        } else {
          // If it is, increment the quantity
          cart[productIndex].quantity++;
        }

        // Save the updated cart to local storage
        localStorage.setItem("cart", JSON.stringify(cart));
      }
      window.addEventListener("load", renderProductPage);
    </script>
  </body>
</html>

cart.html

 1
 2
 3
 4
 5
 6
 7
 8
 9
10
11
12
13
14
15
16
17
18
19
20
21
22
23
24
25
26
27
28
29
30
31
32
33
34
35
36
<!DOCTYPE html>
<html lang="en">
  <head>
    <meta charset="UTF-8" />
    <meta http-equiv="X-UA-Compatible" content="IE=edge" />
    <meta name="viewport" content="width=device-width, initial-scale=1.0" />
    <title>Cypress Ecommerce Cart</title>
  </head>
  <body>
    <script>
      // This function renders the cart page
      function renderCartPage() {
        // Get the cart from local storage
        const cart = JSON.parse(localStorage.getItem("cart")) || [];

        // Check if the cart is empty
        if (cart.length === 0) {
          // If it is, show a message
          document.body.innerHTML = "<h1>Your cart is empty</h1>";
          return;
        }

        // If not, render the cart items
        const cartItemsHtml = cart.map((item) => `<li>Product: ${item.id} - Quantity: ${item.quantity}</li>`).join("");

        document.body.innerHTML = `
    <h1>Shopping Cart</h1>
    <ul>
      ${cartItemsHtml}
    </ul>
  `;
      }
      window.addEventListener("load", renderCartPage);
    </script>
  </body>
</html>

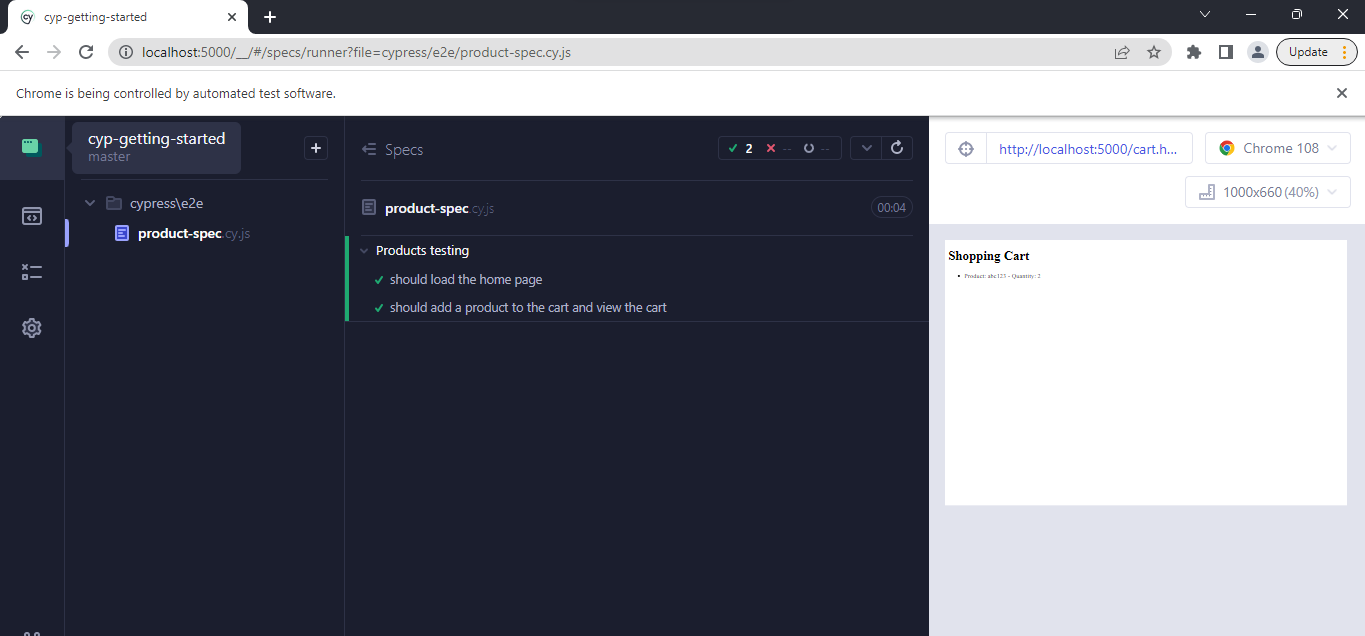
Step 4: Create a new file product-spec.cy.js inside the cypress/e2e folder and the content below:

 1
 2
 3
 4
 5
 6
 7
 8
 9
10
11
12
13
14
15
16
17
18
19
20
21
22
23
24
describe("Products testing", () => {
  it("should load the home page", () => {
    cy.visit("http://localhost:5000");

    //verify that an h2 element contains the text 'Welcome to E-commerce testing with Cypress'
    cy.contains("h2", "Welcome to E-commerce testing with Cypress");
  });

  it("should add a product to the cart and view the cart", () => {
    //visit our product page
    cy.visit("http://localhost:5000/products.html");

    // look for an element with this product-id and click the add to cart button
    cy.get('[data-product-id="abc123"]').click();
    cy.contains("Add to Cart").click();

    // then go to the cart page
    cy.get('a[href="/cart.html"]').click();

    // verify that the product we added to cart exists on the cart page
    cy.contains("h1", "Shopping Cart");
    cy.contains("Product: abc123");
  });
});

Step 5: Start your local server

Run the command on your terminal node server.js to start the server running the app.

Step 6: Run your Cypress tests with the following command:

1
npx cypress open

Creating a component test in Cypress

The component test takes each functional part of the software and tests it one at a time. At this time, component testing with Cypress works within the context of a UI framework. React, Vue, Angular, and Svelte are the supported frameworks.

Here is how to create your first component test using the Vue front-end framework. Note that this assumes that you have already created a Vue project.

Step 1: Inside the Vue project, we will create a new component called modal.vue

Step 2: Add the following code to the component file:

 1
 2
 3
 4
 5
 6
 7
 8
 9
10
11
12
13
14
15
16
17
18
19
20
21
22
23
24
25
26
27
28
29
30
31
32
33
34
35
36
37
38
39
40
41
42
43
44
45
46
47
48
49
50
51
52
53
54
55
56
57
58
59
60
61
62
63
64
65
66
67
68
69
70
71
72
73
74
75
76
77
78
79
80
81
82
83
84
85
86
87
<template>
  <div to="body">
    <button
      @click="
        openModal();
        $emit('modal-opened');
      "
      class="show-modal"
    >
      Show Modal
    </button>
    <div v-show="open" class="modal">
      <div class="modal-content">
        <button
          @click="
            open = false;
            $emit('modal-closed');
          "
          class="close-modal"
        >
          Close
        </button>
        <div>
          <slot>
            <p>Cypress - Vue Modal</p>
          </slot>
        </div>
        <div>
          <slot name="extra"></slot>
        </div>

      </div>
    </div>
  </div>
</template>
<script>
export default {
  name: "DisplayModal",
  data() {
    return {
      open: false,
    };
  },
  methods: {
    openModal() {
      this.open = true;
    },
  },
};
</script>
<style scoped>
/* The Modal (background) */
.modal {
  position: fixed; /* Stay in place */
  z-index: 1; /* Sit on top */
  left: 0;
  top: 0;
  width: 100%;
  height: 100%;
  overflow: auto;
  background-color: rgb(0, 0, 0);
  background-color: rgba(0, 0, 0, 0.4);
}

/* Modal Content/Box */
.modal-content {
  background-color: #fefefe;
  margin: 15% auto;
  padding: 20px;
  border: 1px solid #888;
  width: 80%;
}

.close-modal {
  color: #aaa;
  float: right;
  font-size: 28px;
  font-weight: bold;
}

.close-modal:hover,
.close-modal:focus {
  color: black;
  text-decoration: none;
  cursor: pointer;
}
</style>

Step 3: Create a Cypress spec file in the /cypress/e2e folder. The file should have the following content:

 1
 2
 3
 4
 5
 6
 7
 8
 9
10
import DisplayModal from "../../vues/modal.vue";

describe("Vue modal component test", () => {
  it("opens modal", () => {
    cy.mount(DisplayModal);
    cy.get(".modal-body").should("not.be.visible");
    cy.get(".show-modal").click();
    cy.get(".modal-body").should("be.visible");
  });
});

Step 4: Run your Cypress tests

1
npx cypress open

Frequently Asked Questions

Is Cypress free?

Yes, it’s free and open source. You can run Cypress on your hardware and use an open-source tool called Sorry Cypress to run tests.

What browsers are supported by Cypress?

Cypress supports testing on Chrome and other Chromium-based browsers such as Microsoft Edge, as well as Mozilla Firefox. It also has experimental support for testing in Safari.

How are tests defined in Cypress?

Tests are defined in JavaScript files within the cypress/e2e directory. Each test case is defined within an it() block inside the file, and test cases are organized within describe() blocks which describe the common behavior of the tests inside it.

Try Reflect: A no-code alternative to Cypress

Reflect is a no-code testing platform that lets you build and run tests across all popular browsers. Reflect doesn’t just make it easy to create tests; it also has robust support for modifying tests and extracting common test steps to be shared across multiple tests. This means that it’s much easier to scale your testing efforts in Reflect compared to other tools.

Looking for a great alternative to Cypress? Try Reflect for free.

Get started with Reflect today

Create your first test in 2 minutes, no installation or setup required. Accelerate your testing efforts with fast and maintainable test suites without writing a line of code.

Copyright © Reflect Software Inc. All Rights Reserved.