


Why Micro Frontends
Traditional web applications are usually built as a single page application (SPA). There are many benefits to a SPA, including faster load times between page loads, but a key benefit is separation from the backend/data layer of the application. Having a clearer separation of concerns between frontend and backend logic makes it easier for product teams to make UI changes independent of the API and DB layers. In other words, you can have one team that is focused on delivering a strong API experience, while another team works on delivering the best end user experience.
However as the application grows, a SPA can become hard to maintain and deploy. Similar to the backend trend of microservices, the UI can use micro frontends to achieve the same scalability and speed of delivery. Imagine a UI that has multiple teams pushing features at the same time. Micro frontends can help teams ship faster by separating the UI into separate modules that can be deployed independently of each other. This can help speed up the pace of development while ensuring the application feels like one cohesive product to the end user.
Our Web Application
To test out the full power of micro frontends, we will build a web store application that uses the following:
- React for the UI rendering layer
- Styled Components to add look and feel to the UI
- Webpack as our bundler and Webpack module federation as the micro frontend builder
The application we are going to build is a pizza ordering application that will consist of a container application and two module federated components/packages: basket and product list. The final source code for the project can be found here.
Before we start writing any code, let’s take a look at the concepts mentioned earlier.
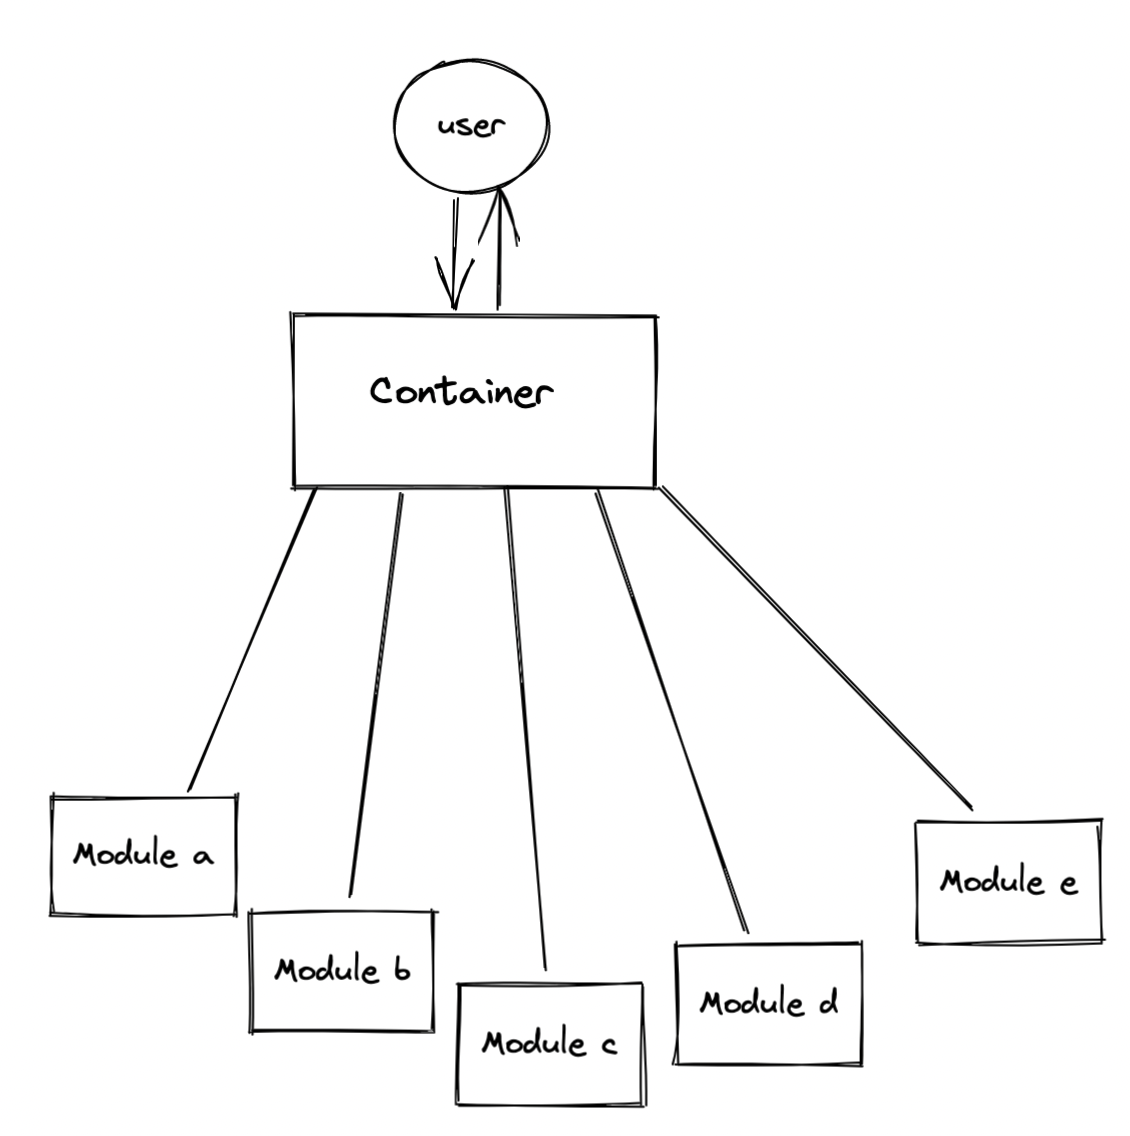
Our application structure can be broken down into two main parts, the container (home) and the packages (basket and product list).
- Container - This acts as a skeleton to our application. This can be thought of as the main entry point for the user; it is a container for all the features the application provides. In a real world example this container would have a team of people working on building and maintaining it.
- Packages - Packages (also called modules) are smaller parts of the application that can exist on their own. These represent a subsection of the application, and would be developed by separate teams independently of each other.
Container
The container, or as we have named it the home application, is a standard React web application that uses Webpack to
compile and build. You can check out the
home folder for how this is
configured. In our application entry (package/home/src/index.js) file we will import our React application:
|
|
This will be the container for our shop, and lives inside the src/App.jsx file:
|
|
As you can see, we don’t have our product list or shopping brackets components yet. However, we can still run this
application by running npm start and it will render a very basic application with no functionality.
So let’s step up our directory structure to the packages/product-list component and start building out our first federated module.
Product List
Our product list module is built using Webpack also, but is a bit different than our home container. Let’s look into how it’s built.
Our entry point (packages/product-list/src/index.js) exports our React component instead of importing a React
application. This is similar to how we would build a reusable React component inside of a larger application.
|
|
In the product list index, we first import our product list and then export it as a named export. Let’s take a look into the product list component:
|
|
This is a very basic React component that takes in an onBuyItem function prop and renders a HTML unordered list using
product data that was imported from the same package. Each list item has a “Buy” button that will trigger the prop,
passing in the selected product. Before this package can be consumed by our home container, we need to add Webpack
module federation to the product list
Webpack config.
In the Webpack config we need to add a plugin that will allow Webpack to serve this code as a federated module that a
corresponding Webpack served application can consume.
|
|
In the module federation plugin options, we need to detail what the module is and how it’s exposed. We’ll define the following options:
- name: This defines the module name, this value can be anything we want. Though to keep things understandable it’s useful to name this the same as the package.
- library: This defines the library type (in our case,
var). The available options arevar,module,commonjs,amd,umd, etc. We are using thevartype as this tells Webpack to bundle the code as an importable variable. The library config is the same as the output settings for a standard web application. - filename: This defines the exposed filename that is referenced from our main container.
- exposes: This defines the modules to be exposed. productList exposes ./ProductList from ./src/ProductList. You can expose more than one file from a module.
- shared: This defines which modules are shared between our product list and the home container. If you know that the container is using React, you could also list React here. However our example lists all modules as we don’t know what will be shared. This means that Webpack will not bundle React etc with our product list module as the container already has React.
Basket
Our basket module is very much the same as the product list module; it’s also a simple React component that takes in props. The two things we do differently compared to the product list is that (1) we are using styled-components to add CSS styles to the component (2) we are using Ramda to perform logic on the data passed to the component.
|
|
Once we build out the container more we will see how the items and onClear props come into play. The Webpack config
and module federation plugin settings are the same except they replace product list with basket.
Container Continued
Let’s jump back to our container and start bringing everything together. First, we need to update the index.html file in our home application. This is the entry point of the React application. By default, Webpack will inject a script tag for our main JS application. We want to add in script tags that will point to our modules. Each module’s folder has a run script that will bundle and host the JS on a local HTTP server. In a real world deployed application, these would point to the where you host the code e.g. AWS Cloudfront/S3
|
|
We’ve added a script tag for both remote entries so that both are served and executed on initial page load. In this example we used Webpack’s default filename, but you can customize the filenames in the Webpack configs.
Next we need to update the home’s Webpack config to use module federation to be able to consume the modules.
|
|
As you can see, we have very much the same options from our two modules (e.g. name, library and shared). The key option
the remotes section. Here we define the modules we are going to consume. In our case it is the basket and product
list.
The remotes object key names follow a format in which the key name is the name we will use when the package is
imported. Since these keys will be the import names, we prepend them with mf- to let us differentiate between node
modules, internal modules, and module federated modules. Let’s now update the App.jsx file to import and use our
modules.
|
|
Using React lazy to import the modules allows us to lazily load the components into our application. As our components are not bundled with the main application, we need to fetch them over the network at runtime. We don’t want to block the application rendering while these modules are being fetched. React lazy is a way to import a file or in this case a component over the network. Since we are using the React JS lazy import pattern we also need to use the React suspense component wrapper..
|
|
React.suspense is a component from the React library that we can wrap a lazy loaded component with. This allows us to render a fallback or loading component. This is useful as the React.suspense component knows when the child has finished fetching/rendering and will render whatever is passed to the fallback prop until the child is available. In our case we are just providing some text, but this could be a React component of its own. Once the components are loaded, they will be rendered immediately and we can pass them props and treat them like any other React component.
Running the application
So now that we have built out our modules and our home container, let’s run the application to see how it all works in
practice. Since we have all the parts in a single repo, we can use the npm scripts in the root of the repo to run all
packages. We can achieve this by running npm start. This will trigger the start script for the home, basket and
product list. It will also open all applications, including each separate micro front end, in separate browser tabs. We
only want to use the application which is hosted on http://localhost:8080/. Once it has started, we can add
products to our basket and see the application in action. If we look at the network panel we can see how the React lazy
import function is loading in the components only when they are needed.
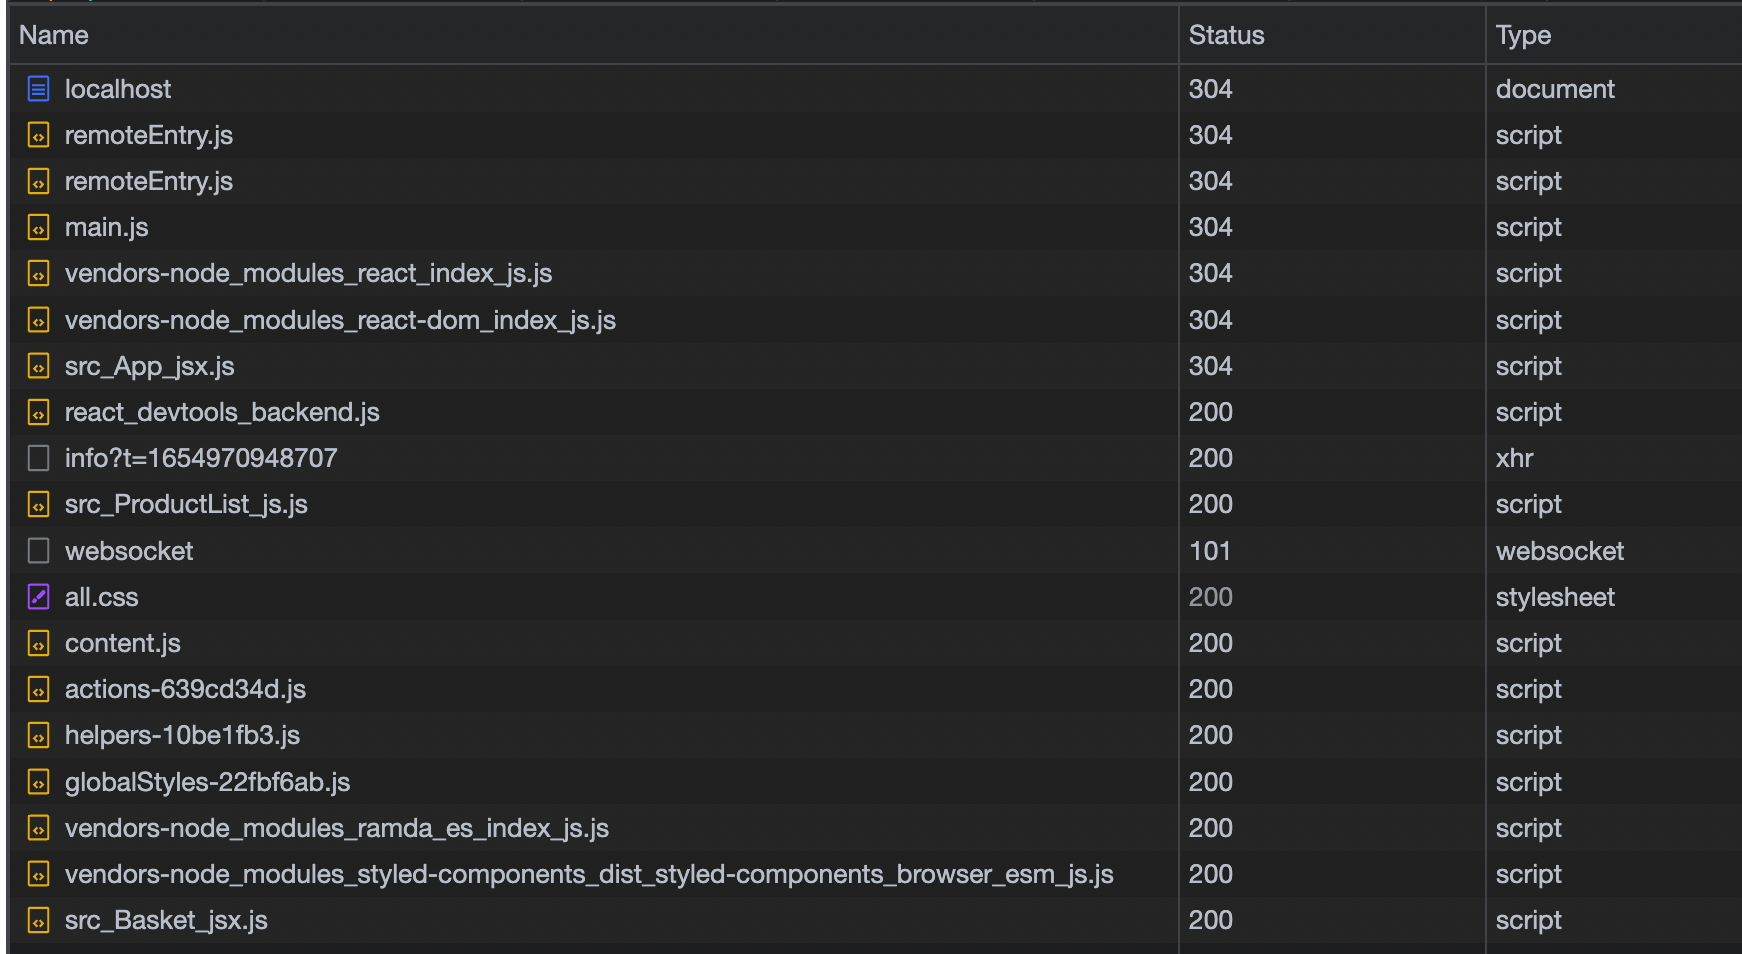
We can see here that we first load the main application, and that the Basket JSX file is loaded when we add an item to our basket. The micro frontend approach can greatly improve application performance as you are not downloading and executing code that users may not need, and you can keep your bundled JavaScript small. We can also see the Styled Components code being loaded. This is due to the shared option in the Webpack plugin. As we can tell the home app which code we share it knows when it needs to load dependencies for modules. The main benefit to this pattern is that when we want to make code changes to the basket, we can change the component code rebuild and deploy it without having to make any changes to the home application. Once the user refreshes the page they will get the latest version of the basket.
Conclusion
We can see the power that a micro frontend application can provide, when it comes to delivering the best performance to the end user and allowing multiple teams to build a deploy in parallel.
Do you have a large application that would benefit from being broken down into modules? Do you have multiple teams deploying to the same application? Then maybe a micro frontend architecture would help you.