


Introduction
Many businesses have private applications that are not publicly-accessible on the Internet. These applications are generally used by employees, but sometimes external partners might use them as well. To access the applications, the user is generally within some restricted boundary of the organization’s network.
Despite users of these applications having a formal and friendly relationship with the provider, the applications themselves are still often mission-critical. This means that the cost of a bug in these applications can be quite high, and there is a strong incentive to thoroughly test new application versions before releasing them.
This setup poses challenges for businesses who use third-party services for testing because an external service for testing won’t have network access to these private applications by default.
This article describes the technical details of how Reflect supports automated testing for private applications. You can follow along with the source code on GitHub while reading this guide. The article assumes you have some familiarity with WireGuard.
Background
Reflect is a web-based testing platform for converting manual end-to-end web tests into automated tests. Users create tests by performing a sequence of actions against their web applications, and Reflect automatically builds a repeatable test from these actions. The test can then be executed on-demand against the same application (potentially running in a different environment) to determine whether the functionality or visual appearance are broken.
A Reflect test might consist of logging into a customer’s SaaS portal and adding a new account to the system and then verifying some default attributes of the account. Reflect captures this test by observing the user perform the actions within Reflect’s cloud-based browser-within-a-browser. Thus, Reflect accesses the customer’s web application starting from Reflect’s cloud (not the user’s machine) and traversing the public Internet.
However, for web applications that are not publicly accessible, changes must be made to the configuration. The simplest way to give Reflect access to an environment is to use a Static IP. The customer configures the environment to allow traffic from a single IP or a set of IPs. Then, we configure the customer’s browser sessions to egress from Reflect’s cloud using that IP address. This is a straightforward approach and it can be enabled by flipping a feature flag.
While theoretically the IP-based restriction should be enough to secure the environment, it still exposes the environment to the public Internet and leaves it vulnerable to IP-spoofing and DoS attacks, among other things. A stricter level of access control is to limit access to the application to sources within the internal network (i.e., with private IPs). This requires a different approach.
Technical Design
Our design is straightforward: run an agent or daemon process on a machine within the customer’s network that has access to the environments the customer wants to test.
Then, create an encrypted connection from the agent machine within their network to our system. Finally, whenever the customer launches new browser sessions, we route the browsers’ web traffic through that encrypted tunnel, so that it exits the agent within their private network and can reach the private applications.
It goes without saying that the machine running the agent should be configured with a strict network access control policy so that traffic exiting the agent can only communicate with the intended applications under test and no other internal resources.
As we considered our options for establishing an encrypted connection between the agent machine and our network, the guiding principles were to use modern best practices for cryptography while being simple to understand and lightweight to use. For example, we don’t want to manage certificates or store long-lived encryption keys if we can avoid it. Instead, we’d rather the agent creates ephemeral encryption keys when it starts up. This allows customers to easily reset their connection by stopping and starting the agent. Fortunately, WireGuard has recently become ubiquitous for managing peer-to-peer encrypted connections in a simple and lightweight way, as demonstrated by the many tools and solutions built atop it.
The other piece of the design is the egress from the agent machine into the customer’s private network. Since our cloud browser traffic is simply HTTP web traffic, we can use a SOCKS proxy or similar at the agent to forward traffic into the network. There are many open-source proxies available today, so we can choose one of them with the simplest off-the-shelf installation.
Implementation
We want to keep things simple, both for our own internal development of the agent, but also for our customers’ auditing of its source code. As a result, we chose to implement the agent as a Linux-based script that runs within a container. With a small collection of Bash scripts, we can orchestrate the different components using existing applications and utilities.
Main logic
The components of the agent are as follows:
entrypoint.sh- main script that initializes the components and loops foreverkeypair.sh- generates a public/private keypair using WireGuard utilitiesconnect.sh- establishes a WebSocket to the Reflect API to register the agent and receive messages about new browser sessionsmonitor.sh- runs the SOCKS proxy and installs newly-identified browser sessions as peers in the agent’s WireGuard network
Here’s the core logic from the entrypoint.sh script, with extra comments for explanation:
|
|
The entrypoint.sh script uses files to share data between the different components.
After generating the keypair, it passes the public key to the connect.sh script,
which is responsible for establishing a long-running WebSocket connection to the Reflect API.
Additionally, the MessagesFile is used as a stream
to pass messages received from the API on the WebSocket connection to monitor.sh,
which reads those messages and updates the WireGuard network appropriately.
Authenticating agents
Agents authenticate with Reflect using an API Key in an HTTP header in the WebSocket request in connect.sh.
The API key uniquely identifies the Reflect account.
Additionally, the agent passes its WireGuard public key in its request,
which allows Reflect to uniquely identify the current agent’s lifetime.
This is required to support multiple agents per Reflect account.
Since the connection is long-lived,
Reflect knows when the agent is connected or not and
can inform users in real-time in the web UI.
Additionally, this reduces the latency when informing the agent of changes to the active browser sessions for the account in Reflect.
Maintaining a connection
Once the WebSocket is established, Reflect can send messages to the agent whenever a new cloud browser session’s status changes. For example, when a user creates a new test recording, Reflect will send a message over the WebSocket to notify the agent to install the active session as a new WireGuard peer. Conversely, when a browser session terminates, Reflect sends another message with an updated list of active sessions.
Here’s an example message sent by Reflect to an agent over the WebSocket, which lists the current active sessions and how to reach them:
|
|
The message format also instructs the agent what IP it should assign to its SOCKS proxy. WireGuard creates an ephemeral encrypted network across the browsers and the agent, so this allows Reflect to (centrally) ensure that the agent’s proxy IP does not conflict with any browser sessions.
Running tests
When it comes time to record or run a test in Reflect that needs access to the private application, there are two steps to ensure this is possible:
- The container or virtual machine hosting the cloud browser must establish a point-to-point encrypted connection with the agent.
- The cloud browser must route all of its web traffic through the encrypted connection so that it can egress from the agent within the internal network.
When a new session starts in Reflect and it’s configured to use the account’s connected agent, Reflect instructs the container hosting the browser to install the account’s agent as a WireGuard peer. This is easy because the agent already communicated its public key to Reflect when it registered. As part of this installation, the browser’s container itself generates a public/private WireGuard keypair. Reflect then sends the session’s public key to the agent over the previously-established WebSocket connection. The agent installs the browser container’s public key as a peer. The last step is to actually establish a network connection in WireGuard, and this is performed by the agent triggering an initial connection packet to the cloud browser’s container. At this point, any traffic destined to a private IP address within the WireGuard network sent from the browser’s container will be routed through the WireGuard tunnel to the agent.
The second step is to configure the container’s browser to use the SOCKS proxy running on the agent. Recall that Reflect instructed the agent to run the proxy on a specific private IP that is unique within the account’s WireGuard network address space. Additionally, this private IP address is configured in the container’s WireGuard installation as an IP that should be routed through WireGuard. This means that the browser routes all traffic to the SOCKS proxy, and the container routes all traffic to the proxy’s IP through WireGuard. Once it reaches the agent’s proxy, it then egresses into the wider internal network. DNS look-ups during the browser session in Reflect also route over this same path.
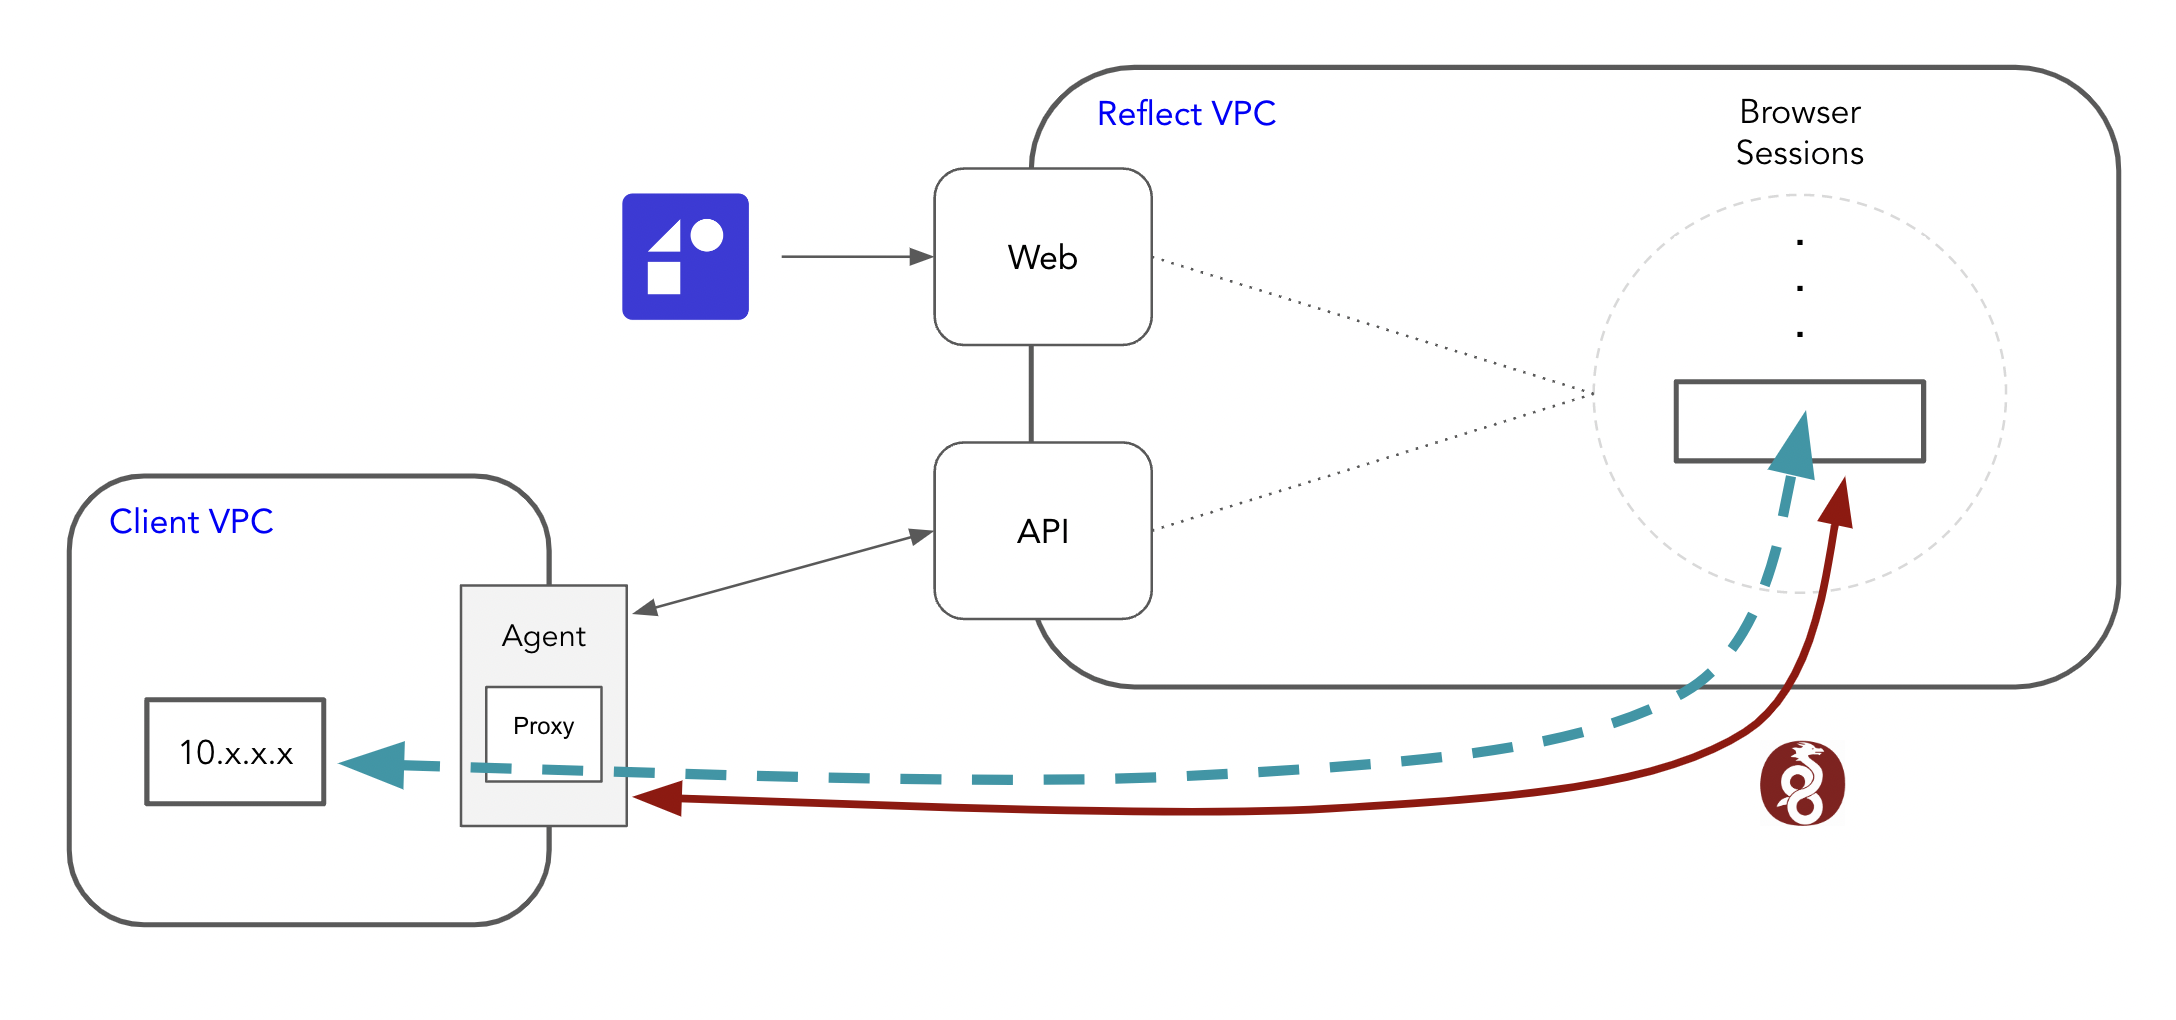
The diagram demonstrates how each browser session sets up a point-to-point encrypted connection to the agent via a WireGuard tunnel. The Reflect webapp and API coordinate the agent’s credentials with the browser session. Lastly, the browser uses a SOCKS proxy to route all web traffic over the tunnel and egress into the internal network.
Discussion
When installing a WireGuard peer, an endpoint can be specified if the peer is publicly reachable. However, our assumption is that the agent is running in an organization’s private network, and it’s likely to be behind a NAT or similar firewall and not have a public endpoint. As a result, we assign a public endpoint to the browser sessions and let the agent reach out to them when it installs each browser session. Combined with a periodic heartbeat from the agent to the browser sessions, this approach performs a “NAT hole-punch” and allows the agent to work behind any firewall configuration as long as it can reach the public Internet.
As alluded to above, agents are authenticated to an account using the API Key, but the agent’s ephemeral public key is what’s used to identify a specific agent. This approach allows Reflect to support multiple agents for a single account since public keys are uniquely generated when each agent starts up. The primary use case for multiple agents would be to segment browser sessions to specific parts of the internal network.
Direct VPC peering
An alternative to the agent-based approach entirely would be a direct network connection across VPCs, such as AWS PrivateLink. This service provides private connectivity between VPCs, cloud accounts or geographically diverse networks without exposing traffic to the public Internet. The link can be configured with all of the network and firewall management rules you would expect, and this is an ideal solution for a complex set of applications, or for formal business regulations and legal requirements. Generally, setting up a direct peer connection is going to take significant time and involve many people or teams across the organization. So, it makes sense to use this only when the business relationship warrants it.
Localhost testing
Interestingly, the Reflect Agent can also be used to test a web application running locally on the host where the agent resides. This is a totally different use case from the private application testing described throughout this article, but it’s actually a very similar concept. A web server running on the localhost may not be publicly accessible (e.g., behind a NAT) and is primarily only reached on the host machine itself where the agent is running and has visibility.
This enables an interesting use case of “shifting left” the phase of testing during software development,
and actually allows a developer to run a production or staging suite of automated end-to-end tests
against their uncommitted changes running locally.
The Reflect Agent supports “localhost testing” mode using the --local flag.
Conclusion
This article describes how the Reflect Agent enables automated end-to-end testing of private web applications. Using WireGuard, Reflect establishes point-to-point encrypted connections between browser sessions and the internal network. Using off-the-shelf tools and utilities, Reflect enables automated testing for non-public applications securely and with low-latency.
Reflect: Automated testing for internal web applications
Reflect is a no-code testing tool that can automate testing of any web application—public or private.
You can easily test your non-public web apps today without coding — try it for free.